 Skip to main content

Most Windows drivers work — until they don’t. And when they fail, they fail loudly: system crashes, broken updates, security bypasses, erosion of customer trust.
Memory-related issues are behind many driver crashes, and for years, they were considered a feature, not a bug, of C/C++ driver development. Rust is changing that reality. As Rust tooling for Windows drivers matures and Microsoft pushes for safer kernel development practices, Rust is becoming a serious option for teams that can’t afford instability or security regressions.
What follows is a detailed guide on everything you need to know about developing Windows drivers in Rust. We analyze the strengths and weaknesses of this language, explore a development workflow, and build a real-world minifilter driver for access protection.
This guide is for CTOs, product architects, and cybersecurity leaders who need practical insights on whether Rust is truly ready for production-grade Windows driver development.
Contents:
- Why is Rust becoming popular for Windows driver development?
- Challenges of developing Windows drivers with Rust
- Driver development workflow in Rust
- 1. Configure a Rust driver development environment
- 2. Create a Rust driver project
- 3. Compile, test, and build a Rust driver
- A practical example: creating a minifilter driver
- 1. Intercepting file operations
- 2. Installing and launching the driver
- 3. Using driver security features
- Useful Rust driver development libraries
- Develop custom Rust drivers with Apriorit
- Conclusion
Why is Rust becoming popular for Windows driver development?
Until now, the standard language for writing Windows drivers has been C, with some developers switching to C++ as a safer and more convenient alternative. However, the directness of these languages often leads to errors and unsafe memory handling.
In fact, memory-related issues are significant to the extent that the White House and the US National Security Agency have urged technology companies to adopt memory-safe languages in order to ensure greater software reliability and strengthen national cybersecurity.
For many companies, these recommendations were a signal to explore other languages that offer a higher level of protection and code checks. And with AWS, Google, Meta, and Microsoft backing the Rust Foundation, it’s clear that the attention of the development community has turned to Rust.
Let’s briefly review the advantages of using Rust for Windows kernel driver development compared to C/C++.

Memory safety features. Rust-based Windows drivers are more robust, easier to maintain, and far less likely to compromise system stability or security over time when compared to C/C++ drivers. The key Rust feature for ensuring memory safety is the compiler, which prevents errors like use-after-free and buffer overflows. Bounds-checked access to buffers, enforced aliasing rules, and explicit lifetimes make it significantly harder to corrupt kernel memory or introduce subtle synchronization bugs. And your team retains low-level control with clearly isolated and auditable unsafe blocks.
Compile-time safety guarantees. Rust shifts a large class of driver bugs from runtime to build time. Ownership rules, borrow and lifetime checkers, strict typing, and the absence of implicit conversions allow the compiler to detect invalid memory access, race conditions, and incorrect API usage before the driver is ever loaded.
This compiler property drastically reduces debugging time and shortens the test–fix cycle. Instead of relying on extensive runtime checks and post-release fixing, your team gets strong correctness guarantees during compilation.
Convenient syntax. Rust’s syntax is far more advanced compared to C/C++, allowing for faster software development. In Rust, the compiler performs many checks for you at the compilation stage. Rust’s standard library is much broader than that of C++, so we don’t need to program many things manually. For example, the ? operator, which enables quick and convenient error return in case of a failed operation, is much more user-friendly than the familiar NTSTATUS value check using the NT_SUCCESS macro in C.
Simple third-party integrations. Rust significantly lowers the cost of reusing proven components in driver development. Thanks to the powerful Cargo utility, which serves as both a build system and a package manager, adding a dependency requires just one command: cargo add <crate_name>. Using Cargo eliminates the need for custom build scripts or manual library management, which is common in C/C++ driver projects. It also enables reproducible builds across environments, which is critical for driver certification and long-term maintenance.
Additionally, the Rust ecosystem encourages small, well-defined crates with clear APIs, making it easier to audit dependencies and limit the amount of third-party code running in kernel mode.
Support for standard algorithms and data structures in kernel mode. Unlike C++, Rust’s standard library is divided into layers, each with its own dependencies and scope of application:
- std – the top layer of the standard library, containing platform-dependent, user-mode implementations of many structures and algorithms
- alloc – the middle layer, which provides implementations of algorithms and data structures that rely on memory allocation
- core – the lowest and most fundamental layer, containing only basic data types and functions that are independent of the C standard library (libc), allocators, or even the operating system
In the Windows kernel, we can only use the middle and lower layers of Rust’s standard library, since the std layer depends on user-mode APIs not available in kernel mode. Access to these parts of the library allows us to use many algorithms and data structures that are unavailable in C++.
For example, in C++, std::vector is part of a monolithic standard library, and platform-dependent code is tightly woven into its implementation. Therefore, we can’t use this structure in kernel mode. In Rust, however, alloc::vec::Vec has no such dependencies and can be used in any environment that supports memory allocation. This greatly simplifies development, as you don’t need to implement a vector or other kernel-compatible data structures yourself.
It’s worth noting that C++ also offers ways to use many standard data structures and algorithms in kernel mode. You can access them via Kernel Foundation — a special library developed by the Apriorit team.
Official Windows driver development platform. For many years, Rust driver development had been a passion project for Rust enthusiasts and lacked official support. However, in recent years, Microsoft has introduced and improved the Windows-drivers-rs platform. It provides a set of crates for configuring and building WDM, KMDF, and UMDF drivers. Key components include:
- wdk-build – A crate for configuring driver build scripts that locates the installed WDK and builds the driver package.
- wdk-sys – A crate containing Foreign Function Interface (FFI) bindings to system APIs available in the Windows Driver Kit.
- wdk – A crate for safe, idiomatic bindings to APIs provided by the WDK.
- wdk-panic – A crate implementing a panic handler function required for driver compilation and execution.
- wdk-alloc – A crate providing a memory allocator that can be used with data structures and algorithms requiring dynamic memory allocation.
- wdk-macros – A collection of macros that simplify interaction with wdk-sys’s low-level bindings. This crate is re-exported via wdk-sys, so projects typically do not depend on wdk-macros directly.
These crates not only allow your team to build Rust driver code but also provide implementations of essential components like the allocator in wdk-alloc, the panic handler in wdk-panic, and even the familiar println! macro, which outputs messages to the debug console.
With these benefits, Rust quickly becomes a reliable choice for developing memory-safe, performant drivers for Windows. However, many development teams aren’t rushing to rewrite their drivers in Rust, choosing instead to combine new Rust modules with existing C/C++ code. In the next section, we take a look at the key limitations of developing Windows kernel drivers with Rust.
Looking for experts in Windows and Rust driver development?
Partner with Apriorit’s top specialists to build Windows drivers that combine safety, speed, and stability for your critical systems.
Challenges of developing Windows drivers with Rust
Although Rust has been around for over a decade, its use in Windows driver development is still relatively new. It’s hard for Rust to compete with C or C++ in the diversity of available tools and libraries or community support.
From our experience, switching to Rust in an existing driver development project (or starting a new driver project in Rust) comes with organizational and development challenges.

Organizational challenges
- Rare development expertise. Rust remains a niche skill in system-level and kernel-mode development, especially for Windows drivers. According to StackOverflow’s 2025 Development Survey, only 15% of developers use Rust. On top of that, Windows kernel development expertise itself is already rare, regardless of language. This increases hiring costs and onboarding time, and it often requires additional internal training. Teams transitioning from C/C++ must invest time in learning Rust-specific concepts such as lifetimes, borrowing rules, and unsafe boundaries, which can slow down early development stages.
- Limited ecosystem. While C/C++ driver development has been around for decades, the Rust ecosystem for Windows drivers is still maturing. There are fewer production-grade examples, tutorials, and libraries targeting kernel mode. Documentation is improving, but many resources are fragmented or experimental, requiring teams to rely heavily on internal expertise and direct testing. However, Rust has a passionate and engaged community that can help you solve challenges and somewhat compensate for the lack of ready-made solutions.
- Maintenance of mixed-language codebases. Most Rust-based Windows drivers have some amount of C/C++ code, or at least have to be integrated with C/C++ software. This integration requires FFI layers and careful coordination between languages. While Rust provides tools for seamless integration with C/C++, your developers must clearly define ownership, memory boundaries, and safety contracts across language boundaries, and they must ensure that unsafe code remains minimal and well-documented. Without strong discipline, maintaining a mixed-language code base can erode some of Rust’s safety benefits and increase long-term technical debt.
Development challenges
Lack of complete access to system APIs. There are two ways to use Windows APIs in your driver:
- Manually write necessary bindings, which isn’t ideal for large projects
- Use provided crates:
- windows-sys – offers bindings for most Windows APIs with some gaps
- wdk-sys – part of the windows-drivers-rs platform; offers significantly fewer bindings
Despite the broader coverage in windows-sys, we recommend using wdk-sys for reasons we explain in the next challenge. Note that bindings provided in wdk-sys require customization before you can use them in a driver. You can either copy them to your project or fork the repository and reference it by path. Inside the crate, specify which additional header files should be converted to Rust.
For example, to generate bindings for the Minifilter structures and functions discussed further in this article, we had to add bindings for fltkernel.h.
Incorrect binding generation from Windows metadata. There are two main approaches to generating Windows API bindings:
- From Windows metadata – used by popular crates like windows-sys by Microsoft
- From header files in the Windows Driver Kit (WDK) – used by wdk-sys in the windows-drivers-rs platform
The problem with metadata-based generation is that it often introduces errors. For example, the macro POINTER_ALIGNMENT in the FLT_PARAMETERS structure may be ignored, resulting in incorrect alignment and invalid data representation.
Such issues are hard to detect during development because they require your team to manually verify structure sizes and field offsets. They’re even harder to catch during testing, since they only appear when reading data from a system-provided structure at the wrong offset.
That’s why we recommend generating bindings from header files. This method correctly handles such details and produces accurate structures. As mentioned earlier, you may need to manually add header files to the generation list if they’re not included by default in wdk-sys.
Missing some try_* variants of methods in standard structures. In kernel mode, it’s critical to handle failed operations gracefully. Rust aims to provide developers with methods that return a result instead of panicking on failure. For example, it often happens that memory allocation in a driver fails, especially when testing with Driver Verifier using the Randomized low resources simulation option.
In such cases, your team has to make sure that proper error handling is in place. However, the Vector structure doesn’t have a try_push method. To address this, you need to pre-allocate space in the vector or implement a custom TryPush trait.
Some structures already have try_* methods. For example, the Arc method provides try_new, but it’s only available when the unstable allocator_api feature is enabled.
As you can see, a skilled Rust development team can foresee or prevent these challenges, helping you benefit from this language without its downsides. They only need to know where to look and what to expect.
In the next section, we share some of that expertise by walking you through the nuances of using Rust for Windows driver development.
Related project
Porting a Remote Connectivity Protocol from C to Rust for Web Use
See how Apriorit’s team helped a client improve memory safety, reduce vulnerabilities, and deliver a high-performance solution by porting a VNC protocol from C to Rust.

Driver development workflow in Rust
Before jumping to minifilter development, let’s first study how the driver development process generally works in Rust. There are some important differences compared to C/C++ development.
You can use the following sample workflow as a template for your own Windows driver development project if you plan on building something other than a minifilter driver.
1. Configure a Rust driver development environment
To set up an environment where you can build a driver package written in Rust, complete the following steps:
- Download and install Rust from the official website
- Install LLVM using the command
winget install -i LLVM.LLVM --version 17.0.6 –force - Install the cargo make utility with cargo
install --locked cargo-make --no-default-features --features tls-native - Install WDK 22H2 or newer
Now you can build a Rust driver from source code. To make development more convenient, install Visual Studio Code with the rust-analyzer extension.
2. Create a Rust driver project
There are two approaches to creating a Rust driver skeleton:
- Manually create all necessary files with specific content according to the instructions described in windows-drivers-rs and build with the cargo-make utility. This is the default approach.
- Use the new cargo-wdk utility, which creates the driver skeleton with all required files. This approach was introduced by the Microsoft Surface team quite recently.
Both of these approaches are effective. In the example below, we use the manual approach to show which files are required for such a project.
To create a WDM driver capable of loading and unloading from the kernel, we need to:
1. Create a project as a library crate using the cargo new wdm-driver-example-rs --lib command and navigate to the newly created project directory.
2. Add the wdk-build crate as a dev-dependency. You can do this manually in the [build-dependencies] section of your Cargo.toml file, or run the cargo add --build wdk-build command to do it automatically.
3. Add dependencies for the wdk, wdk-sys, wdk-alloc, and wdk-panic crates, also manually or using the cargo add wdk wdk-sys wdk-alloc wdk-panic command.
4. Add a build.rs file, which will be executed before each driver build. It should contain the following code:
fn main() -> Result<(), wdk_build::ConfigError> {
   wdk_build::configure_wdk_binary_build()
}This call collects all necessary information for compiling the driver and configures the environment.
5. Add the driver source code to the lib.rs file. There are several steps to do that:
5.1. At the beginning of the file, add the #![no_std] attribute, which tells the compiler not to link or use the std layer of the standard library for this project. This driver will run in kernel mode, where std isn’t supported anyway. Omit this attribute and use all layers of Rust’s standard library if you’re working on a UMDF driver that runs in user mode.
5.2. Connect and use the wdk-panic handler crate. A Rust project must define its behavior in case a panic occurs. By default, when a panic occurs, the thread in which the panic happened unwinds the stack for further panic handling or for crashing the program. However, we can’t unwind the stack in kernel mode, so we need to use a panic handler. When a panic occurs, the driver will call a special function that should handle it. The windows-drivers-rs platform provides the wdk-panic crate with a panic handler implementation.
To register this crate, let’s explicitly include it by adding the following code to lib.rs:
#[cfg(not(test))]
extern crate wdk_panic; Now we need to add this panic handling approach to the configuration file. Add the following code to Cargo.toml:
[profile.dev]
panic = "abort"

[profile.release]
panic = "abort"5.3. Declare a global allocator used by default for any memory allocation attempts in your driver. Do this step only if you plan to use algorithms and data structures that can allocate memory. To declare a global allocator, add the following code to the lib.rs file:
#[cfg(not(test))]
#[global_allocator]
static GLOBAL_ALLOCATOR: WdkAllocator = WdkAllocator;This will register the WdkAllocator structure as the default allocator.
Note that for both the panic handler and the allocator, we use the #[cfg(not(test))] attribute, which tells the compiler to generate this code fragment only when compilation isn’t done in test mode. We’ll discuss this attribute more when building the driver.
Also, keep in mind that this default allocator implementation (wdk-alloc crate) allocates memory only from the non-paged pool. To enable pool selection, implement a custom allocator that supports this feature. In our minifilter implementation, we’ll use the kernel-allocator crate developed by Apriorit. It allows us to select which memory pool we want to use.
5.4. Add an entry point to the driver by defining the DriverEntry and DriverUnload functions:
use wdk::println;
use wdk_sys::{
   DRIVER_OBJECT,
   PDRIVER_OBJECT,
   NTSTATUS,
   PCUNICODE_STRING,
   STATUS_SUCCESS,
};

#[unsafe(export_name = "DriverEntry")]
pub unsafe extern "system" fn driver_entry(
   driver_object: &mut DRIVER_OBJECT,
   _registry_path: PCUNICODE_STRING,
) -> NTSTATUS {
    println!("Hello World!");

    driver_object.DriverUnload = Some(driver_unload);

	  STATUS_SUCCESS
}

extern "C" fn driver_unload(_driver_object: PDRIVER_OBJECT) {
    println!("Goodbye World!");
}Note that we use the snake_case naming style for functions, which is standard for Rust, but we use the export_name attribute to change the function name when exporting it. We do this because Windows expects the driver to have functions specifically named DriverEntry.
At the end, we return the STATUS_SUCCESS value, which signals to the OS that the driver was successfully loaded.
5.5. Add metadata for building the driver using the wdk-build crate. The wdk-build crate needs to know which type of driver you are trying to build: WDM, KMDF, or UMDF. To specify that we want to build a WDM driver, let’s add the following code to Cargo.toml:
[package.metadata.wdk.driver-model]
driver-type = "WDM"5.6. Add the crate type specification to Cargo.toml to indicate that the crate should be built as a C-compatible dynamic library. Let’s add this code:
[lib]
crate-type = ["cdylib"]Note that the driver is initially compiled as a .dll file and is renamed to a .sys file only after a successful build and execution of the configuration scripts.
5.7. To build the driver, we also need to link it with the CRT library. Let’s create a file named .cargo/config.toml and add the following:
[build]
rustflags = ["-C", "target-feature=+crt-static"]Now, with each build, the C runtime library will be statically linked to your driver.
5.8. Add a .inx file, which will be used to generate the .inf setup information file. This file should be placed in the root directory of your project with a name matching your crate name and the .inx extension.
The windows-drivers-rs platform works with .inx files to provide greater flexibility in driver development, since automatic .inf file generation using the stampinf utility uses standard driver compilation rules for different architectures.
You can take the .inx file text for this example from the repository containing this driver skeleton.
Keep in mind that all hyphens in the name of the generated driver binary file will be replaced with underscores. Therefore, you need to name the .inx file in this format and also specify the driver binary file name inside the .inx file accordingly.
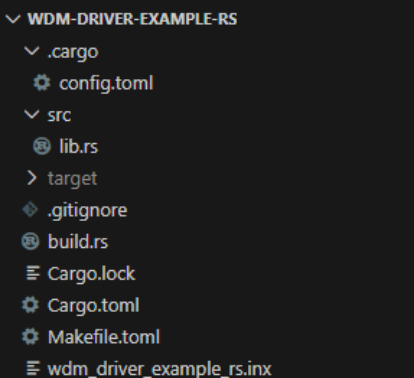
As a result, you should have the following structure for your driver skeleton:
Now that you know how to create a driver project in Rust, let’s move to the next driver development steps. We’ll show you how to compile the driver, write tests for it, and launch it.
Read also
Using Rust for IoT Development: Everything You Need to Know to Start a Project
Explore how Rust helps build secure and reliable IoT solutions and which types of boards and environments Rust currently supports.

3. Compile, test, and build a Rust driver
Currently, there are two approaches to building a Rust driver:
- Using the cargo-make utility
- Using the cargo-wdk utility
Both utilities are valid choices, so let’s examine how they work.
Building with cargo-make
Initially, the Windows-drivers-rs driver development platform was designed to rely on the third-party cargo-make utility, which creates files with specific tasks that can be grouped and executed as needed. These tasks are defined in the Makefile.toml file, which we created in the root of our driver skeleton.
The Makefile.toml file extends the existing rust-driver-makefile.toml, which describes all tasks performed to build the driver package. It also defines a default task that builds the driver in debug configuration.
To start the build, you need to run the cargo make or cargo make default command. Either will execute the default task of building your driver in debug configuration for the architecture matching your host system.
To specify the required architecture and build configuration, you can use the same command-line parameters as for regular Rust applications:
--target <triple>for architecture, operating system, and ABI--releasefor building in release configuration
Currently, only x86_64 and ARM64 architectures are supported, so you can specify --target as x86_64-pc-windows-msvc or aarch64-pc-windows-msvc respectively.
Building with cargo-wdk
Building a driver using the cargo-wdk utility is similar to the previous method, as it still relies on the wdk-build crate to implement the driver package build logic. However, since this approach doesn’t rely on the cargo-make utility, it does not require a Makefile.toml file to specify which task the utility should execute. Instead, the cargo-wdk utility provides a build parameter that initiates the driver build in the current directory. All logic for running build tasks is integrated into this utility.
To build a driver for the default architecture in debug configuration, just run cargo wdk build.
To build in release configuration, specify the --profile release parameter. And to choose a specific architecture, use the --target-arch <amd64/arm64> parameter.
Both build methods are straightforward and convenient. Using cargo-make offers more flexibility and better automation of the driver build process, as the tasks you specify in Makefile.toml can also include any other actions you wish to perform before building the driver. For example, you can create tasks for formatting code with cargo fmt or checking code with cargo check and/or clippy.
Our developers often combine these two approaches. For example, we can use cargo-wdk to build all drivers with a Makefile.toml file and cargo-make for specific tasks before building the driver.
Writing tests
Another advantage of writing a driver in Rust is the ability to write tests for the code without using any additional utilities or frameworks. Writing tests for driver code is no different from writing tests for user-mode code. However, this code must not depend on kernel-mode APIs, which are unavailable in user mode where tests are executed on the host machine.
That’s precisely why we have marked the global kernel allocator and panic handler with the #[cfg(not(test))] attribute. For accurate testing, it is necessary to use the standard user-mode allocator and panic handler.
Exploring and launching the driver package
After building the driver, you’ll see a corresponding message in the command line. Now, let’s explore what exactly we compiled. To do this, navigate to the target/<triple>/<config: debug/release>/<driver package name>_package folder.
After building the driver with the cargo wdk build --target-arch amd64 --profile release or cargo make default --target x86_64-pc-windows-msvc –release command, you’ll find the driver package in the target/x86_64-pc-windows-msvc/release/wdm_driver_example_rs_package folder.
The compiled driver package includes all standard Windows driver components, as well as some additional files. In it, you will find:
- Driver binary file (wdm_driver_example_rs.sys)
- Setup information file (wdm_driver_example_rs.inf)
- Catalog file (wdm_driver_example_rs.cat)
- Linker map file with binary exports (wdm_driver_example_rs.map)
- Program database file (wdm_driver_example_rs.pdb)
- Test certificate (WDRLocalTestCert.cer)
Note: If you compile the driver without explicitly specifying the architecture and platform, your driver will be located in the target/<debug/release>/<driver package name>_package folder. In such a case, the triple for the driver build will correspond to your host computer where the build is performed. However, to prevent errors and improve build accuracy, it’s recommended to always build the driver with a specified target.
Once your Rust driver is built and packaged, the subsequent process of launching and debugging is identical to that for drivers written in C/C++. You can use the familiar Service Control tool sc.exe to launch a Rust driver. For debugging, you have the Windbg debugger at your disposal, and for performing more rigorous checks, you can also use Driver Verifier and other tools.
Those are the basic skills and facts you need to build your first Rust-based Windows driver. With that, let’s move to a practical example of building and testing a real-life minifilter driver for a cybersecurity product.
Read also
How to Use WinDbg for Kernel Debugging to Develop a Reliable Windows Driver
Discover effective WinDbg techniques for kernel and driver debugging and learn how to identify root causes of crashes and performance issues faster.

A practical example: creating a minifilter driver
Say we want to develop a Rust driver that reads settings from the Windows registry and applies them to files. These settings will include access rules for certain folders and files. There are only two types of rules: Deny and ReadOnly.
Here’s an example of rules for our driver:
Table 1. Minifilter driver rules for certain folders and files
| Key | Value | Explanation |
|---|---|---|
| <root>/Deny/word.exe | “d:\” | Deny the word.exe process access to the entire D: drive |
| <root>/ReadOnly/notepad.exe | “c:\windows\system32\drivers\etc\hosts” | Deny the notepad.exe process from editing the hosts file |
Both the names of keys (processes) and the names of values (files) support shortened wildcards * and ?. The rules are read from the registry when the driver starts and then dynamically monitored for changes in the registry to update them.
Based on the task at hand, it’s clear that we need to monitor numerous events, including:
- File operations
- Process start and stop
- Registry modification
All of this is possible at the kernel level, and the most suitable type of driver for this task would be a minifilter driver. It allows for intercepting, blocking, or modifying file operations in a simple, reliable, and secure manner. And we can use the windows-drivers-rs platform to build the Rust source code.
Le’ts begin development by figuring out how we can intercept the operations.
1. Intercepting file operations
To intercept and filter file operations, let’s create the FLT_OPERATION_REGISTRATION structure, specifying that we’re registering two callback functions:
Minifilter::pre_createcallback for opening and creating a file to monitor attempts to access file contentsMinifilter::pre_set_infocallback to monitor attempts to delete or rename the file
/// Callbacks for the [`Minifilter`] registration.
#[allow(clippy::cast_possible_truncation)]
const CALLBACKS: &[FLT_OPERATION_REGISTRATION] = &[
	FLT_OPERATION_REGISTRATION {
      MajorFunction: IRP_MJ_CREATE as u8,
    	Flags: 0,
    	PreOperation: Some(Minifilter::pre_create),
      PostOperation: None,
    	Reserved1: null_mut(),
	},
	FLT_OPERATION_REGISTRATION {
      MajorFunction: IRP_MJ_SET_INFORMATION as u8,
    	Flags: 0,
    	PreOperation: Some(Minifilter::pre_set_info),
      PostOperation: None,
    	Reserved1: null_mut(),
	},
	FLT_OPERATION_REGISTRATION {
      MajorFunction: IRP_MJ_OPERATION_END as u8,
    	Flags: 0,
    	PreOperation: None,
      PostOperation: None,
    	Reserved1: null_mut(),
	},
];Next, we need to store this structure together with a pointer to the driver unload function in the minifilter registration structure:
/// Registration structure that contains all information about
/// minifilter driver functions.
#[allow(clippy::cast_possible_truncation)]
const FILTER_REGISTRATION: FLT_REGISTRATION = FLT_REGISTRATION {
	  Size: size_of::<FLT_REGISTRATION>() as u16,
	  Version: FLT_REGISTRATION_VERSION as u16,
  	Flags: 0,
    ContextRegistration: null_mut(),
    OperationRegistration: CALLBACKS.as_ptr(),
    FilterUnloadCallback: Some(Driver::driver_unload_callback),
	…
};Also, let’s register this minifilter:
	/// Register the minifilter in the system
	///
	/// Call the [`FltRegisterFilter`] function with [`FILTER_REGISTRATION`] settings and obtains the [`PFLT_FILTER`] pointer to the minifilter
    fn register(&mut self) -> kerror::Result<()> {
    	// SAFETY:
    	// Inherently unsafe as a system call. The caller ensures that the `driver` parameter is a valid pointer to the current driver object
    	// and `FILTER_REGISTRATION` is a properly initialized structure with callbacks
    	unsafe {
            FltRegisterFilter(
                self.driver.cast(),
              	&FILTER_REGISTRATION,
            	  &raw mut self.handle,
        	)
    	}
    	.into_result()
	}
Now, we can start the filtering operations:
	/// Start minifilter filtering.
	///
	/// Call the [`FltStartFiltering`] with [`Minifilter::handle`] argument previously obtained from the
	/// [`FltRegisterFilter`] function.
	pub fn start_filtering(&self) -> kerror::Result<()> {
    	// SAFETY:
    	// Inherently unsafe as a system call. The caller ensures that the `filter` parameter is a valid handle to `FLT_FILTER`
    	unsafe { FltStartFiltering(self.handle) }.into_result()
}To register a callback function for process start and stop events in the system, we can use the PsSetCreateProcessNotifyRoutine function in the following code.
	/// Initialize the process manager.
	///
	/// Sets the [`ProcessManager::process_callback`] routine to monitor process termination.
	pub fn init() -> kerror::Result<()> {
        ProcessManager::set_process_callback()
        	.inspect_err(|err| log::error!("Failed to set process create callback: {err}"))
	}

	/// Set the process notify routine using [`PsSetCreateProcessNotifyRoutine`] call that registers
	/// the [`ProcessManager::process_callback`] callback.
	///
	/// <https://learn.microsoft.com/en-us/windows-hardware/drivers/ddi/ntddk/nf-ntddk-pssetcreateprocessnotifyroutine>
    fn set_process_callback() -> kerror::Result<()> {
    	// SAFETY:
    	// Inherently unsafe as a system call, `PsSetCreateProcessNotifyRoutine` registers the
    	// `process_callback` function in the system. The caller ensures that the `notifyroutine`
    	// parameter is a valid CREATE_PROCESS_NOTIFY_ROUTINE pointer
    	unsafe { PsSetCreateProcessNotifyRoutine(Some(Self::process_callback), false.into()) }
        	.into_result()
}And to register a callback function for receiving notifications about registry changes and dynamically updating protection rules, we add this call:
	/// Register the [`RegistryManager::registry_callback`] function using
	/// the [`CmRegisterCallbackEx`] call.
	///
	/// It saves the returned `cookie` value.
    fn set_callback(
    	&mut self,
    	driver: PDRIVER_OBJECT,
    	altitude: &NtUnicodeStr,
	) -> kerror::Result<()> {
    	// SAFETY:
    	// Inherently unsafe as a system call, `CmRegisterCallbackEx` registers the
    	// `registry_callback` function in the system. The caller ensures
    	// that `altitude` is a valid UNICODE_STRING that equals the altitude specified
    	// in the `.inx` file. The caller also ensures that the `driver` is a valid
    	// pointer to the current driver object, and that cookie is a valid object
    	unsafe {
            CmRegisterCallbackEx(
                Some(Self::registry_callback),
                altitude.as_ptr().cast(),
                driver.cast(),
                core::ptr::from_mut(self).cast(),
            	  &raw mut self.cookie,
                null_mut(),
        	)
    	}
    	.into_result()
}Now, our minifilter driver will be aware when any process in the system attempts to access and modify specific files. Let’s install it and see if it works correctly.
Read also
Rust vs C++ Comparison
Discover how Rust and C compare in memory safety, reliability, and control to help you choose between Rust, C, or a combination of both for your next project.

2. Installing and launching the driver
To install the driver on the target machine, we can simply copy the compiled minifilter_rs_package package and install the minifilter_rs.inf file. Now our minifilter driver is installed in the system.
We can run the driver with fltmc — the utility for managing minifilter drivers. To do so, execute the fltmc load minifilter_rs command, or use the familiar sc utility with the sc start minifilter_rs command.
These commands will initialize our driver. By using the DebugView utility or connecting to the kernel with the WinDbg debugger, you can see logs confirming the driver’s successful start:

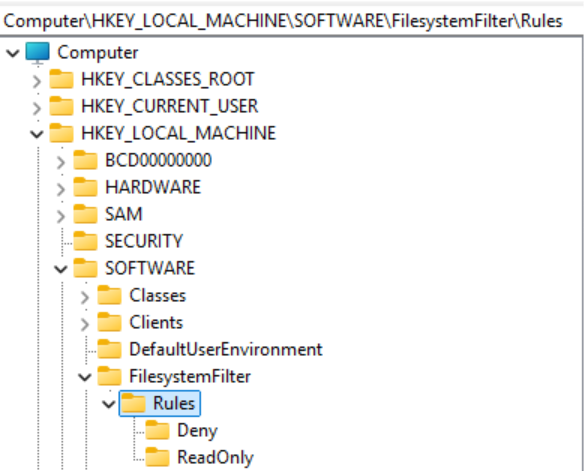
The fltmc load minifilter_rs and sc start minifilter_rs commands will also create registry keys, where you can specify rules for protecting your files.
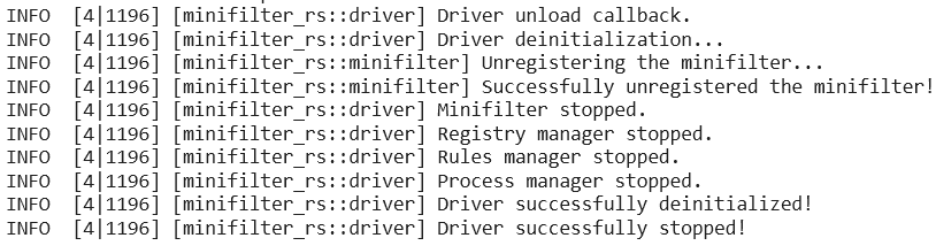
To stop the driver, simply run the fltmc unload minifilter_rs or sc stop minifilter_rs command. The corresponding logs will be displayed:
3. Using driver security features
By default, our driver can deny operations with access to certain files or allow read-only access. To add protection rules, either write them to the registry before starting the driver or do this while the driver is running.
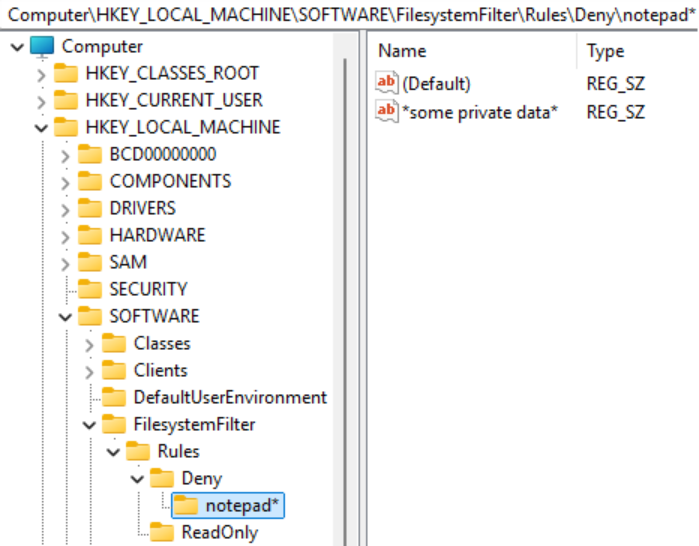
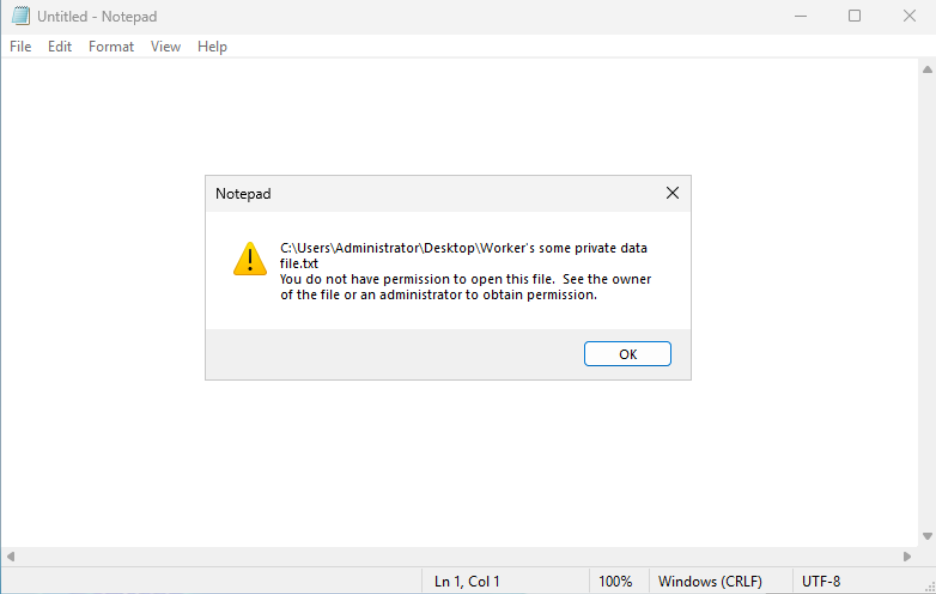
Let’s start the driver and then block access for all processes whose names start with “notepad” to files whose names contain “some private data.”
Now, when attempting to open this file using Notepad, we’ll see the following message indicating access to the protected file has been denied.
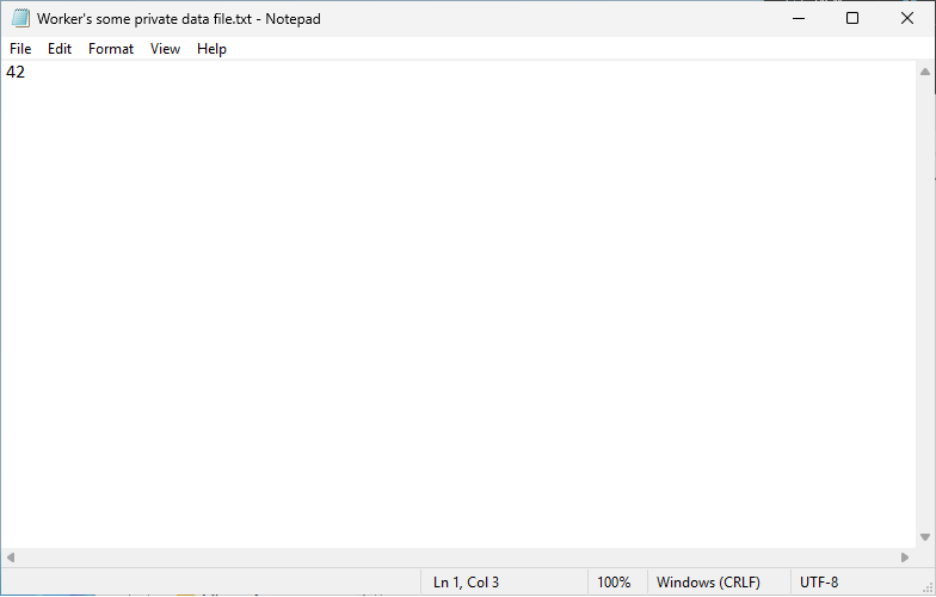
If we delete the *some private data* value, the notepad* key, or the Deny rule (or simply stop the driver), access to the file will be restored.
The final check we can perform is testing the driver’s reliability with Driver Verifier, which checks various aspects of driver performance. To ensure the reliability of our driver written in Rust, let’s apply the most stringent Driver Verifier configuration by enabling all available checks.
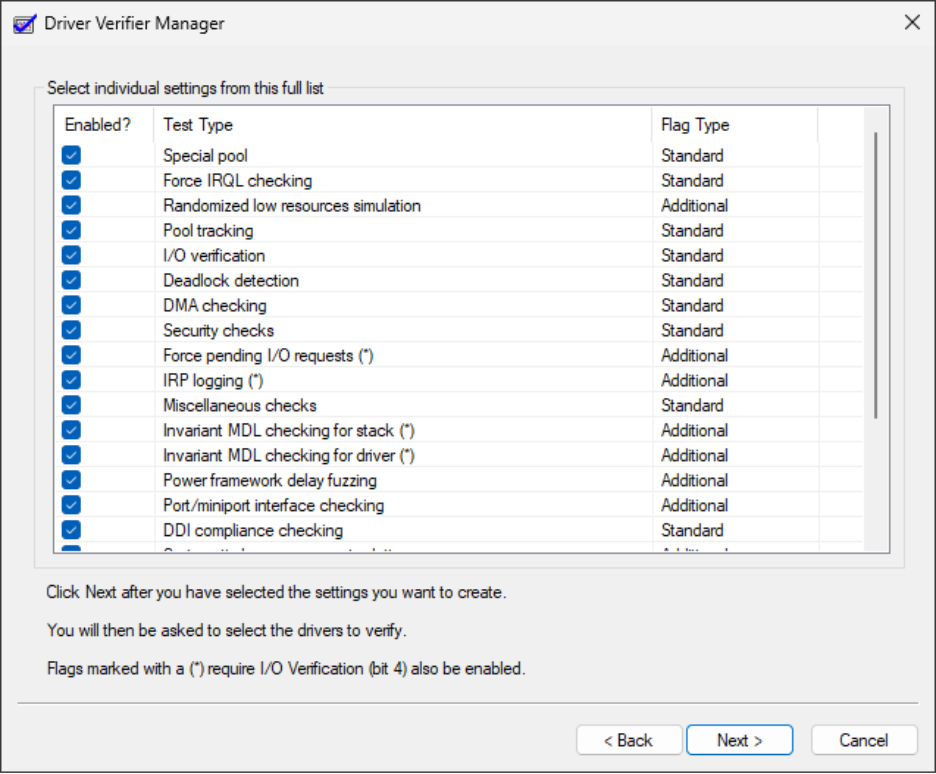
After rebooting, all checks will be applied, and you can safely use the developed driver without any freezes or blue screens of death. You can check out the source code of the developed minifilter driver at our GitHub repository.
Read also
Linux Driver Development with Rust: Benefits, Challenges, and a Practical Example
Understand how Rust fits into the Linux driver ecosystem and how it helps developers build safer, more reliable kernel modules without sacrificing efficiency or control.

Useful Rust driver development libraries
During development of the driver, we used many third-party libraries to implement functionality. If you plan on building your own custom Rust drivers, you’ll benefit from using the following crates:
- bitfield – Provides macros for defining and manipulating bitfields in a type-safe way. This library helps developers work with hardware registers, protocol headers, and packed flags without manual bit masking and shifting.
- const_format – Enables string formatting at compile time. Useful in driver development where dynamic allocation is restricted or unavailable, allowing you to build static strings (for logging, identifiers, or debug messages) without runtime overhead.
- hashbrown – A high-performance hash map and hash set implementation extracted from Rust’s standard library for managing lookup tables, caches, or mappings when std::collections isn’t available.
- log – A logging API that provides a common interface for showing diagnostic messages while delegating the actual output to a platform-specific back end, keeping logging code portable and low-overhead.
- nt-string – A utility for working with Windows NT string types. Simplifies safe creation, conversion, and lifetime management of NT strings.
- spin – Implements spin-based synchronization primitives without relying on OS threading or blocking. Particularly valuable in Rust kernel driver contexts where sleeping isn’t allowed and standard synchronization primitives are unavailable.
All these libraries can work in a no_std environment, meaning they don’t depend on the top layer of Rust’s standard library.
If necessary, you can easily find and add a crate to your driver. This process is no different from adding crates to your user-mode application, except that the crate description must indicate that it works in a no_std environment.
Many crates even list this as a category they belong to, so you can view the full list of no_std crates here. As Rust evolves, the list of these crates grows longer and longer.
Develop custom Rust drivers with Apriorit
Driver development, whether for Windows or Linux, is our passion here at Apriorit. For over 20 years, we’ve been delivering performant and secure drivers for our clients in cybersecurity, automotive, robotics, and other industries.
Clients who have been working with us for years on sensitive, requirement-heavy projects especially value Apriorit for:

- Near-instant access to rare expertise. Apriorit gives you immediate access to highly specialized talent in C, C++, and Rust driver development. Instead of spending months on recruitment or training, you can start your project right away with experts who already know the nuances of low-level programming and performance-critical systems.
- Strong cybersecurity skills. Security isn’t an afterthought for us — it’s a core competency. We apply a secure SDLC approach to every project, adding protection mechanisms at every step of development. Whether you need to harden your product, implement advanced encryption, or ensure resilience against emerging threats, Apriorit provides the expertise to keep your systems and data safe.
- Strict adherence to compliance requirements. We have experience developing software that complies with the GDPR, HIPAA, ISO 27001, and other more niche laws, regulations, and standards. Apriorit integrates compliance requirements into every stage of development, ensuring your solution meets legal and security obligations without slowing down innovation.
- Proactive and flexible approach to projects. We welcome development challenges and enjoy solving them quickly. Our teams work as true partners of our clients, offering insights, suggesting optimizations, and flagging issues as they arise. Our goal is to ensure your project stays on track and deliver the best possible version of your software.
Conclusion
Rust is no longer an experimental option for Windows driver development — it’s a practical tool for building safer, more maintainable kernel-level software. For organizations building security-critical, system-level software, the shift to Rust or a combination of Rust and C helps reduce defect rates, improve long-term maintainability, and lower driver maintenance costs.
In this article, we walked through the full Rust-based driver lifecycle, from setting up the environment and creating a driver project to building, testing, packaging, and deploying a working minifilter driver on Windows. By implementing a functional file system minifilter, we showed that Rust is not limited to prototypes or experiments but is ready for real-world security and system-level use cases.
If you’re evaluating Rust for new Windows drivers or planning to modernize existing kernel code, execution quality matters as much as language choice. At Apriorit, we build production-grade Windows drivers and security software using Rust, C, and C++. Whether you need to design a driver from scratch, migrate an existing driver to a new language, or strengthen your driver with new modules, Apriorit will help you deliver reliable, secure, and maintainable Windows drivers.
Need to deliver a reliable, memory-safe Windows driver?
Leverage Apriorit’s deep expertise in this field to power your software with a driver tailored to your requirements and expectations.
FAQ
Does Microsoft officially support Rust for driver development?
<p>Yes. The Windows Driver Kit includes Rust support for writing kernel-mode drivers, including sample projects and tooling. Rust is positioned as a safer alternative to C/C++ for certain driver scenarios, particularly where memory safety is critical.</p>
<p>However, Rust support is still evolving, and most production drivers today combine Rust and C/C++ code rather than pure Rust.</p>
What are the challenges of writing a Windows driver in Rust?
<p>The main challenges are Rust ecosystem maturity and API coverage. Windows kernel APIs (WDM, KMDF, Filter Manager) were designed for C, so Rust demands binding generation. To work with the system API, developers need to know the nuances of binding generation by different crates. Also, developers often need to use unsafe blocks, manual memory handling, and FFI to integrate with existing frameworks.</p>
<p>Debugging kernel-mode Rust also requires strong familiarity with Windows driver debugging tools like WinDbg and KDNET, since Rust-specific diagnostics are limited in kernel contexts.</p>
<p>These challenges lead to higher upfront complexity of Rust driver development projects. However, Rust’s benefits lower long-term defect rates.</p>
Is performance affected when writing kernel components in Rust?
<p>Rust introduces no inherent runtime overhead in kernel mode. There is no garbage collector, runtime scheduler, or hidden allocations unless explicitly used. Compiled Rust kernel code is comparable to optimized C/C++ in terms of both latency and throughput.</p>
<p>Performance risks come from misuse of abstractions or unnecessary safety checks in hot paths. In practice, development teams often use Rust for control logic and validation layers while keeping performance-critical paths lean. The tradeoff typically favors Rust due to fewer crashes and race-condition bugs.</p>
What can I use a filesystem minifilter driver for?
<p>A filesystem minifilter driver intercepts file system I/O operations such as file creation, reads, writes, and deletes. Minifilters integrate with the Windows Filter Manager, enabling controlled inspection and modification of file operations without implementing a full filesystem driver from scratch.</p>
<p>Such drivers are widely used for antivirus, endpoint security, ransomware protection, data loss prevention, encryption, and backup solutions.</p>
Can a Rust minifilter prevent ransomware attacks?
<p>A Rust-based minifilter can significantly strengthen ransomware mitigation by detecting suspicious patterns such as rapid bulk file modifications, unauthorized encryption behavior, or abnormal rename/write sequences.</p>
<p>However, you can’t rely solely on a Rust-based minifilter driver for ransomware protection. Effective security still depends on detection logic, heuristics, and policy design, not on the programming language alone.</p>
Can I use Rust only for part of the driver and not the entire solution?
<p>Yes, and this is currently the most realistic and widely adopted model. Rust can safely coexist with C/C++ inside the same Windows driver using FFI. For example, you can implement parsing, policy enforcement, state machines, and security logic in Rust while leaving KMDF, IRP handling, or filter manager code in C.</p>
<p>This hybrid approach minimizes risk, avoids large rewrites, and allows gradual Rust adoption while immediately improving memory safety and maintainability.</p>
How do you sign a Rust Windows driver?
Rust-based Windows drivers use the same signing process as C/C++ drivers. Using Rust doesn’t change WHQL, secure boot, or INF/catalog requirements. From the perspective of the Windows operating system, a Rust driver is just another kernel binary. The .sys file must be signed with an EV code-signing certificate and submitted to Microsoft through the Hardware Dev Center.


