 Skip to main content

Contents:
How often does your development team send API keys or other sensitive data to their colleagues in plaintext? While it’s the fastest way to share data, it’s definitely not the safest.
A large number of breaches happen when sensitive data ends up in configuration files, source code, or plaintext. This issue is known as secrets sprawl, and it has detrimental consequences for businesses.
Data breaches caused by secrets sprawl cause financial losses, reputational damage, and legal issues for companies. You can mitigate these risks by using a reliable secrets management tool that allows you to share, store, and manage your secrets securely.
This article will be useful for developers, security professionals, and product managers who want to protect their companies from vulnerabilities associated with secrets sprawls. You’ll get an in-depth overview of the HashiCorp Vault secrets management solution and learn how to manage your secrets securely. We’ll share Apriorit’s experience in installing, configuring, and setting up HashiCorp Vault based on a practical example that you can follow step by step.
What is secrets sprawl, and why should you care?
In software development, secrets are any piece of information that is used in user authorization and authentication and provides access to a system or data. Such information includes:
- API keys
- Passwords
- Cryptographic keys
- Database credentials
- Access tokens
Secrets sprawl, also called secrets leakage or mismanagement, is the improper handling of secrets within a company’s software and infrastructure. Mismanaged secrets are lucrative and easy targets for hackers, who can gain unauthorized access with them.
According to the 2023 State of Secrets Sprawl report by GitGuardian, in 2022, 10 million new secrets were detected in public GitHub commits — a whopping 67% increase from 2021. GitGuardian states that even more secrets accumulate in closed spaces like private repositories or corporate IT assets, meaning that the secrets sprawl on GitHub represents only a small share of the globally exposed secrets.
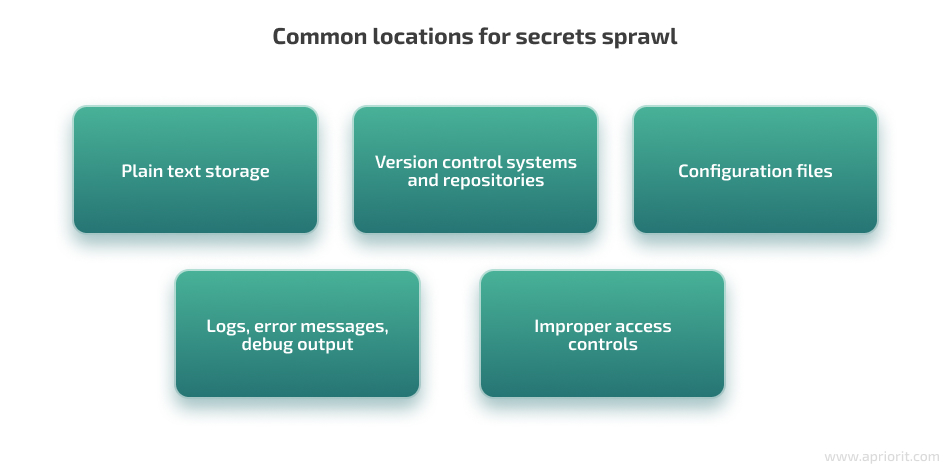
To effectively mitigate the risk of secrets sprawl, you need to know where to look. These are the most common places where secrets sprawl happens:
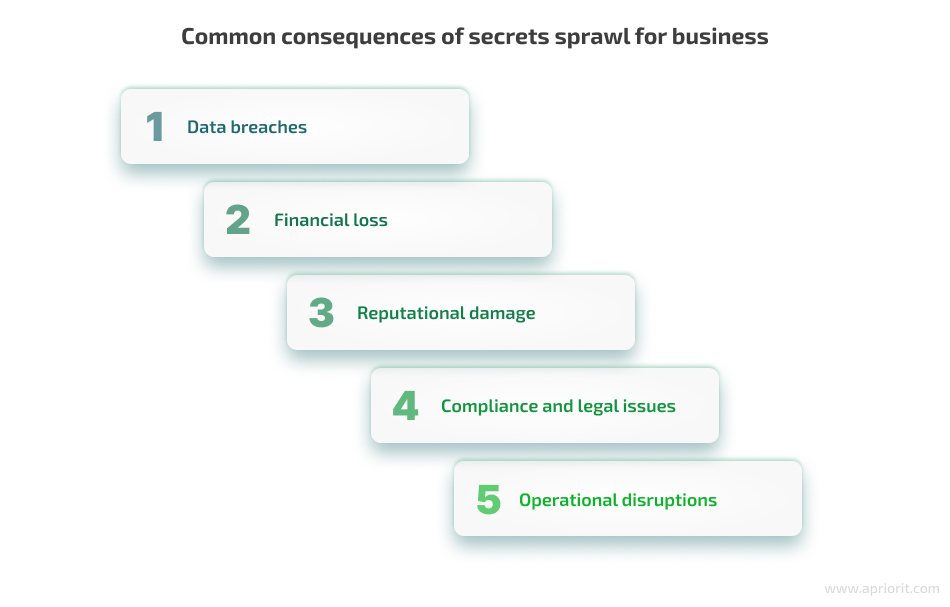
What exactly are the dangers of secrets leakage for businesses? Here are the six most common consequences organizations face because of secrets sprawl:
Let’s discuss each consequence in detail.
Ensure data security starting from the early development stages!
Leverage 20+ years of our experience in cybersecurity to protect your business from costly data breaches and ensure your sensitive information is stored and shared securely.
1. Data breaches
The most obvious consequence of secrets sprawl is, of course, data breaches. By exposing API keys or passwords, your company risks giving attackers access to its systems, databases, and sensitive data. This leads to data exposure and possible theft of valuable information, including intellectual property, financial records, or even user data.
2. Financial losses
There are several ways in which a business can lose money as a result of secrets sprawl. Hackers can conduct fraudulent activities around financial transactions or even commit theft. They can also hack and configure the system in order to get a ransom for data access. Another category of breach-related financial losses you can face are legal fees, regulatory fines, and compensation to affected parties.
According to IBM’s Cost of a data breach 2022 report, breaches caused by stolen or compromised credentials had a global average cost of $4.50 million. In the US, that cost is even higher, reaching $9.77 million per breach.
3. Reputational damage
Data breaches and secrets sprawl incidents can seriously harm your company’s reputation. Data breach cases attract negative publicity, media attention, and customer backlash. All this is often followed by losing customers, business partners, and investors.
Reputational damage may deter customers, partners, and investors from your company and motivate them to work with your competitors. This will create additional business opportunities for competitors and allow them to gain a larger market share.
4. Compliance and legal issues
Mishandling customer data can lead to non-compliance with various data protection and privacy laws and regulations including HIPAA, the GDPR, and the CCPA. As a result, you may face fines, penalties, and lawsuits that will result in further reputational and financial damage. Not to mention the additional strain associated with recertification and re-auditing that your company will need to go through in order to continue its work.
5. Operational disruptions
Your business operations can also suffer from secrets sprawl, as you will need to allocate resources towards investigation, incident response, and remediation activities. You may need to shut down systems and services until they’re secured, and every second of this downtime may cost thousands of dollars in losses.
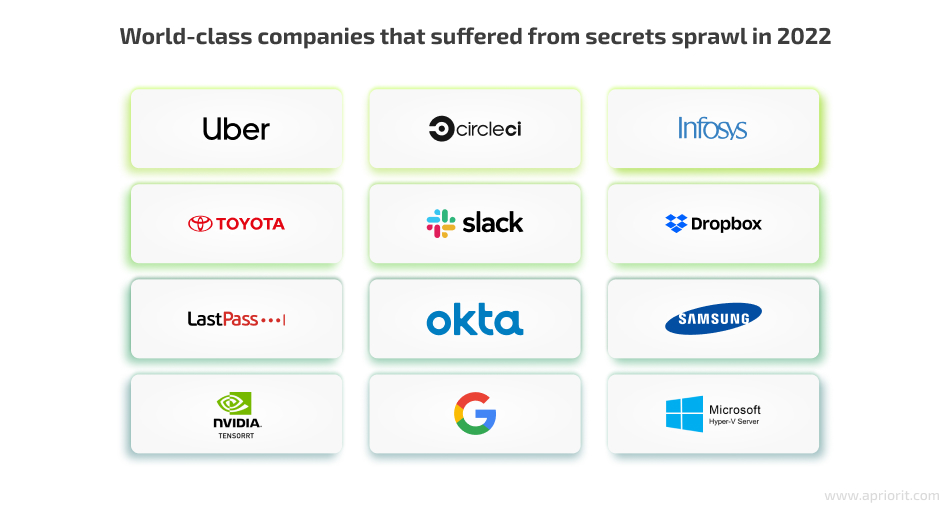
Despite all these consequences, the number of secrets sprawl incidents continues to grow year after year, harming businesses of all sizes. According to the 2023 State of Secrets Sprawl report by GitGuardian, in 2022 alone, many world-known companies were affected by data exposure and breaches due to secrets sprawl:
What should businesses do to reduce the risk of exposing their secrets? Let’s take a look at best practices for protecting your sensitive data.
Read also
Cloud Application Security Best Practices: Data Safety and IT Compliance Challenges
Protect your cloud-based applications efficiently. Understand the legal requirements and best practices to ensure your data is secure and compliant with industry standards.

Best practices for minimizing the risk of secrets sprawl
To prevent secrets sprawl, we at Apriorit recommend adopting the following best security practices in your development processes:
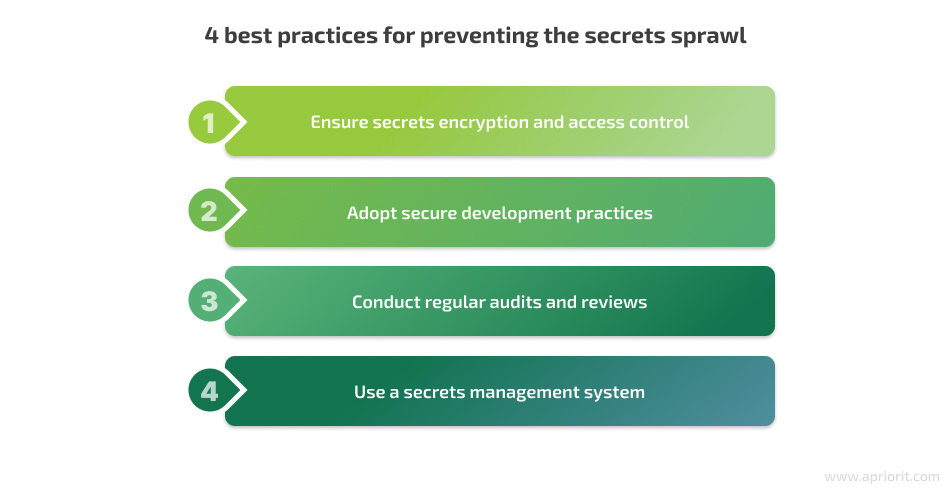
1. Encryption and access control
Your secrets should be encrypted at rest and in transit so that hackers can’t get access to information even if it’s leaked. Also, check who has access to certain data: grant access to systems only to a limited number of employees based on their position and work requirements.
2. Secure development practices
Implement secure coding practices, such as avoiding hardcoding secrets in source code and utilizing environment variables or configuration files to reference secrets.
3. Regular audits and reviews
Make sure to regularly check your system with:
- Penetration testing
- Static application security testing
- Dynamic application security testing
- Security code reviews
- Secrets scanning tools
- Security audits and compliance assessments
4. Secrets management systems
Use secrets management systems that will help you securely store and control access to your secret data. The most popular systems are HashiCorp Vault and AWS Secrets Manager.
In many ways, a secrets management solution resembles a password manager. Most password managers are simple and don’t have advanced features like per-user permissions or access control lists (ACLs). They can store and retrieve passwords when needed, but not much else.
A secrets management solution is expected to have more complex functionality:
- Creating ACLs
- Adding rights for users or user groups
- Built-in credential rotation
- Advanced access control capabilities
This article is dedicated to using secrets management systems, namely HashiCorp Vault, to protect your secrets. Let’s discuss how to install, initialize, and configure the HashiCorp secrets management tool.
What is HashiCorp Vault and how does it work?
HashiCorp Vault is an open-source identity-based secret and encryption management system with many use cases and capabilities. For example, Vault supports a Zero Trust Security architecture that can help you secure your cloud infrastructure.
HashiCorp is ISO-certified. ISO certification ensures that an organization has implemented robust systems, processes, and controls to maintain quality, security, and compliance. Audit reports and compliance letters, such as the SOC 3 report from Armanino and FIPS compliance letter from Leidos further prove HashiCorp has undergone rigorous testing and evaluation.
You can start using Vault for secrets management for free, or you can choose from two paid plans if you need a specific solution. You can check out the pricing policy on the official HashiCorp Vault website.
Vault has a complex structure and uses components called backends to which it delegates tasks. There are four backends dedicated to different processes within Vault: authentication, secret, audit, and storage. All of them are controlled by the Vault core — a central component of the Vault architecture that routes all user requests to a specific backend.
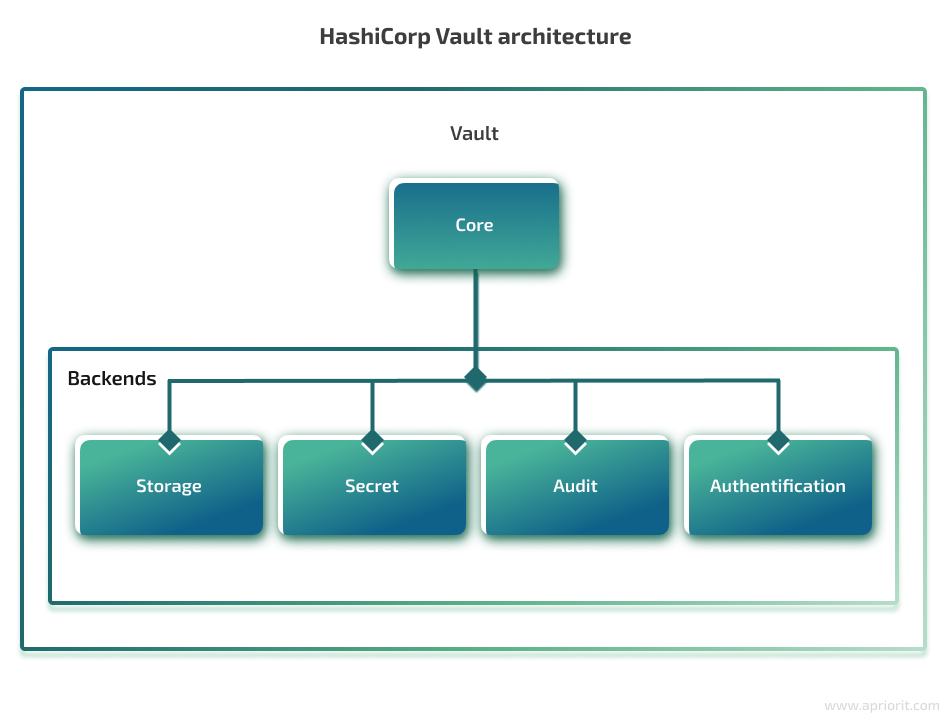
Let’s now talk about the backends within the secrets management vault in more detail and discuss their functions and purpose.
1. Authentication backends
Authentication backends, or identity providers, handle the authentication process and return a user identity (usually as a token or user information like email, ID, role, etc) upon successful authentication.
Token authentication is a central authentication method, as all other methods rely on it. How exactly does it work?
When a user successfully authenticates, the identity provider returns information about the user, such as their username or unique identifier. Vault then takes this identity information and creates an access token associated with that identity. This access token allows the user to access the desired resources or perform specific operations within Vault based on the configured access policies and permissions.
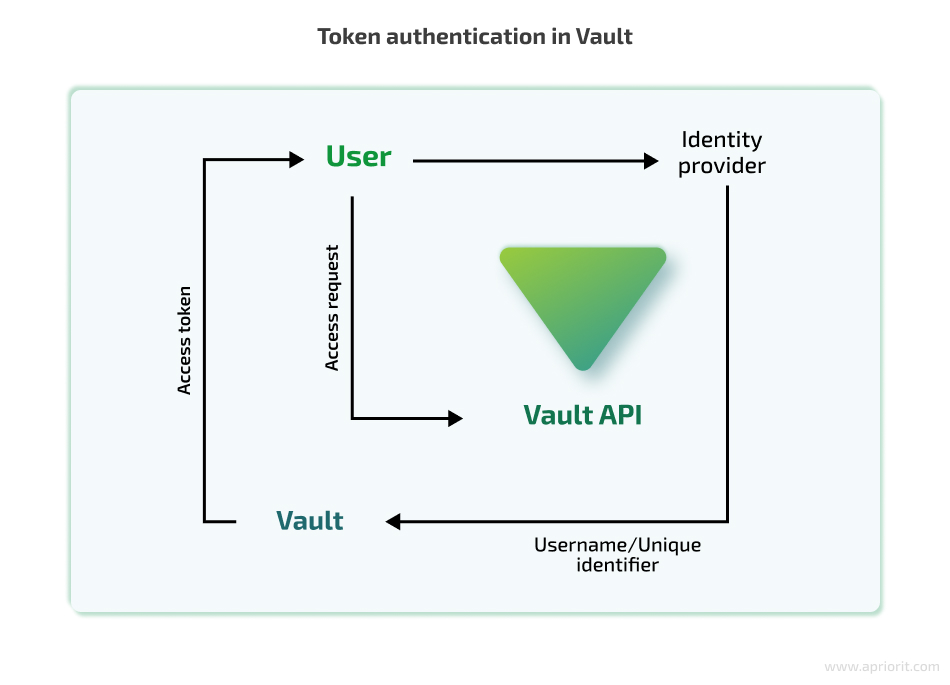
Of course, token authentication can be used on its own. It’s possible to create, revoke, and renew these tokens without using any additional identity providers. But it’s not always the best way to handle authentication.
Tokens also play a vital role in access control, as when a token is created, user-specific policies that allow or disallow access to resources are encoded onto it.
Some examples of authentication backends integrated with Vault are the Lightweight Directory Access Protocol (LDAP), GitHub, and Azure Active Directory. You can also use other supported authentication methods like JSON Web Tokens, Kerberos, or even standard usernames and passwords.
Related project
Developing a Custom Secrets Management Desktop Application for Secure Password Sharing and Storage
Learn how the Apriorit team engineered a custom secrets management solution that helped our client fortify their data protection, streamline access control, and enhance operational efficiency for their business!

2. Storage backends
Storage backends are responsible for storing all information. The generally accepted practice is to treat storage backends as untrusted entities. Like many other secrets management solutions, Vault only stores encrypted data in storage backends, so if storage is compromised, it’s impossible to retrieve secrets without knowing the encryption key.
There are many storage drivers that Vault supports, including filesystems, in-memory storage, relational databases, and Amazon S3. Each has its pros and cons, so which is best will depend on your particular needs and the storage driver’s capabilities.
Moreover, Vault has its own embedded data storage called integrated storage. Using this integrated storage removes another dependency from your system and makes monitoring and troubleshooting a bit easier, as you must only monitor Vault.
Using Vault’s native storage driver doesn’t require installing any additional software and is an out-of-the-box solution.
3. Secret backends
Secret backends, or secret engines in the secrets management HashiCorp tool, are responsible for various ways of storing secrets. Some secret engines can only store and read data, while others have more complex features like dynamic secret generation.
There are many supported engines, including key–value storage, Lightweight Directory Access Protocol (LDAP), databases (for dynamic database credential generation), time-based one-time password (TOTP) tools for generating time-based credentials, and engines from AWS, GCP, and Azure. We can also add custom secret engines.
These engines behave like virtual filesystems and are mounted at a specified path in Vault. We can have multiple engines running simultaneously, and they all will have different paths. As each engine has its own path, a request we send to Vault is automatically forwarded to the required engine.
For example, we can have a key–value secrets engine enabled for storing our passwords and API keys and, at the same time, have an AWS secrets engine that will dynamically generate AWS access credentials.
4. Audit backends
Audit backends are responsible for logging all requests and responses that Vault processes. Logging the activity of a secrets manager might seem insecure, as we will most likely have our secrets inside the logs.
However, Vault handles this by hashing most of the strings that requests and responses contain to avoid revealing sensitive information. Hashing also allows us to quickly compare values of secrets to values in the logs by generating these hashes ourselves.
You can choose from several auditing mechanisms that include system logging protocol (Syslog), file, or socket. Socket allows you to stream your logs to a TCP, UDP, or UNIX socket, allowing you to use any log management platform.
Now that we understand how Vault works and what it offers, let’s demonstrate it in a real-life example, using the Hashicorp Vault security best practices.
Installing, configuring, and initializing Vault
Let’s start with installing, configuring, and running Vault in accordance with our needs.
Installation
In this article, we’ll use the official Docker image from Docker Hub. Docker allows for the containerization of applications, making it convenient for us to run Vault in an isolated environment. It’s the easiest way to try Vault. Let’s now launch Vault by running this command in our terminal or command prompt:
$ docker run --rm --cap-add=IPC_LOCK vault This will download the Vault Docker image if it’s not already available locally and start a new container with Vault running inside it.
Vault configuration
By default, Vault’s server runs in development mode: it stores all secrets using in-memory storage, initializes automatically, and starts unsealed. Development mode is useful for trying things out but shouldn’t be used in production.
In our case, we’ll use standard mode, which implies the need for manual initialization and unsealing of Vault. To run our server in standard mode, we should create a configuration file.
Vault’s configuration files are written in HashiCorp configuration language. They have many different options, but we will use only a few throughout the article.
Let’s create a simple configuration for our Vault:
# config.hcl
disable_mlock = true
ui = true

listener "tcp" {
  address 	= "0.0.0.0:8200"
  tls_disable = "true"
}

storage "file" {
  path = "/vault/file"
} Now, let’s take a look at the key settings. First, we disabled the Transport Layer Security protocol (TLS). Please note that you should always use TLS in production to provide secure communication between a client and a server.
Second, we disabled the memory lock. Even though having a memory lock enabled is considered the safest approach when working with Vault, it’s not supported on all platforms, and we want our examples to be as straightforward as possible without any unexpected errors. We also enabled web UI, as some people find it easier and faster than the command-line interface (CLI).
Now we can start the server using the new configuration by passing the path to the configuration as an argument:
$ vault server -config=config.hcl Everything works as it should, but now we have to initialize the server itself.
Read also
How to Implement Kerberos Authentication for Windows with the LSA Service API
Strengthen your Windows server security and streamline access control. Our practical guide can help you enhance security and achieve better compliance in your organization.

Initializing Vault
To initialize our server, we will need another Docker container with Vault installed. To simplify the process, we created the following Dockerfile:
services:
  vault_server:
	image: vault
	container_name: vault-server
	command: ["server"]
	cap_add:
  	- IPC_LOCK
	ports:
  	- 8200:8200
	environment:
  	VAULT_LOCAL_CONFIG: '{"storage": {"file": {"path": "/vault/file"}}, "listener": [{"tcp": { "address": "0.0.0.0:8200", "tls_disable": true}}], "disable_mlock": true, "ui": true}'
	networks:
  	- vault

  vault_client:
	image: vault
	container_name: vault-client
	command: ["sh"]
	tty: true
	stdin_open: true
	environment:
  	- VAULT_ADDR=http://vault-server:8200
	depends_on:
  	- vault_server
	networks:
  	- vault

networks:
  vault:
driver: bridge Note that we moved our configuration from the file to an environment variable. This is a feature that Vault’s official Docker image offers. It allows us to define the necessary configuration parameters directly in the environment without needing a separate file.
We also mapped TCP port 8200 in the server to port 8200 of the Docker host to access the web UI from the Docker host machine.
Now we can use Docker Сompose to start our containers. Docker Compose is a tool that allows us to define and manage multi-container Docker applications. It uses a YAML file (usually named docker-compose.yml) to specify the configuration and dependencies of containers that make up an application.
Here’s what our container creation looks like:
$ docker compose up
[+] Running 2/2
 ⠿ Container vault-server  Created
 ⠿ Container vault-client  Created
Attaching to vault-client, vault-server
# Vault server output At this point, we will also include screenshots from the web UI to show how you can do the exact same thing without using the command-line interface. You can access the web UI by navigating to http://localhost:8200 from any browser of your choice. The UI looks like this:

Lastly, we need to attach our terminal session to our vault-client container from another terminal (you can skip these CLI steps entirely if you are using the web UI):
$ docker attach vault-client You can verify that everything runs as intended by executing the following command inside the client:
$ vault status
Key            	Value
---            	-----
Seal Type      	shamir
Initialized    	false
Sealed         	true
Total Shares   	0
Threshold      	0
Unseal Progress	0/0
Unseal Nonce   	n/a
Version        	1.12.2
Build Date     	2022-11-23T12:53:46Z
Storage Type   	file
HA Enabled falseAs we can see from the output, Vault is sealed and uninitialized. Vault always starts in a sealed state, so we should unseal it after each launch.
To do this, we use an unseal key. This key is generated once during initialization. Vault uses Shamir’s secret sharing to split the key into a predefined number of pieces, which are then used to reconstruct it. Such an approach reduces the risk of exposing the unsealed token, as we only have part of it. Other parts can be held by your colleagues or stored securely in different places.
To unseal Vault, run the following command inside the client:
$ vault operator init -key-shares=1 -key-threshold=1
Unseal Key 1: <UNSEAL_KEY>


Initial Root Token: <ROOT_TOKEN>
# additional outputSpecify that you want one key share and that the key threshold is one key. Now press Initialize and save the generated keys.

This will initialize the server with a single unseal key. Save the generated token and the key to environment variables. We’ll need them later. From now on, we’ll refer to the initial root token as ROOT_TOKEN and the first unseal key generated during Vault server initialization (Key 1) as UNSEAL_KEY.
Vault supports multiple unseal keys, but as we are only learning and not creating a production-ready solution, we’ll use one.
Now you can unseal the server using the unseal key:
$ vault operator unseal $UNSEAL_KEY
Key         	Value
---         	-----
Seal Type   	shamir
Initialized 	true
Sealed      	false
Total Shares	1
Threshold   	1
# ... Paste the UNSEAL_KEY and press Unseal.

Now we are all set, and we can finally start using Vault.
Read also
5 Expert Tips on Secrets Management: Solutions, Tools, Dos and Don’ts
Find out the key features and benefits of popular secrets management tools. Select the best solutions to secure your sensitive data and streamline access control for your applications.
How to store and share secrets with Vault
Adding authentication methods
We will use username and password authentication. By default, it’s disabled, so we have to enable it. But before we can do that, we should log in to Vault with the root token that we generated previously:
$ vault login $ROOT_TOKEN
Success! You are now authenticated.
# ... 
Now, we can change our authentication methods and other protected server parts. Let’s add the authentication method:
$ vault auth enable userpass
Success! Enabled userpass auth method at: userpass/If you’re working with the web UI instead of the command line, follow this path to enable authentication methods: Access -> Auth Methods -> Enable new method -> Username & Password -> Next -> Enable method. We won’t change any settings here, so you can leave them as they are.

Now that we have our username and password authentication set, let’s add a secrets engine.
Adding a secrets engine
By default, Vault only enables cubbyhole as the secrets engine. At least, it’s the only engine that we can use for storing data. We can check that by running the following command:
$ vault secrets list

Path      Type     Accessor          Description

----      ----     --------          -----------

cubbyhole/ cubbyhole cubbyhole_82fd0500 per-token private secret storage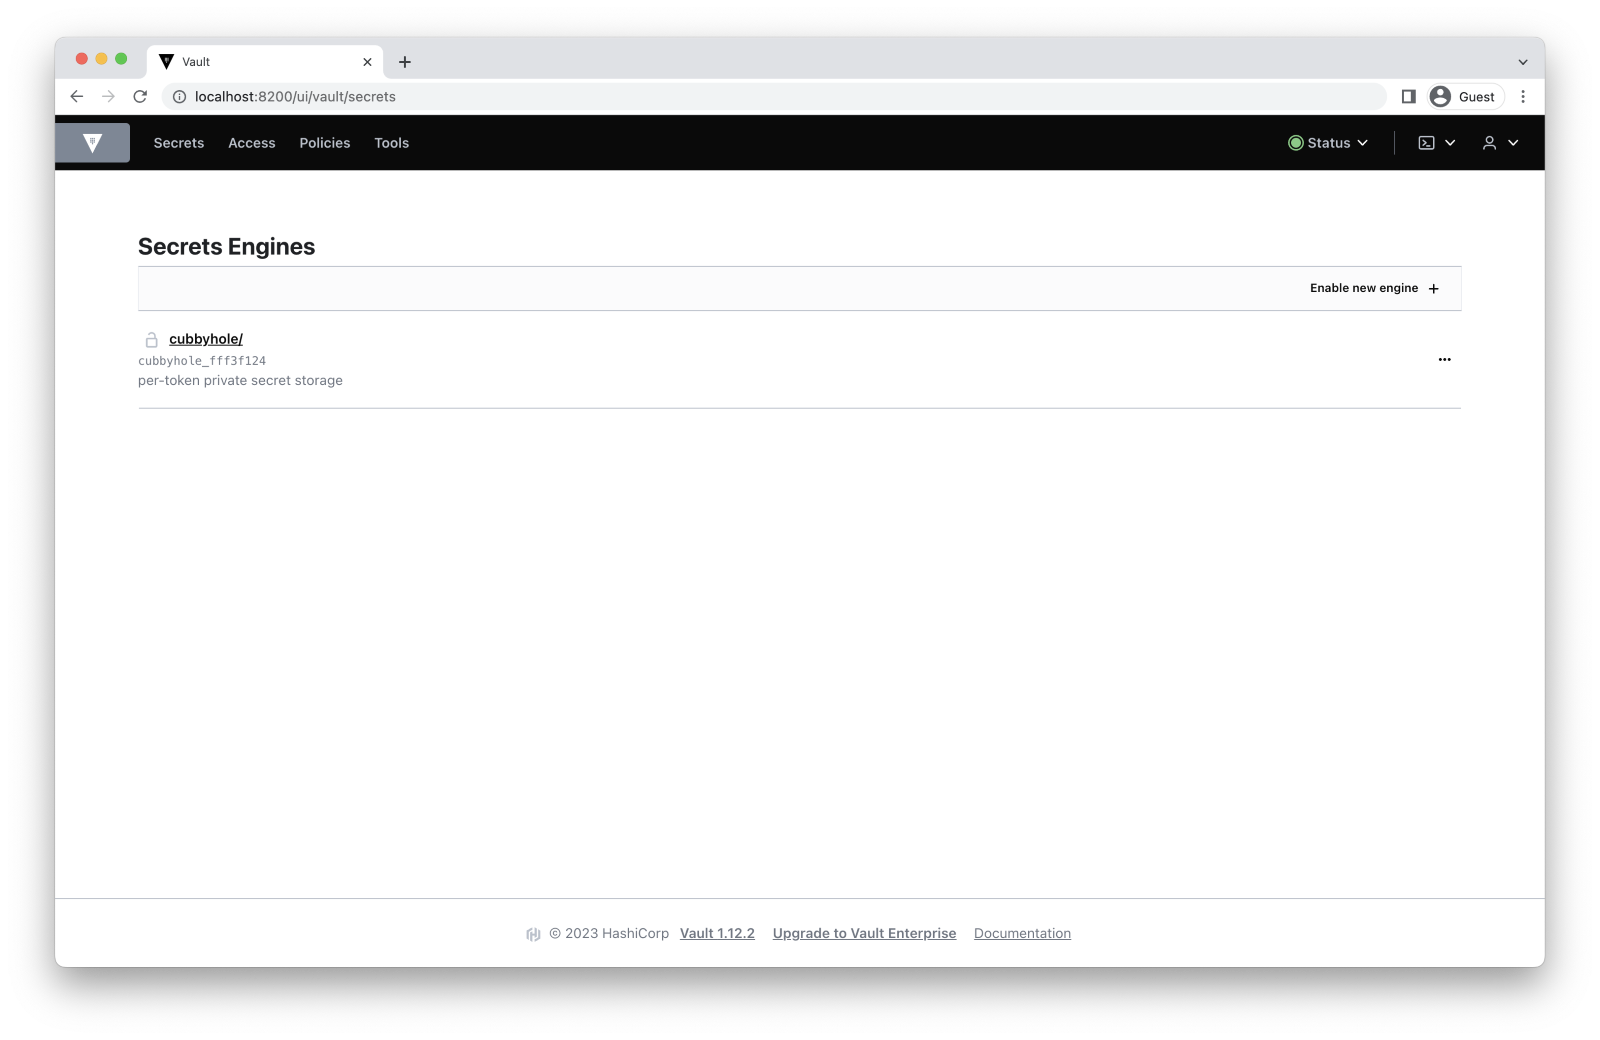
This engine allows us to wrap and unwrap our secrets to share them securely. Wrapping means generating a one-time token with a configurable time to live (TTL) that references our secret. The secret only exists inside our cubbyhole until the token is unwrapped or expires.
You can think of a cubbyhole as a key–value pair, where the one-time token is the key. It allows us to safely share something our recipient doesn’t have access to without giving them permanent access rights. It’s a simple, fast, and reliable way of sending data that we don’t want to be sent in plaintext.
However, cubbyhole provides a temporary and short-term way to share secrets. That’s why we want to add the key–value engine. Like cubbyhole, it follows the key–value logic, but it allows us to create, read, update, and delete key–value pairs. The KV engine is suitable for long-term storage and management of secrets, configuration data, or any other structured key–value information.
Let’s add a key–value secrets engine:
$ vault secrets enable -version=2 -path='/kv-engine' kv

Success! Enabled the kv secrets engine at: /kv-engine/Follow this path to enable the key–value secrets engine: Secrets -> Enable new engine -> KV. Then, change Path to kv-engine and choose Enable Engine.
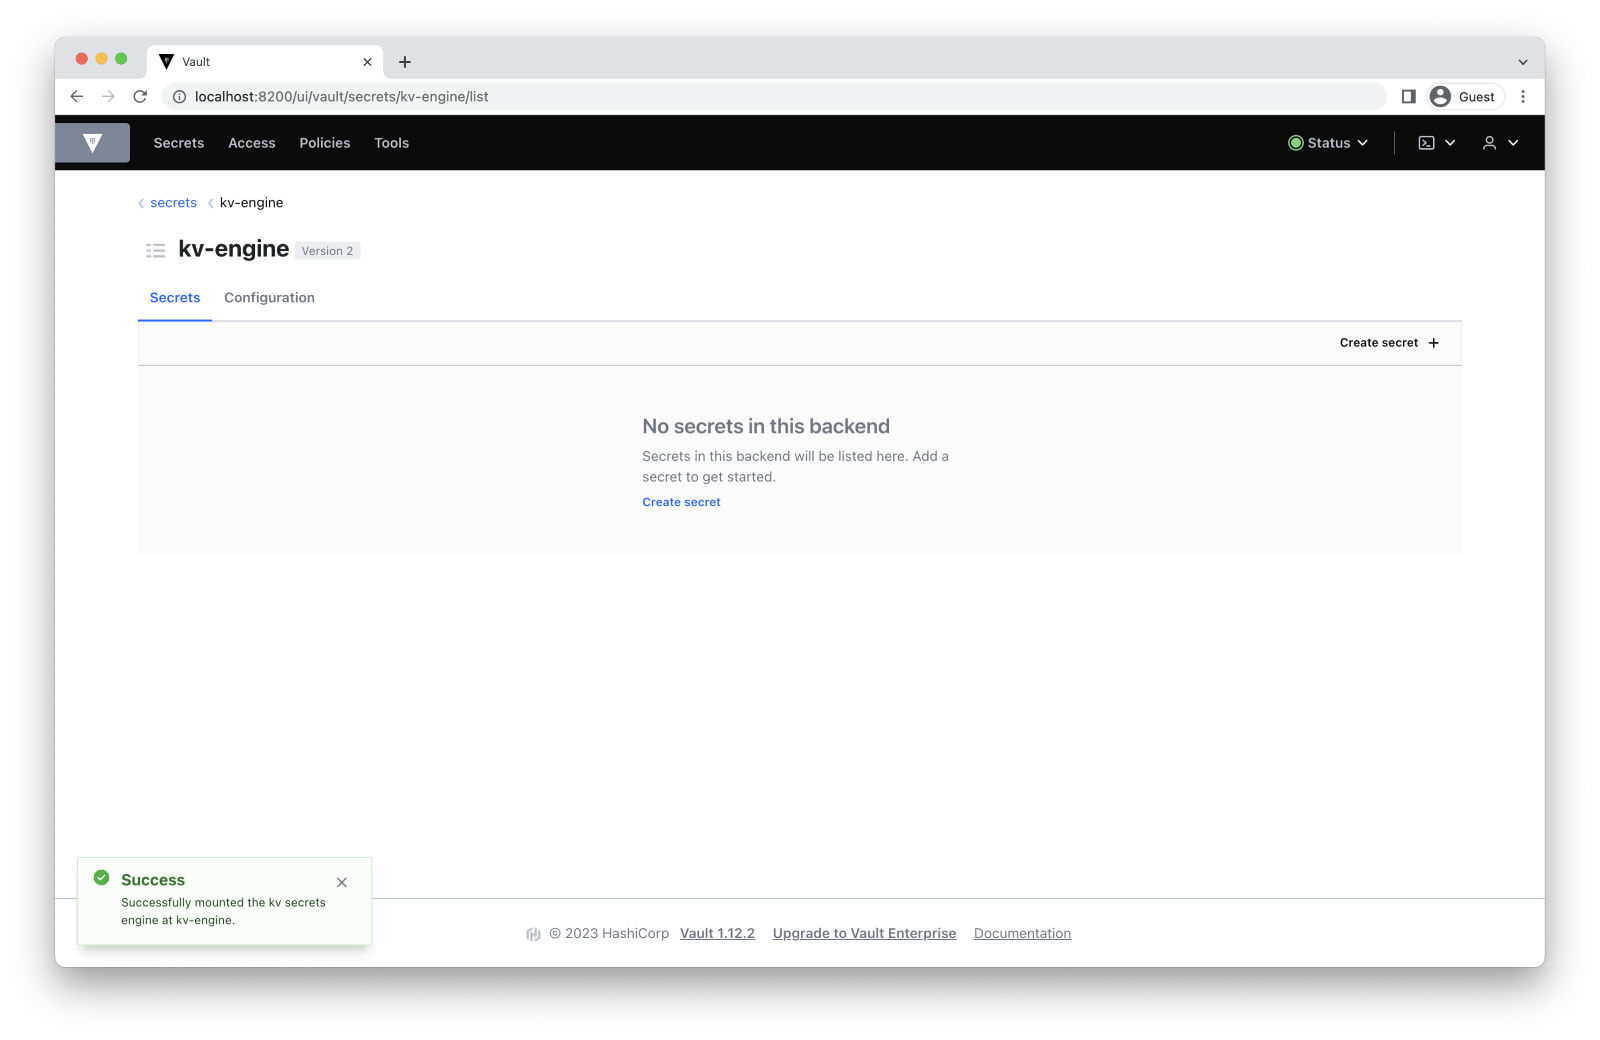
We’ll use the second version of the key–value engine. This version has some additional features including versioning of secrets and restoring deleted secrets.
Now we can add policies that will allow users to store and read secrets using our new secrets engine.
Related project
Developing a Custom MDM Solution with Enhanced Data Security
Explore how Apriorit’s team created a custom MDM solution for centralized and secure tablet management, allowing the client to expand their services and maintain high data security.
Adding policies
We need policies to follow the principle of least privilege. This principle says that an entity (a user, a group, etc.) should only have access to resources they need to complete a specific task.
For example, developers should have access to API keys or other credentials they need in development. DevOps specialists, on the other hand, need credentials for a cloud hosting platform, but they shouldn’t be able to access all other secrets, as it increases the possibility of secrets leakage. We can take our access control game to a new level by adding app-specific access rights. Our server probably needs database credentials, but our app doesn’t.
Basically, policies are just named Access Control Lists (ACLs). In this example, we want users to store secrets in their own directory that won’t be accessible to any other user.
To do this, we’ll use ACL templating. We can use double curly braces inside our policies as templating delimiters. There are a few available templating parameters; you can read more about them on the ACL Policy Path Templating page.
Before we can add a policy, let’s find out the identifier of our new authentication method to use it inside our template.
We can do it by running the following command:
$ vault auth list

Path     Type    Accessor  Description                Version

userpass/ userpass <ACCESSOR> n/a n/aYou can see the identifier in the Accessor column. Find the Authentication methods by following Access -> Auth Methods.

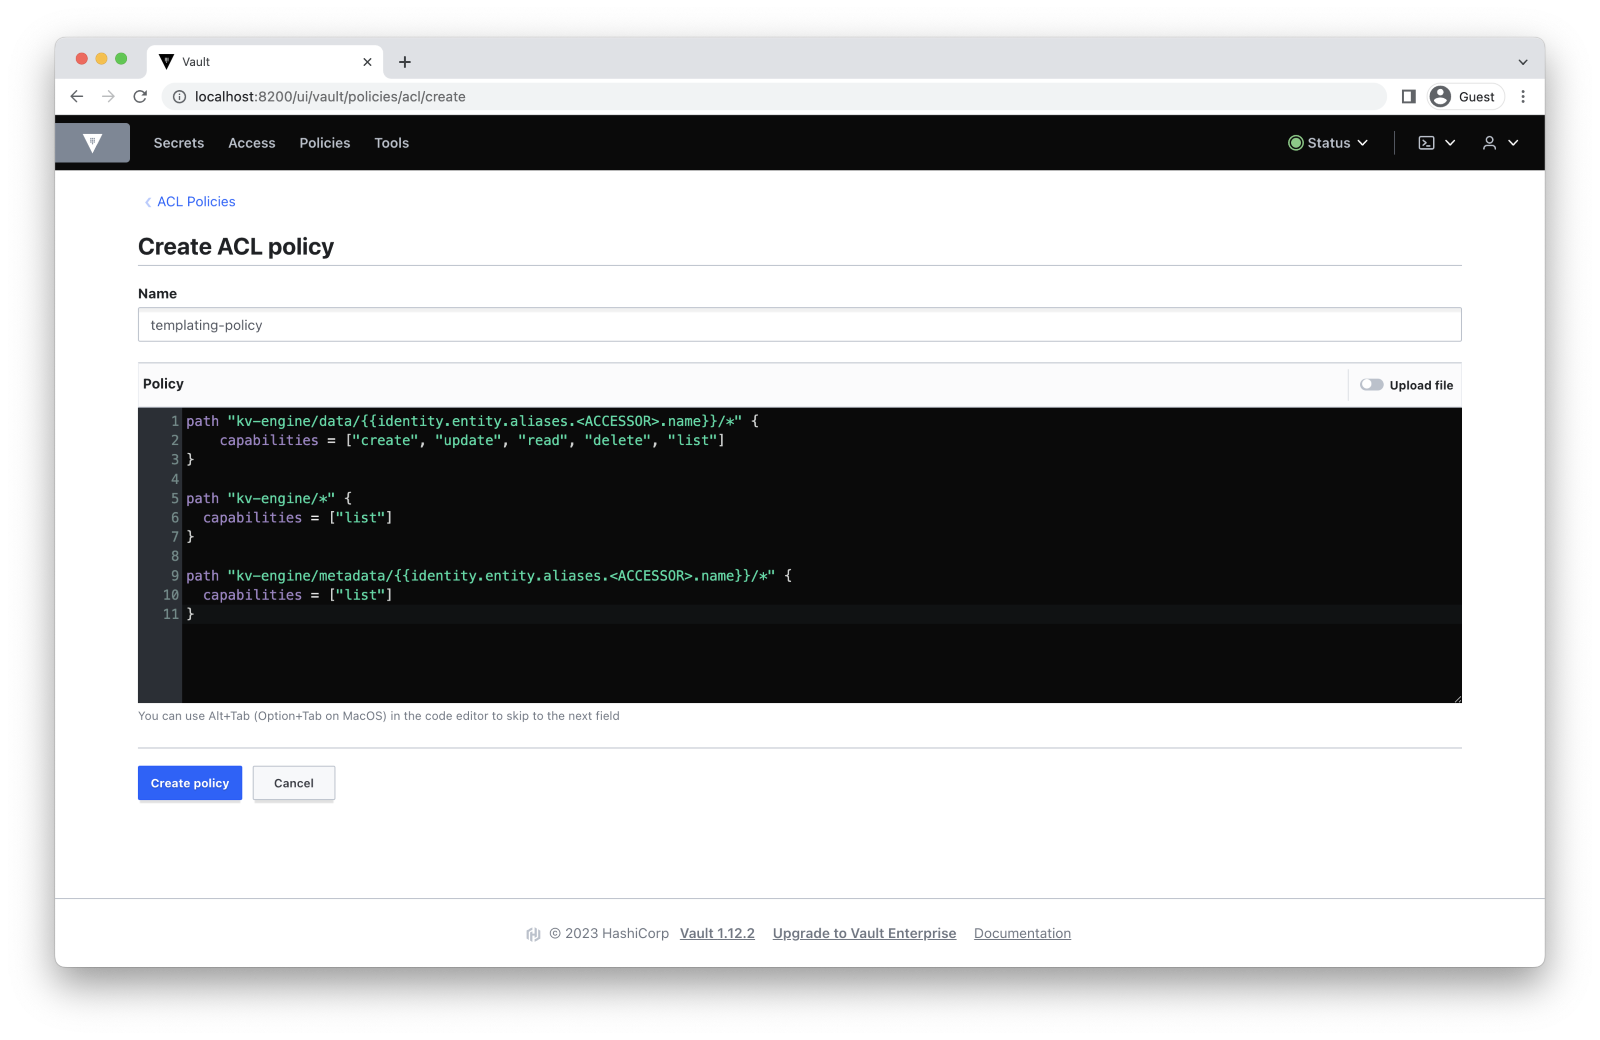
Now we can create a policy:
# policy.hcl
path "kv-engine/data/{{identity.entity.aliases.<ACCESSOR>.name}}/*" {
	capabilities = ["create", "update", "read", "delete", "list"]
}

path "kv-engine/*" {
  capabilities = ["list"]
}

path "kv-engine/metadata/{{identity.entity.aliases.<ACCESSOR>.name}}/*" {
  capabilities = ["list"]
} Replace <ACCESSOR> with the identifier that we got in the previous step.
This policy will allow our users to create, read, delete, list, and update secrets inside their home directory. We will use policy path templating to leverage identity parameters within policy rules. This will allow us to fine-tune access control based on the user’s identity attributes that are returned to us upon authentication.
These attributes can be anything: the user’s role, username, email address, group membership, etc. Depending on the attributes, we’ll be able to grant different levels of access and thus adhere to the principle of least privilege.
In this example, we use the name that is returned when a user successfully authenticates using username and password authentication.
Note the data prefix after kv-engine. It’s where the actual data is stored in the key–value storage of version two. There are several other paths inside kv-engine, including metadata and delete. You can read more about the KV Secrets engine in the HashiCorp documentation.
Also, we added a rule for the metadata path. This rule allows our users to list all stored keys inside their folders. Furthermore, we added permission for each user to list the contents of the kv-engine path so that it’s easier to navigate using the web UI. This rule doesn’t allow users to read the contents of folders inside kv-engine — only to see them.
Let’s save our policy:
$ vault policy write templating-policy policy.hcl
Success! Uploaded policy: templating-policy
Go to Policies -> Create ACL policy to create an ACL policy:
Now we have a fully functioning system with an ACL policy and authentication. Let’s try it out.
Storing and reading secrets using the key–value engine
Now that we’ve added an authentication method, we can create a new user. This process is rather straightforward:
$ vault write auth/userpass/users/user password=1234 policies=templating-policy
Success! Data are written to: auth/userpass/users/user
Follow this path in the UI to create a user: Access -> Auth Methods -> userpass -> Create user. Enter the username and the password and add the policy that we created in the Generated Token’s Policies section inside the Tokens dropdown menu.
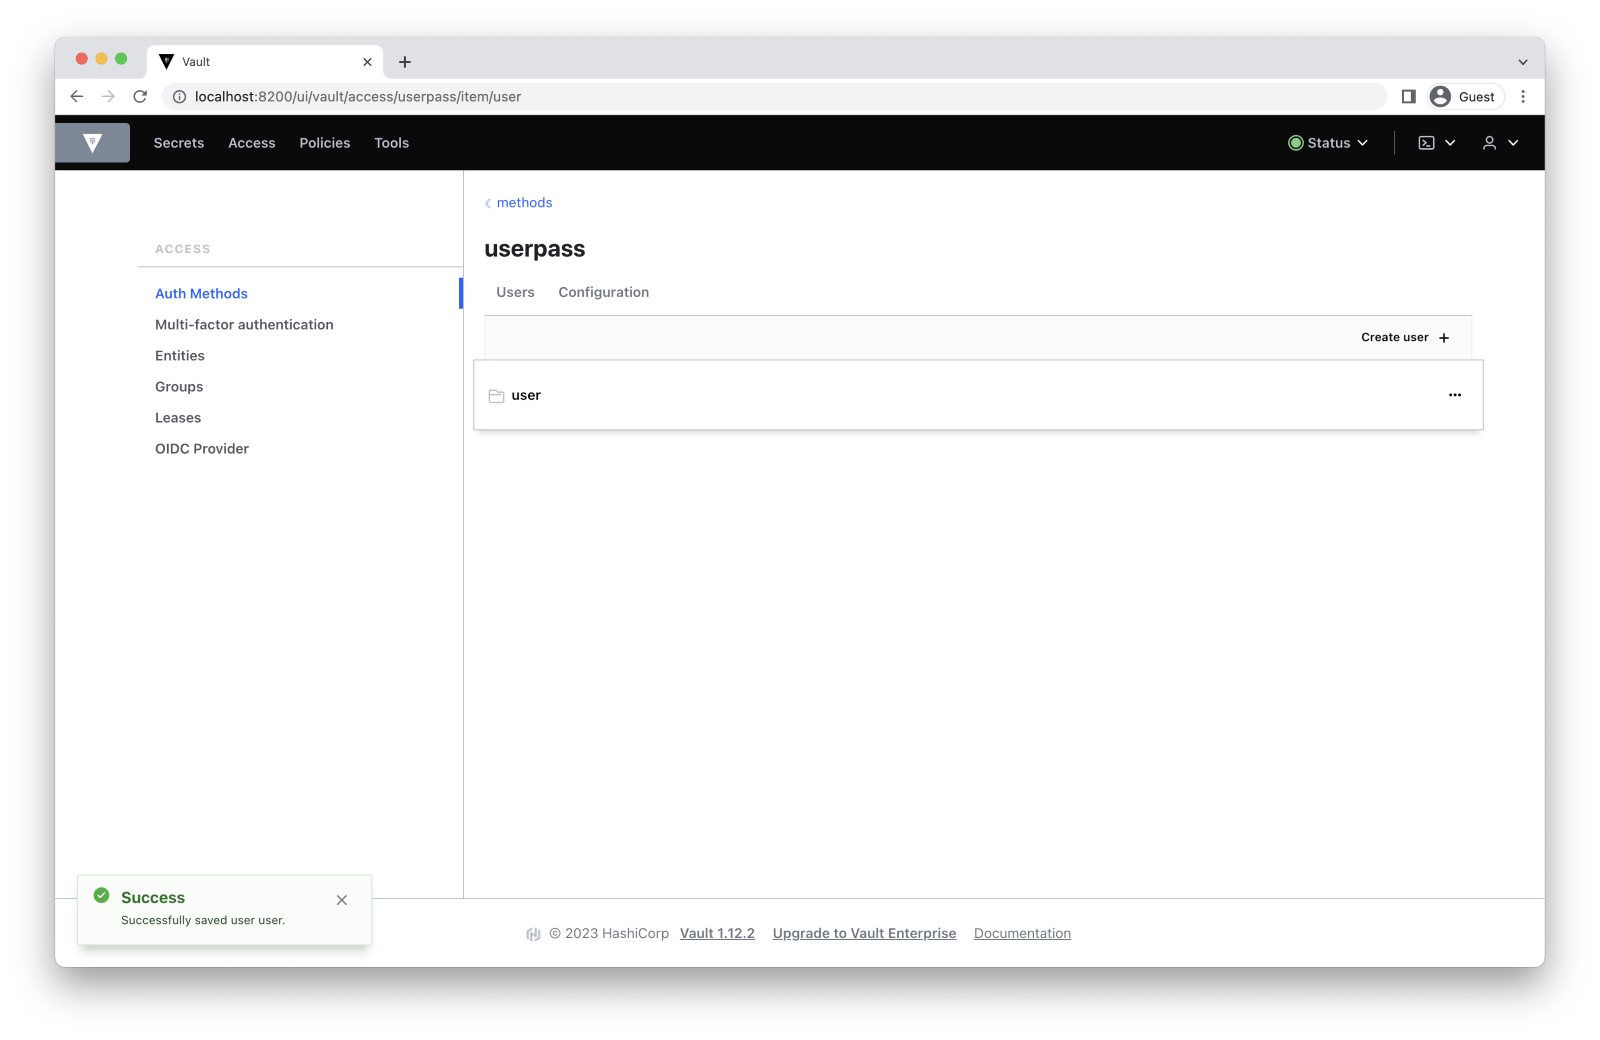
We created a user with username user and password 1234. We also assigned this user to the policy we created.
Now we can log in as the new user:
$ vault login -method=userpass username=user password=1234
Success! You are now authenticated. The token information displayed below
# ...To do it in the web UI, let’s sign out from the root account using the dropdown menu in the right corner and then select the Username authentication method and enter our username and password.

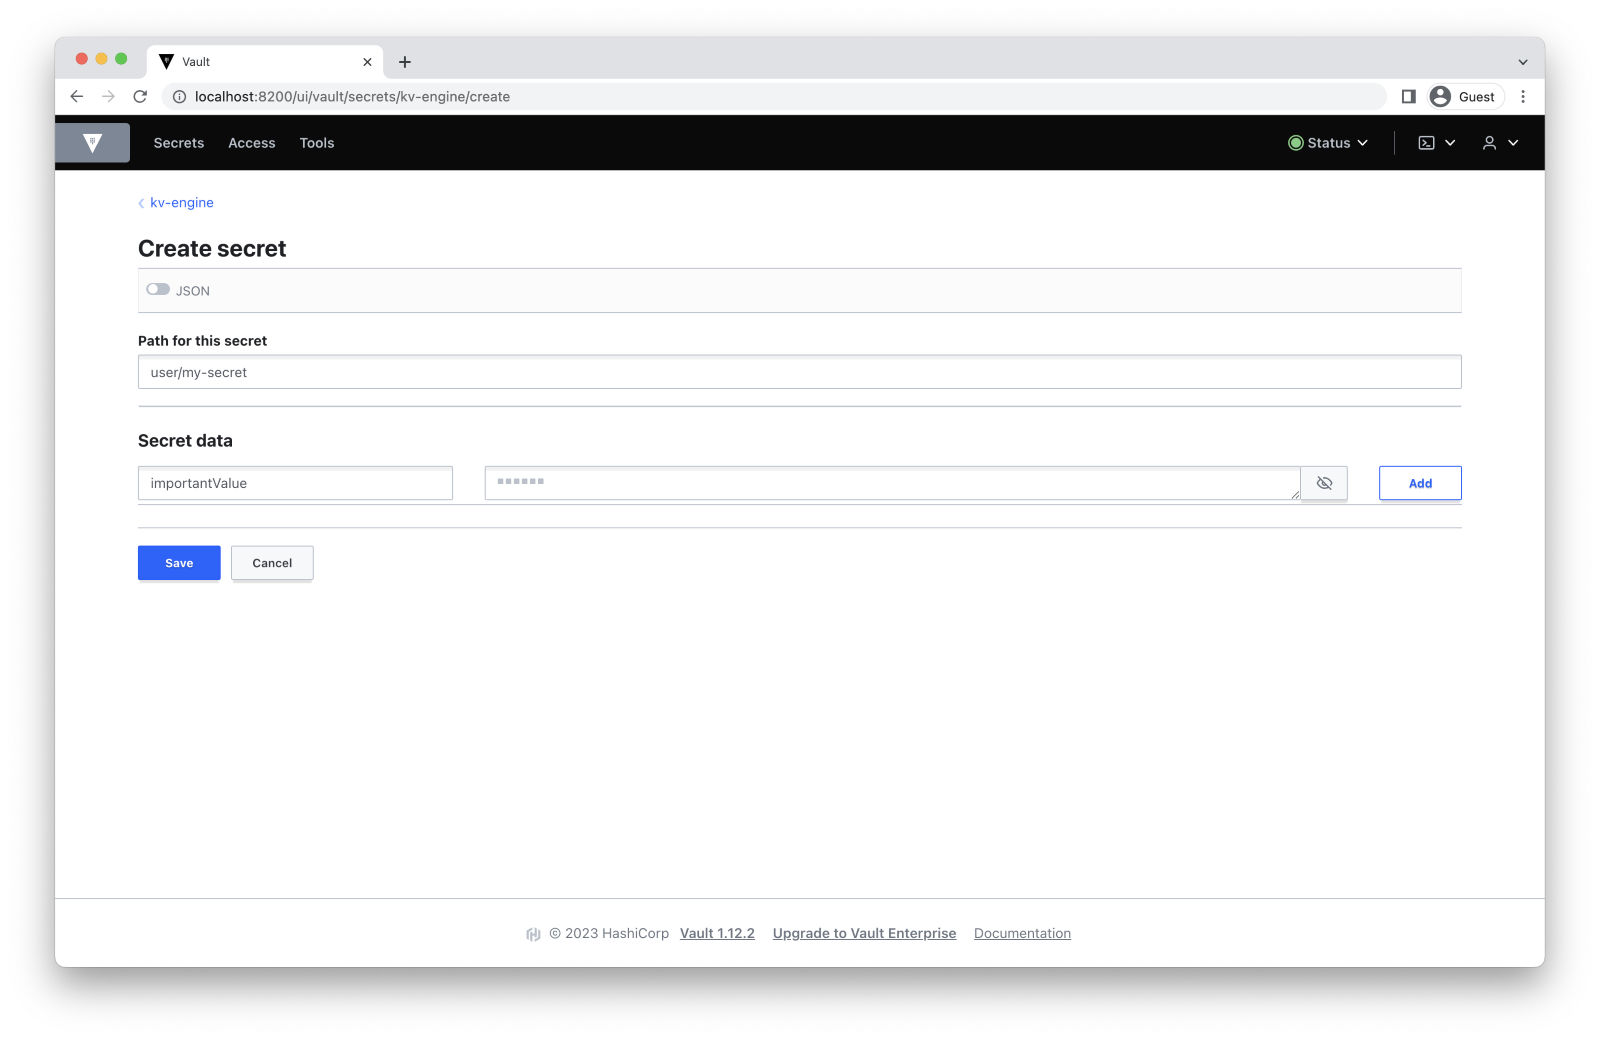
Let’s now put something inside our home directory:
$ vault kv put -mount=kv-engine user/my-secret importantValue=secret
======== Secret Path ========
kv-engine/data/user/my-secret

======= Metadata =======
Key            	Value
---            	-----
created_time   	2022-12-29T16:18:45.076362889Z
custom_metadata	<nil>
deletion_time  	n/a
destroyed      	false
version 1 Follow this path to create a secret: Secrets -> kv-engine/ -> Create Secret.
We can confirm that our secret was added by running the following command:
$ vault kv list kv-engine/user/
Keys
----
my-secretTo find your secret in the KV engine using Vault’s UI, follow this path: Secrets -> kv-engine/ -> user/.

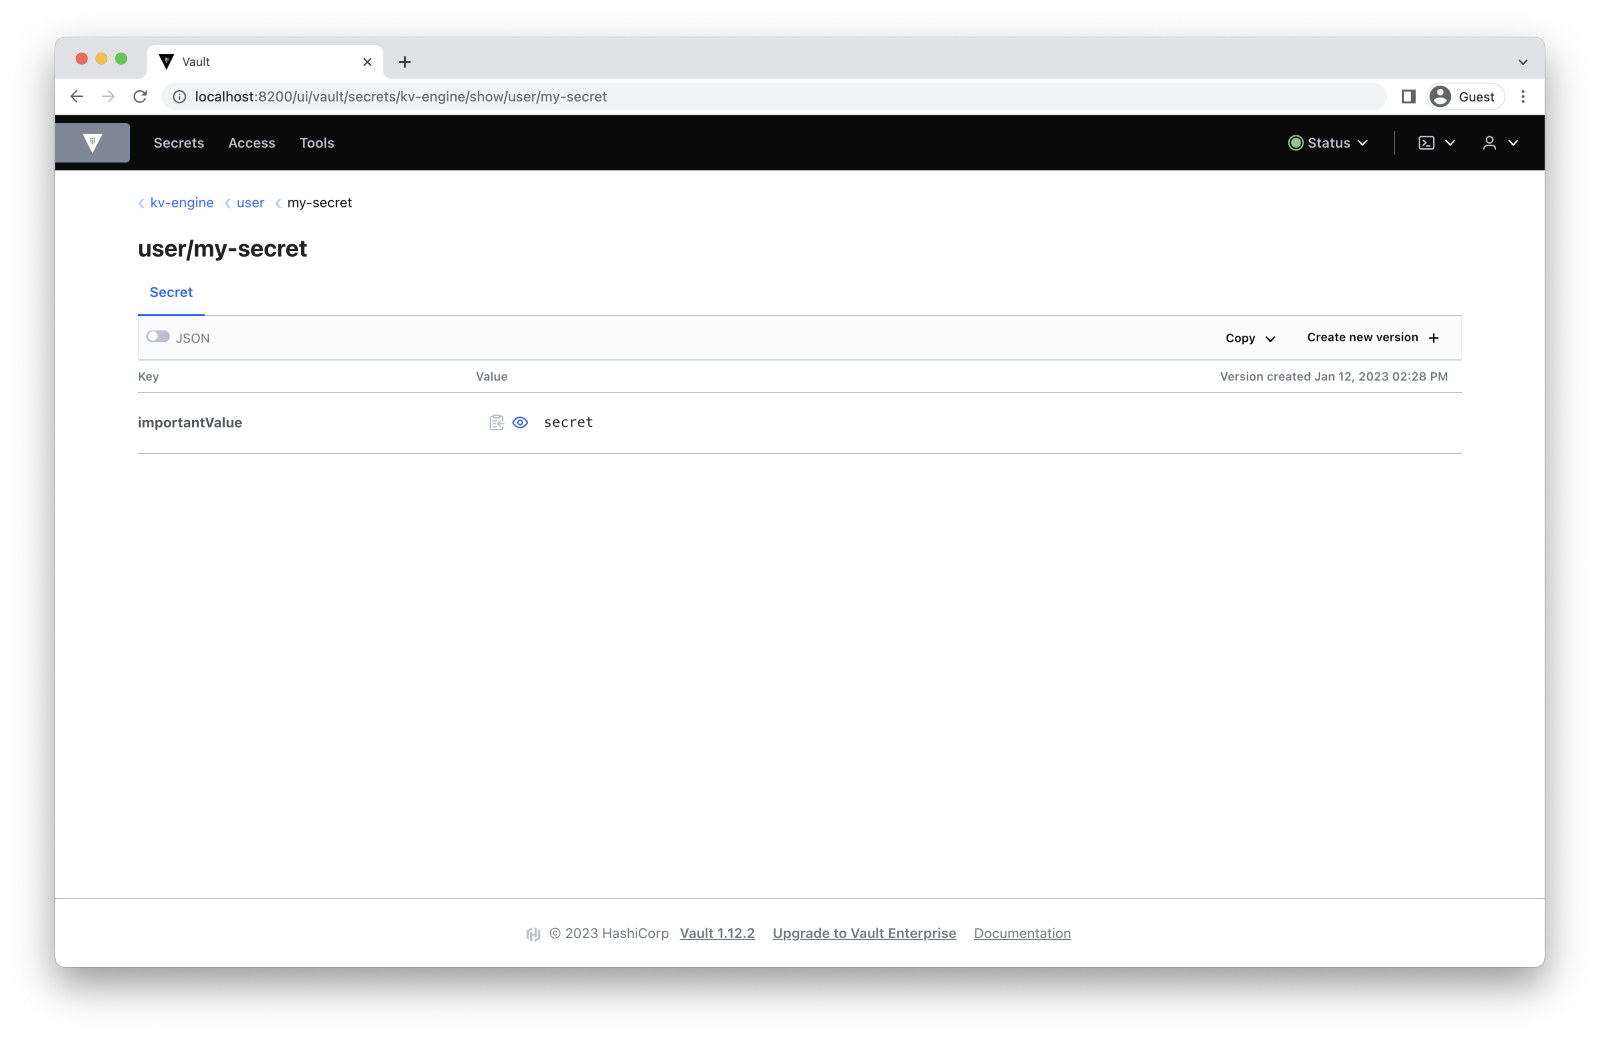
Great! Everything works properly. Let’s try to read the secret that we just added:
$ vault kv get -mount=kv-engine user/my-secret
======== Secret Path ========
kv-engine/data/user/my-secret

======= Metadata =======
Key            	Value
---            	-----
created_time   	2022-12-29T16:18:45.076362889Z
custom_metadata	<nil>
deletion_time  	n/a
destroyed      	false
version        	1

========= Data =========
Key           	Value
---           	-----
importantValue	secret
Read the secret in the KV engine by following this path: Secrets -> kv-engine/ -> user/ -> my-secret.
Let’s verify that our policy works by trying to save a new secret outside the user’s home directory:
$ vault kv put -mount=kv-engine my-secret foo=bar
Error writing data to kv-engine/data/my-secret: Error making API request.
URL: PUT http://vault-server:8200/v1/kv-engine/data/my-secret
Code: 403. Errors:
* 1 error occurred:
* permission denied
Follow this path to attempt to create a secret: Secrets -> kv-engine/ -> Create secret.
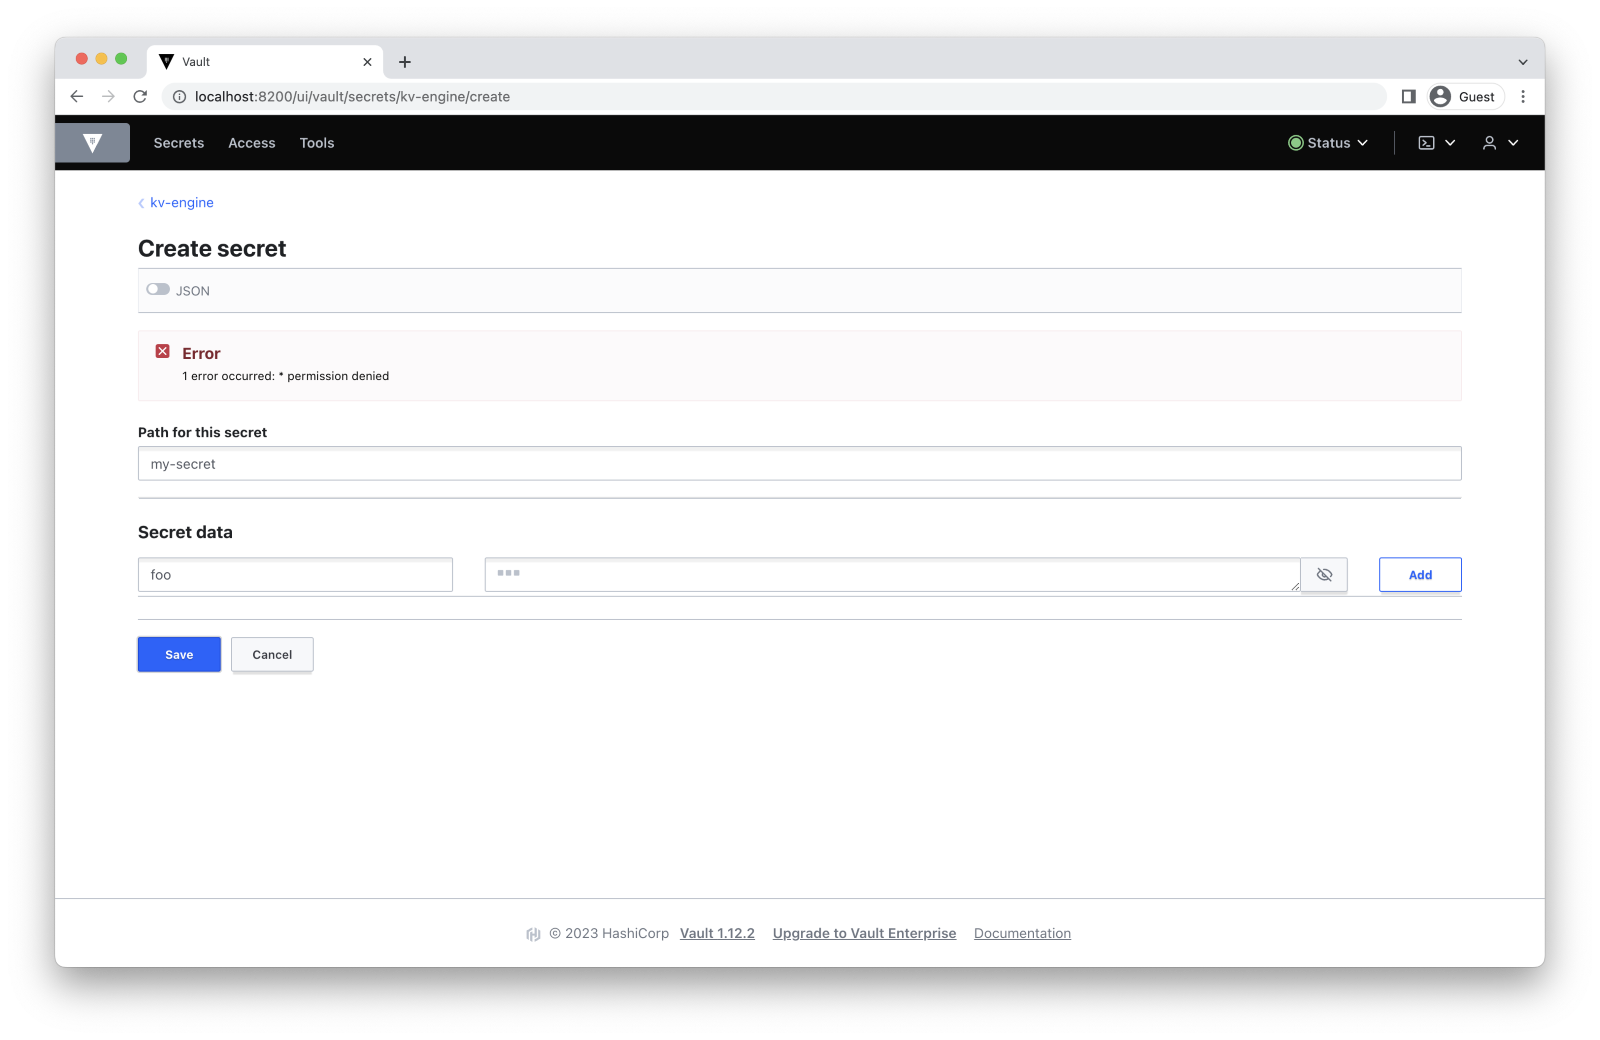
Users cannot read or store secrets outside their home directory, just like we intended.
Read also
Infrastructure Automation: 7 DevOps Tools for Orchestration, Secrets Management, and Monitoring
Discover how to automate your IT infrastructure with the right DevOps tools and increase the efficiency of your operations.
Using the cubbyhole engine for secure secrets sharing
Let’s try out the cubbyhole secrets engine. To share secrets, we can use Vault’s cubbyhole response wrapping. When reading a secret, we can add an argument that will tell the secrets engine to wrap that secret in a single-use token that can later be unwrapped:
$ vault kv get -wrap-ttl=600 kv-engine/user/my-secret
Key Value
--- -----
wrapping_token: <WRAPPING_TOKEN>
wrapping_accessor: <WRAPPING_ACCESSOR>
wrapping_token_ttl: 10m
wrapping_token_creation_time: 2022-12-29 17:15:34.777258216 +0000 UTC
wrapping_token_creation_path: kv-engine/data/user/my-secret To wrap your secret in a single-use token, follow this path: Secrets -> kv-engine/ -> user/ -> my-secret -> Copy -> Wrap secret. Then, copy the generated token.

The output contains a wrapping token we can use later to unwrap the secret. The specified argument tells the cubbyhole how long the created token should be valid in seconds. In our case, the token will be valid for the next ten minutes.
Let’s unwrap it:
$ vault unwrap $WRAPPING_TOKEN
Key Value
--- -----
data map[importantValue:secret]
metadata map[created_time:2022-12-29T16:18:45.076362889Z custom_metadata:<nil> deletion_time: destroyed:false version:1] Follow this path to unwrap the token: Tools -> Unwrap. Then, paste WRAPPING_TOKEN.

As you can see, we successfully retrieved the secret. This token can be shared with any user, allowing us to safely share secrets without sending them in plaintext.
But what if we don’t want to copy the secret over and over just to share it with people? There is a solution.
Using policies to share secrets dynamically
Right now, we can only share secrets by wrapping them using the cubbyhole secrets engine. While it’s certainly better than sending them in plaintext, it still requires us to wrap and send secrets manually. What if we could share an existing secret without copying it?
The policy that we implemented before can help us with dynamic sharing. Let’s find out how to implement it.
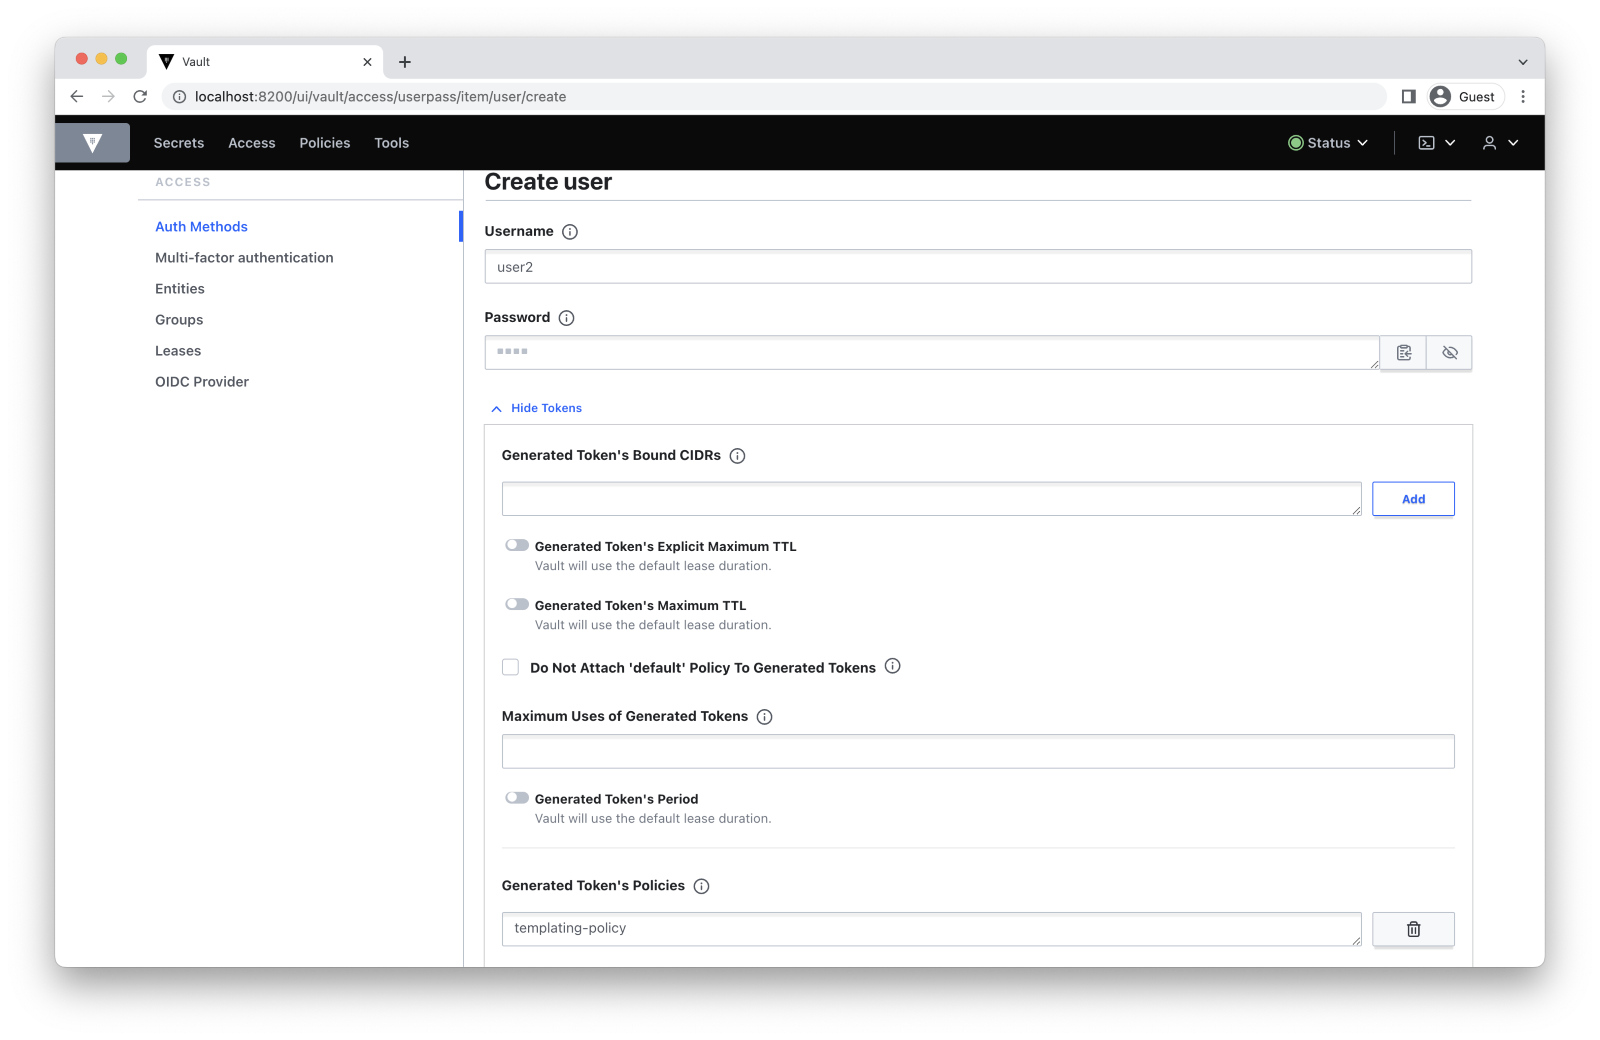
First, let’s create another user with whom we want to share our secrets:
$ vault login $ROOT_TOKEN
Success! You are now authenticated. The token information displayed below
# ...
$ vault write auth/userpass/users/user2 password=1234 policies=templating-policy
Success! Data written to: auth/userpass/users/user2 To create a new user, follow this path: Access -> Auth Methods -> userpass -> Create user.
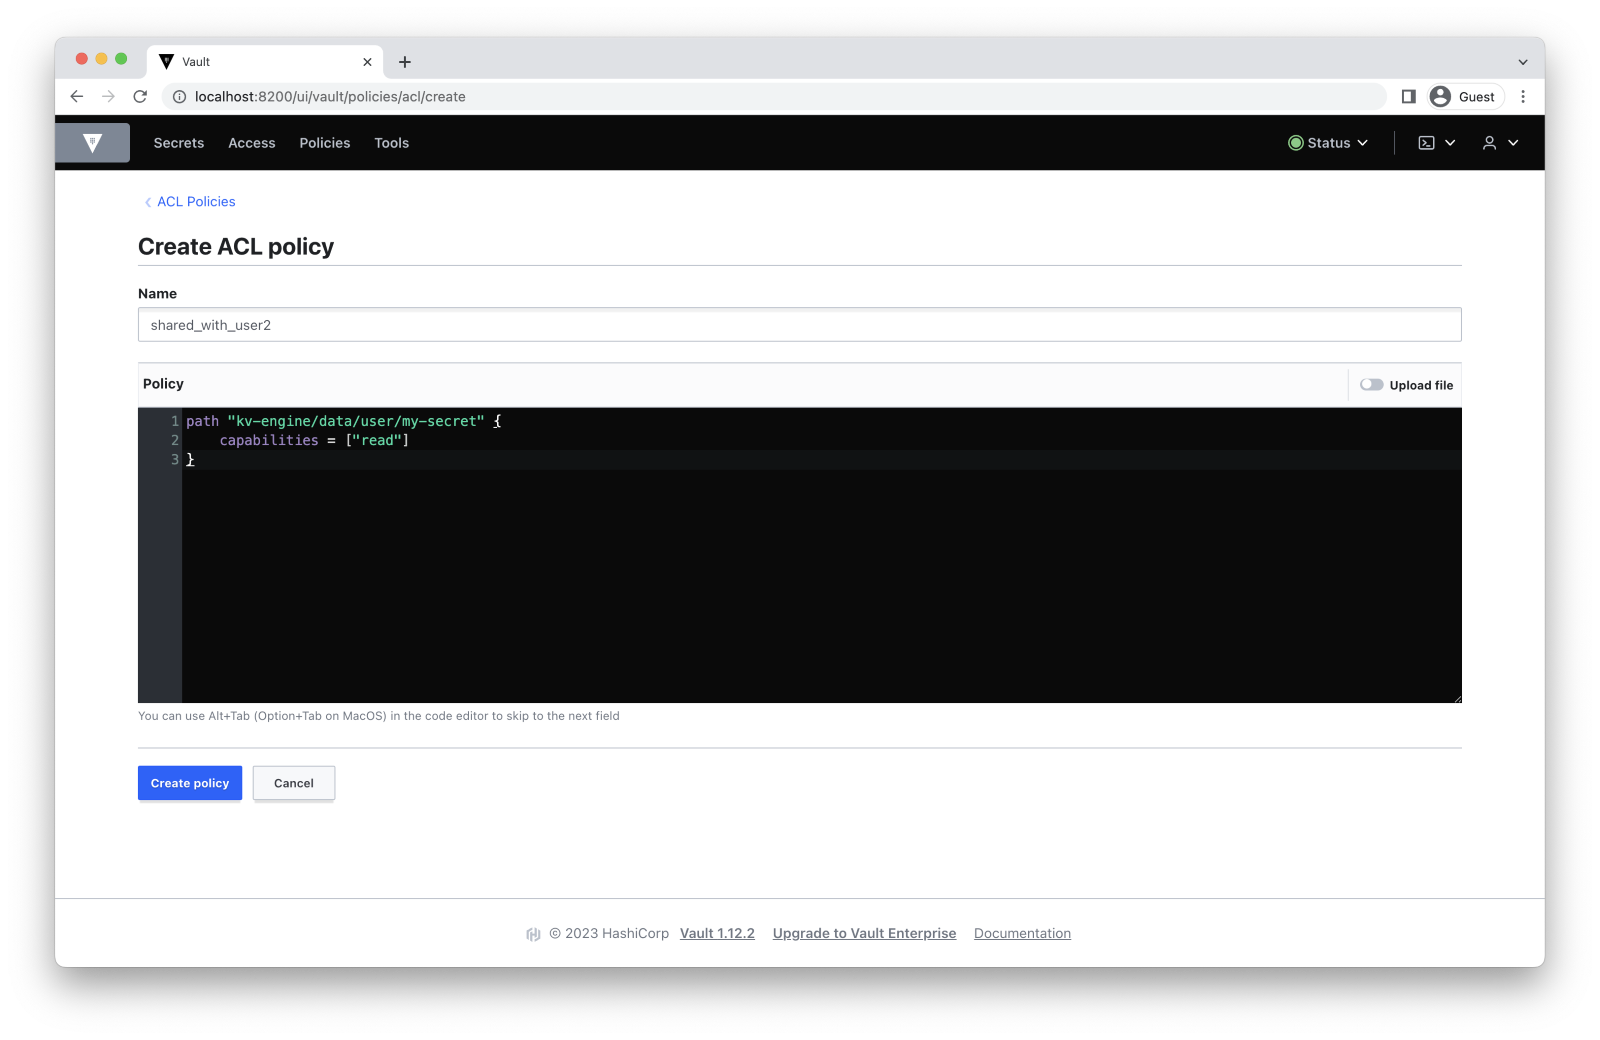
Now, we want this user to be able to read our secret inside kv-engine/data/user/my-secret. We can add another policy that allows our second user to read this secret:
# shared_with_user2.hcl
path "kv-engine/data/user/my-secret" {
capabilities = ["read"]
} We can also give this user the ability to change, delete, or do anything with the secret. In some cases, you might want to use these access rights too.
Now we should save this policy, just like we did before:
$ vault policy write shared_with_user2 shared_with_user2.hcl
Success! Uploaded policy: shared_with_user2 You can create another policy here: Policies -> Create ACL policy.
Finally, we add the new policy to user2:
$ vault write auth/userpass/users/user2/policies policies="templating-policy,shared_with_user2"
Success! Data written to: auth/userpass/users/user2/policiesYou can edit your user2 here: Access -> Auth Methods -> userpass -> user2 -> Edit user. Then, add the new policy in the Generated Token’s Policies section inside the Tokens dropdown menu.

When adding new policies to an existing user, it’s important to add old policies too, as we are overwriting all policies that the user had. In our case, we should also include a templating-policy.
Let’s log in as this user and check if our policies work:
$ vault login -method=userpass username=user2 password=1234
Success! You are now authenticated. The token information displayed below
# ...
$ vault kv get -mount=kv-engine user/my-secret
======== Secret Path ========
kv-engine/data/user/my-secret

======= Metadata =======
Key            	Value
---            	-----
created_time   	2022-12-29T16:18:45.076362889Z
custom_metadata	<nil>
deletion_time  	n/a
destroyed      	false
version        	1

========= Data =========
Key           	Value
---           	-----
importantValue secret 
You can find the secret here: Secrets -> kv-engine/ -> user/ -> my-secret.

Now user2 can read this secret without needing to wrap and unwrap it. Also, if the first user changes the secret, the second user will see the latest version. This becomes extremely handy if we know that, at some point, we might want to change the secret, and some people should immediately have access to the latest version.
Creating and assigning policies to users manually can quickly become tedious, so what can we do to make it easier? Can we somehow automate it?
Read also
Internal Security Audit Checklist for Increasing Product Quality
Are you 100% sure your software can securely handle user data? Explore our comprehensive internal security audit checklist for implementing the best security testing practices into your development lifecycle!
Automating Vault
You can configure Hashicorp Vault to strengthen security automatically. The Vault client that we used just sends requests to the server’s API. This API can be used to control every aspect of Vault. So we can use any method of sending these requests. Vault has many libraries for many different programming languages that can be used to automate everything we do manually:
- Vault SDK for Go
- hvac (HashiCorp Vault API Client) for Python
- Ruby Vault for Ruby
- node-vault for Node.js
- VaultSharp for .NET
For example, we can create our API server to communicate with the Vault server using one of these libraries depending on the language used for our project. Our server can expose a higher-level API, allowing users to easily create accounts; store, read, and share data; etc.
This kind of automation easily solves the tedious task of creating and assigning policies. You can find all libraries that communicate directly with Vault’s API in the HashiCorp Vault documentation, for example, the official Go and Ruby libraries as well as a lot of community libraries. You can even build your own library using Vault’s official API documentation.
Conclusion
In this article, we discussed the reasons for and consequences of secrets sprawl and how to prevent them using the HashiCorp Vault secrets management tool.
By securing your secrets effectively, you can protect your company’s reputation, maintain customer trust, and avoid the financial and legal repercussions associated with data breaches. In this article, you’ve learned proactive steps towards enhancing your organization’s security.
If you’d like to bring your organization’s security to a new level and protect your software from security breaches and any kinds of malicious attacks, our web development team with expertise in cybersecurity will be happy to share Apriorit’s experience and build a secure environment for your needs.
Enhance your project protection!
Let Apriorit’s cybersecurity experts safeguard sensitive data, mitigate risks, and secure your development process.
Have a question?
Ask our expert!
VP of Innovation and Technology, Canada Branch Director


