 Skip to main content

Collecting telemetry data is the cornerstone of any cybersecurity solution, as it allows your software to monitor and handle system events. In macOS, the only way to collect extensive data about what’s happening in the system is by using the Endpoint Security (ES) framework.
If you don’t migrate from OpenBSM to Endpoint Security, your cybersecurity solution won’t be able to fully collect device telemetry data, such as data on process monitoring and login activity. However, some challenges can arise when integrating this framework.
In this article, we take a practical look at Endpoint Security, including features it provides and different ways to use it. You’ll also find an example of developing a simple system extension for process monitoring. This article will be helpful for cybersecurity product leaders looking to enhance their solutions with efficient macOS support for telemetry collection.
Contents:
- Why collect telemetry data?
- Endpoint Security: main events, components, and features
- How to integrate Endpoint Security into your cybersecurity solution
- Using Endpoint Security as a standalone product
- Using Endpoint Security as a separate system extension
- Setting up communication with an ES-based system extension using XPC
- Conclusion
Why collect telemetry data?
If your team is working on a cybersecurity solution — data loss prevention, antivirus, forensics, threat hunting, EDR, XDR, etc. — you most likely need to implement a way to automatically collect, transmit, and analyze data from infrastructure monitoring. This is what telemetry collection is about.
Telemetry data, for example, might contain information about the launch of an unknown application. This way, using telemetry in cybersecurity software to prevent data leaks and provide security specialists with extensive information for incident investigation.
Let’s break down the main advantages your business gains with correctly configured telemetry data collection in your macOS cybersecurity software:
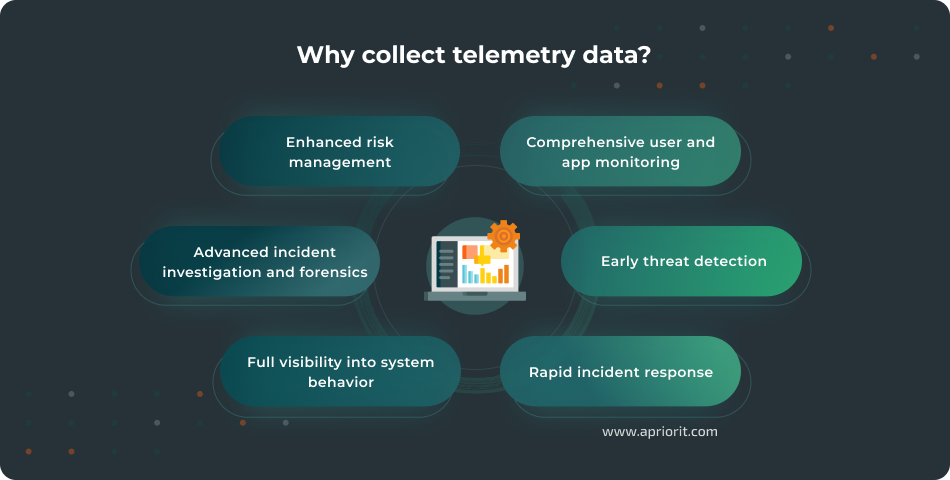
- Comprehensive user and app monitoring. Telemetry data helps your product efficiently track user authentication events like Touch ID, sudo, and login attempts. It also assists with monitoring third-party application behavior and access to sensitive resources. In macOS, this is especially useful for securing against third-party apps that users may install outside of the App Store.
- Early threat detection. On macOS, malware may use native APIs or blend into system processes, making signature-based detection challenging. Collecting telemetry data can help you spot threats proactively thanks to continuous monitoring of user behavior, network traffic, and endpoint events.
- Rapid incident response. Access to granular, real-time data empowers your security teams to isolate compromised systems, trace attack pathways, and respond faster when incidents occur.
- Full visibility into system behavior. Telemetry data offers a holistic view across networks, endpoints, users, and applications, reducing blind spots and enabling organizations to better understand their security posture. For example, telemetry data collection and analysis can help your macOS solution spot early threat signs like unusual process executions, file system modifications, and unexpected network connections.
- Advanced incident investigation and forensics. When a security event occurs, telemetry data provides historical context about the incident, helps trace the root cause, and enables faster remediation and patching.
- Enhanced risk management. Data-driven insights allow organizations to identify vulnerabilities and prioritize remediation efforts based on real activity and trends.
macOS environments present unique security challenges due to their architecture and specific threats coming from malicious actors. If your cybersecurity solution supports this operating system, make sure to use Endpoint Security for collecting telemetry data, as this is a macOS-specific framework. In the next section, we explore this framework in detail.
Looking to enhance your macOS solution’s security?
Focus on your business goals and let Apriorit developers do all the tech work for you!
Endpoint Security: main events, components, and features
Endpoint Security is Apple’s framework that provides a C API for monitoring and controlling system events. ES allows your team to both collect information about and block system events, thus replacing Kernel Authorization KPIs.
Your team can leverage Endpoint Security to work with notification and authorization events:
- Notification events have already occurred in a system, and therefore their execution can’t be affected. They can be useful, for example, for collecting telemetry data.
- Authorization events are scheduled to occur but require permission to execute from the Endpoint Security client. These events allow your developers to block certain activities like malicious process execution or restrict file access, similar to how antivirus software works.
Since we are looking at ES from the perspective of collecting telemetry data, we’ll mainly focus on notification events. The list of supported events is quite extensive and covers the following types:
- Process activities like
fork,exec, andexit - File-system activities like
open,close, andwrite - Authentication activities like
touch_idandpassword - Login activities like
login,logout,openssh_login,openssh_logout, andscreensharing_attach - Malware detection like
malware_detectedandmalware_remidiated - Memory mapping like
mmapandmprotect - Code signing changes like
signature invalidation - Socket activities like
bindandconnect - Kernel activities like
kextload,kextunload, andiokit_open - Mounting events like
mount,unmount, andremount
Note: Although these events are similar to system calls, they don’t correspond to them directly. For example, creating a process using the posix_spawn function results in both fork and exec events. If a process crashes, you’ll still see an exit event, even though no explicit exit() system call was made.
Let’s take a closer look at the main components and features of the Endpoint Security API:
1. Client management
The es_client_t type is the main entity responsible for connecting to Endpoint Security. Your developers can manage the client lifecycle using the following functions:
es_new_client_result_t es_new_client(es_client_t** client, es_handler_block_t handler);
es_return_t es_delete_client(es_client_t* client);2. Subscription management
Using the es_subscribe function, your developers can subscribe your application to events you want to monitor. Each supported event corresponds to one of the es_event_type_t enumeration types: ES_EVENT_TYPE_NOTIFY_FORK, ES_EVENT_TYPE_NOTIFY_OPEN, etc.
es_return_t es_subscribe(es_client_t* client, const es_event_type_t* events, uint32_t event_count);
es_return_t es_unsubscribe(es_client_t* client, const es_event_type_t* events, uint32_t event_count);
es_return_t es_unsubscribe_all(es_client_t* client);3. Event handling
Once subscribed, your application receives messages about events for processing. Thus, your solution can monitor, process, and respond to system events.
Note that Endpoint Security won’t send a new event to your application until your app processes the previous event. Developers should keep this in mind during implementation and avoid performing any long-running tasks in an event handler block (such as CPU-intensive work or multiple I/O operations).
Pro tip: If your project requires execution of long-running tasks in an event handler block, we recommend using a separate dispatch queue and asynchronous execution. When applying asynchronous execution, use the es_retain_message/es_release_message API for correct lifecycle management of the es_message_t object. Otherwise, you’ll face undefined system behavior.
Here are a few functions that can help your security products monitor and respond to system events:
void es_retain_message(const es_message_t* msg);
void es_release_message(const es_message_t* msg);4. Muting events
Say your application processes a large number of events and you want to reduce the load or filter out unnecessary information. ES allows you to mute certain events so they never reach your client, improving performance and minimizing noise. You can mute events based on a process’s audit token or based on the path to the executable file.
Here are four functions for event filtering that can help you suppress specific types of events or all events originating from a particular process or file system location:
es_return_t es_mute_process(es_client_t* client, const audit_token_t* audit_token);
es_return_t es_mute_process_events(es_client_t* client, const audit_token_t* audit_token, const es_event_type_t* events, size_t event_count);
es_return_t es_mute_path(es_client_t* client, const char* path, es_mute_path_type_t type);
es_return_t es_mute_path_events(es_client_t* client, const char* path, es_mute_path_type_t type, const es_event_type_t* events, size_t event_count);With basics in mind, let’s move to the practical part and explore ways to integrate Endpoint Security into your product and ensure efficient threat response.
Read also
How to Enhance Your Cybersecurity Platform: XDR vs EDR vs SIEM vs IRM vs SOAR vs DLP
Find out how to choose the most relevant vector to grow your cybersecurity solution. Leverage expert tips to build a platform that aligns with modern security trends and improves threat detection and response.

How to integrate Endpoint Security into your cybersecurity solution
There are two main ways to use Endpoint Security for gathering telemetry data:
1. As a standalone product
2. As a separate system extension
Below, we take a close look at each of them and provide practical examples. But first, let’s discuss two nuances your team must be aware of before working with Endpoint Security:
- You can’t use Endpoint Security without the
com.apple.developer.endpoint-security.cliententitlement issued by Apple. To obtain this entitlement, you must send a request to Apple describing what application your team is developing and why your team needs access to ES. Otherwise, distribution of the application will be severely restricted, as it can’t be launched on user machines with enabled system integrity protection (SIP). When planning your development process, keep in mind that waiting for entitlement may take time: from a few weeks to a month, or even longer. - To distribute a product that uses ES, your application needs not only the correct entitlement but also a Provisioning Profile. If your team has previously shipped your app as a single binary, this might introduce some challenges, as your developers will now have to wrap your application in a bundle.
1. Using Endpoint Security as a standalone product
If your application supports C API calls, your team can integrate Endpoint Security into your product as a regular C library. This is quite a convenient approach that can save you the effort of developing a separate system extension.
Let’s move to a practical example and implement process monitoring in C. For this purpose, we need to monitor fork, exec, and exit events, for which the types ES_EVENT_TYPE_NOTIFY_FORK, ES_EVENT_TYPE_NOTIFY_EXEC, and ES_EVENT_TYPE_NOTIFY_EXIT are responsible (respectively).
1. We’ll start by creating an ES client using the es_new_client function and subscribing to events we are interested in via the es_subscribe function. In this example, we’ll make a separate dispatch queue for asynchronous event processing. Such an approach is crucial if you’re planning to do a lot of work in the event handler.
#include <EndpointSecurity/EndpointSecurity.h>
#include <bsm/libbsm.h>
#include <dispatch/dispatch.h>
#include <stdio.h>
#include <stdlib.h>
static dispatch_queue_t queue = NULL;
int main(int argc, char* argv[]) {
queue = dispatch_queue_create("com.test.queue", DISPATCH_QUEUE_SERIAL);
es_client_t* es_client = NULL;
es_new_client_result_t result = es_new_client(&es_client, ^(es_client_t* client, const es_message_t* message) {
es_retain_message(message);
dispatch_async(queue, ^{
// TODO: Implement handle_event
handle_event(client, message);
es_release_message(message);
});
});
if (result != ES_NEW_CLIENT_RESULT_SUCCESS) {
printf("Error: Unable to create ES client (%d)\n", result);
exit(EXIT_FAILURE);
}
es_event_type_t events[] = {ES_EVENT_TYPE_NOTIFY_FORK, ES_EVENT_TYPE_NOTIFY_EXEC, ES_EVENT_TYPE_NOTIFY_EXIT};
size_t num_events = sizeof(events) / sizeof(events[0]);
if (es_subscribe(es_client, events, num_events) != ES_RETURN_SUCCESS) {
puts("Error: Unable to subscribe to events");
es_delete_client(es_client);
exit(EXIT_FAILURE);
}
dispatch_main();
return 0;
}Note: Pay attention to correct error handling, as a client may not be created (for example) due to lack of privileges. You can find all possible error types and their descriptions in the ESTypes.h header file.
2. Now, we will implement the handle_event function, redirecting the processing of each event to a separate handler:
void handle_event(es_client_t* client, const es_message_t* message) {
switch (message->event_type) {
case ES_EVENT_TYPE_NOTIFY_FORK:
handle_fork(message);
break;
case ES_EVENT_TYPE_NOTIFY_EXEC:
handle_exec(message);
break;
case ES_EVENT_TYPE_NOTIFY_EXIT:
handle_exit(message);
break;
default:
printf("\nUnhandled event type: %d\n", message->event_type);
break;
}
}3. Next, we will extract more detailed data about the event and print it to the console. We can find the complete message structure and a description of each field in the ESMessage.h file.
void handle_fork(const es_message_t* message) {
const pid_t ppid = audit_token_to_pid(message->process->audit_token);
const pid_t pid = audit_token_to_pid(message->event.fork.child->audit_token);
const char* parent_process = message->process->executable->path.data;
const char* process = message->event.fork.child->executable->path.data;
const long time = message->time.tv_sec;
printf("\n== FORK ==\n"
"Parent [%d]: %s\n"
"Child [%d]: %s\n"
"Time: %ld\n",
ppid, parent_process,
pid, process,
time);
}
void handle_exec(const es_message_t* message) {
const pid_t ppid = message->process->ppid;
const pid_t pid = audit_token_to_pid(message->process->audit_token);
const char* parent_process = message->process->executable->path.data;
const char* process = message->event.exec.target->executable->path.data;
const long time = message->time.tv_sec;
printf("\n== EXEC ==\n"
"Parent [%d]: %s\n"
"Process [%d]: %s\n"
"Time: %ld\n",
ppid, parent_process,
pid, process,
time);
}
void handle_exit(const es_message_t* message) {
const pid_t pid = audit_token_to_pid(message->process->audit_token);
const char* process = message->process->executable->path.data;
const long time = message->time.tv_sec;
printf("\n== EXIT ==\n"
"Process [%d]: %s\n"
"Time: %ld\n",
pid, process,
time);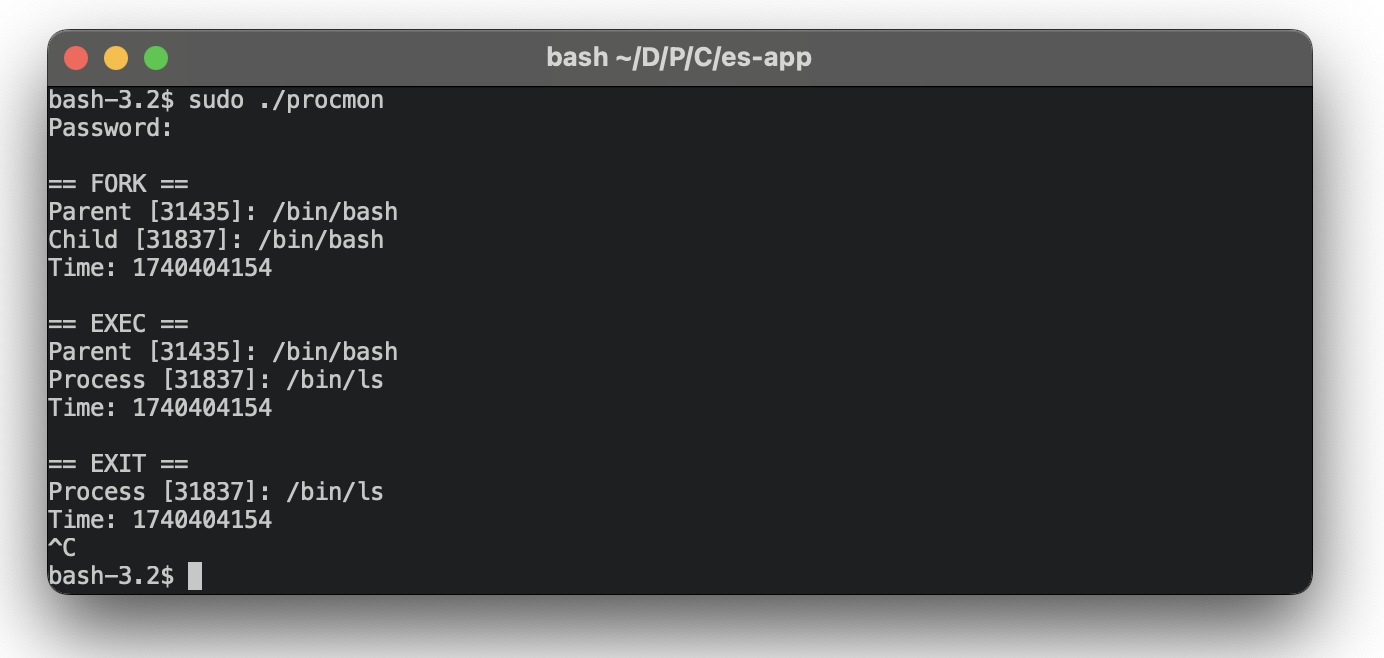
}4. Finally, we’ll test our application by running the ls utility from the terminal. In the logs of the monitoring process, we expect to see a fork of the shell process, the exec call directed to the ls binary, and an exit process. The screenshot below confirms that the application is working as expected.
As you can see, integrating ES as a standalone product into your cybersecurity application is quite straightforward and an easy way to collect telemetry data. Your team can use this approach to implement a standalone solution that collects user actions — for example, to provide a detailed report regarding launched apps and the total time a user spent in each application.
However, there are many challenges your team must know about. A standalone application can only be launched after system boot, which means that catching events early is nearly impossible. Effort is also needed to properly collect background data. Such an application can be implemented in the form of a daemon, for example. But this approach can lead to security drawbacks.
Related project
Cross-Platform Data Backup Solution Development: Windows, Android, macOS, iOS
See how the Apriorit team helped our client speed up the time to market, receive revenue at early project stages, and gather valuable feedback by launching reliable and user-friendly product versions for different operating systems.

2. Using Endpoint Security as a separate system extension
Apple recommends this approach to using macOS Endpoint Security Framework.
In our experience with a macOS security project, using ES as a system extension provides several essential advantages:
- Early boot availability. By enabling the
NSEndpointSecurityEarlyBootoption in your app’sInfo.plist, your team ensures that no third-party processes are allowed to run until all early boot clients have completed their first subscription. With this option enabled, Endpoint Security won’t miss events at late startup. - Support for interprocess communications. A system extension typically acts as a telemetry collector that gathers system-level data and passes it to the main application. Your team can ensure communication between components using the native macOS interprocess communication mechanism ー XPC.
- Improved security. A system extension built on Endpoint Security is more robust than a default daemon, as it can block signals with
AUTHevents and is more protected by the system itself. This makes it much less likely for your security solution to miss important information about malicious actions. - User-driven installation. Because system extensions operate with elevated privileges, users must explicitly approve their installation and grant them necessary permissions, such as full disk access. This extra step increases user transparency and reduces the risk of unauthorized behavior.
However, your team also faces a significant drawback ー development complexity. Interprocess communication and the need to develop a system extension based on Endpoint Security complicates development and can cause complexities during debugging versus a standalone approach. This trade-off must be weighed against the benefits mentioned above, with your project needs and goals in mind.
Introduced in macOS Catalina, system extensions are not just a replacement for kernel extensions in macOS. Rather, they are privileged applications that run in the user space. System extensions improve the security and stability of the operating system while letting your team write less code in the kernel.
At Apriorit, we have extensive experience developing macOS system extensions with DriverKit and Endpoint Security. You can find more details and practical examples in our article on working with system extensions.
As we’ve mentioned, to ensure communication between your application and a system extension based on Endpoint Security, your team will need to use XPC. Let’s explore how to work with this mechanism.
Related project
Custom Cybersecurity Solution Development: From MVP to Support and Maintenance
Explore the astonishing results of a 13+ year-long journey, from project discovery and MVP creation to support and continual enhancement of a comprehensive cybersecurity platform.

Setting up communication with an ES-based system extension using XPC
The XPC framework is based on the concept of interaction between two parties: a client and a server (listener). The server listens for incoming connections, and the client initiates them by creating a session with the server. Once the connection has been established, the two parties exchange all necessary data in the dictionary format.
XPC offers both a high-level API for Swift (NSXPCConnection) and a low-level C API that allows your team to use different programming languages.
Below, we explore the low-level API and show a practical example of creating an XPC endpoint inside a system extension based on Endpoint Security.
Step 1. First, we need to come up with an identifier for the XPC service that the client will use when connecting to the server. Let’s make it com.testing.xpcservice.
Step 2. Next, we must add this identifier to Info.plist in the extension with the NSEndpointSecurityMachServiceName key. Otherwise, the client won’t be able to establish a connection.

Step 3. Now, let’s create an XPC service using xpc_connection_create_mach_service.
In the parameters, we pass the identifier, the queue in which messages will be processed, and the XPC_CONNECTION_MACH_SERVICE_LISTENER constant, which signals that this service will be the server that accepts connections.
xpc_connection_t service = xpc_connection_create_mach_service(
"com.testing.xpcservice",
dispatch_get_main_queue(),
XPC_CONNECTION_MACH_SERVICE_LISTENER
);Step 4. We should also take care of connection security and protect our extension from malicious actors. We want our application to only be able to communicate with the server. One way to implement this is to check the client’s signature and allow a connection only if the signature contains our Team Identifier. The xpc_connection_set_peer_code_signing_requirement function will help us with this:
int xpc_connection_set_peer_code_signing_requirement(xpc_connection_t connection, const char* requirement);This function accepts a connection object and a signature requirement string. You can explore code requirements in Apple’s documentation. For example, the requirements for Team ID “ABCDEF1234” would look like this:
anchor trusted and certificate leaf[subject.OU] = "ABCDEF1234"Step 5. Now, we must set up the event handler, which will handle incoming connections in the external handler and new messages in the internal handler. To do so, we’ll use the xpc_connection_set_event_handler function.
xpc_connection_set_event_handler(service, ^(xpc_object_t peer) {
if (xpc_connection_set_peer_code_signing_requirement(peer, "anchor trusted and certificate leaf[subject.OU] = \"ABCDEF1234\"") != 0) {
os_log(OS_LOG_DEFAULT, "Signature is invalid");
return;
}
if (client_connection) {
os_log(OS_LOG_DEFAULT, "Connection is already established");
return;
}
client_connection = peer;
xpc_connection_set_event_handler(client_connection, ^(xpc_object_t event) {
xpc_type_t type = xpc_get_type(event);
if (type == XPC_TYPE_DICTIONARY) {
// Process message from a client
}
else if (type == XPC_TYPE_ERROR) {
os_log(OS_LOG_DEFAULT, "XPC Service error: %s\n",
xpc_dictionary_get_string(event, XPC_ERROR_KEY_DESCRIPTION));
if (event == XPC_ERROR_CONNECTION_INTERRUPTED || event == XPC_ERROR_CONNECTION_INVALID) {
client_connection = NULL;
}
}
});
xpc_connection_activate(client_connection);
});
xpc_connection_activate(service);Note: In our example, we intentionally skip processing messages from the client to simplify the implementation. Don’t forget to check the signature of the client and handle errors correctly to eliminate possible security vulnerabilities. Also, make sure to activate the connection using the xpc_connection_activate command.
Step 6. At this point, we will implement functionality for sending messages to the client by creating an empty dictionary and filling it with data received from Endpoint Security. We’ll be sending messages using xpc_connection_send_message and releasing resources.
void send_event_to_client(const char *event_type,
int64_t parent_pid,
int64_t pid,
const char *parent_path,
const char *child_path,
int64_t event_time) {
if (client_connection == NULL) {
return;
}
xpc_object_t message = xpc_dictionary_create_empty();
xpc_dictionary_set_string(message, "event", event_type);
xpc_dictionary_set_int64(message, "time", event_time);
if (parent_pid != -1)
xpc_dictionary_set_int64(message, "parent_pid", parent_pid);
if (pid != -1)
xpc_dictionary_set_int64(message, "pid", pid);
if (parent_path)
xpc_dictionary_set_string(message, "parent_path", parent_path);
if (child_path)
xpc_dictionary_set_string(message, "child_path", child_path);
xpc_connection_send_message(client_connection, message);
xpc_release(message);
}Step 7. At this point, implementation of the server part is complete. We will now move to creating a connection with the client:
xpc_connection_t connection = xpc_connection_create_mach_service(
"com.testing.xpcservice",
dispatch_get_main_queue(),
0);The last argument in this case is 0, unlike for the server, where a special value is used to indicate the listening service.
Step 8. We’ll configure the handler and activate the connection the same way we did in the extension:
xpc_connection_set_event_handler(connection, ^(xpc_object_t event) {
handle_event(event);
});
xpc_connection_activate(connection);After the connection is established and xpc_connection_activate is called, the server will not automatically start sending messages to the client. To start communication, the client must send any message to the server. For example, we can send a ping message to the server to check if it is working correctly. For simplicity, we’ll send an empty message, as this will also wake up the connection:
xpc_object_t message = xpc_dictionary_create_empty();
xpc_connection_send_message(connection, message);To check the correctness of implementation, let’s install the extension into our solution, connect it to the client, and run the ls utility, as in the previous test.
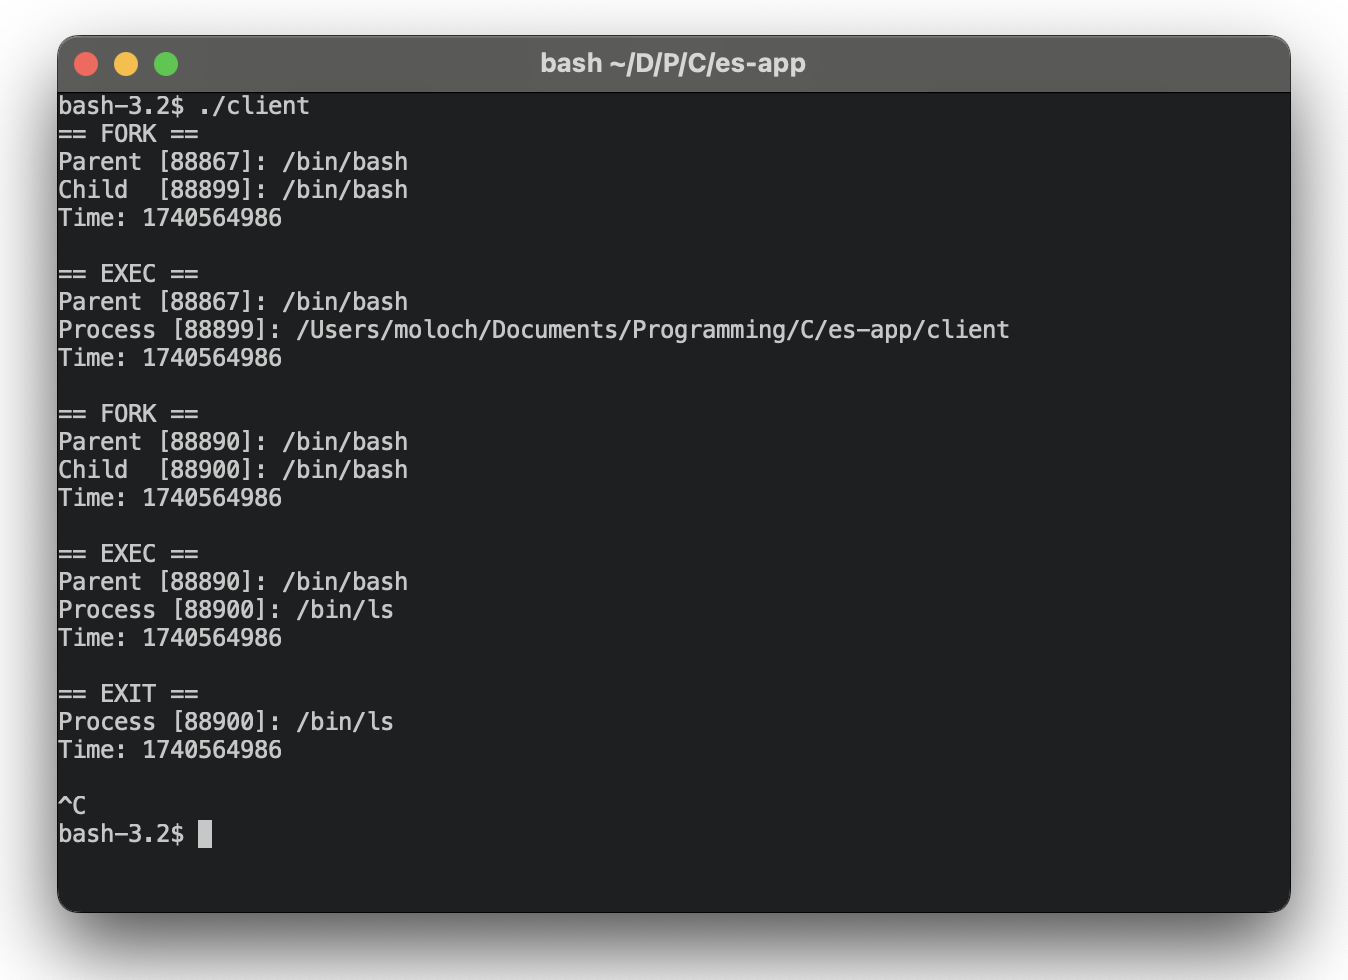
As you can see, all communications are successfully configured, and our application can now work with an ES-based system extension to collect telemetry data.
Conclusion
Endpoint Security is a key component for collecting telemetry data on macOS and is a recommended alternative to the previously deprecated OpenBSM subsystem. It provides a comfortable API for interacting with the kernel and doesn’t limit users.
However, your team might face challenges when implementing telemetry data collection, from choosing an approach for ES integration to executing it within time and budget limits.
At Apriorit, we have experienced and skilled macOS developers and cybersecurity engineers who are ready to help you:
- Analyze your requirements and choose the most suitable development approaches and tools
- Create robust and protected system extensions for your macOS project
- Assist with any questions and tasks you have in mind, no matter how complex
Partner with us to build cybersecurity solutions that are fully optimized for Apple environments and aligned with strict industry requirements.
Ready to level up your cybersecurity project?
Deliver the exact macOS application you have in mind with Apriorit’s top developers by your side!


