



Most software products reach a point where the system works, but only for what it was originally built to do. Adding a mobile client, connecting a payment provider, or giving a partner access to your data requires either rebuilding core logic or building bridges between components that were never meant to talk to each other.
A REST API layer solves this by giving your system a standardized communication channel that other services, clients, and platforms can use without touching your existing codebase.
In this article, we walk through what REST API integration involves and why engineering teams choose to integrate a REST API over building custom integrations or modifying existing architecture. We use an order management system built on the MVC (Model-View-Controller) pattern as a practical example to show how a REST API layer gets added to an existing system, what that implementation looks like in code, and what to keep in mind when it comes to versioning and security.
This is a useful read for technical leaders who are evaluating REST API integration for an existing product, as well as for senior developers and architects planning the implementation.
Contents:
What is a REST API?
Representational State Transfer (REST) is an architectural style for designing communication between networked services.
A REST Application Programming Interface (API) defines a standardized interface that simplifies the exchange of data among different systems. Each system involved in this data exchange only needs to know what requests its counterparts accept and what responses they return. The specifics of their internal operations are not relevant and remain unknown to their counterparts.
In practice, most REST APIs are implemented over HTTP, which maps neatly onto REST’s core operations. Each request targets a resource (identified by a URL) using one of the standard HTTP methods:
Table 1: Standard HTTP methods
| Method | Purpose | Example |
|---|---|---|
| GET | Retrieve data | GET /api/users/123 — fetch user details |
| POST | Create new data | POST /api/users — create a new user |
| PUT/PATCH | Update existing data | PUT /api/users/123 — update the full user record |
| DELETE | Remove data | DELETE /api/users/123 — delete a user |
With REST APIs, data is exchanged in a predefined format. The most common format in modern web systems is JSON, although some still use XML.
Key benefits of REST API integration
Working with REST APIs offers both engineering and business benefits to product teams:
- Connectivity without rebuilding — A REST API lets your system expose its functionality to external consumers, such as mobile apps, third-party services, and partner platforms, without requiring a complete rewrite of the whole system. The same endpoint can serve a web front end, a mobile client, and an external integration simultaneously.
- Statelessness — REST APIs don’t store the client session state between requests, which means that servers can easily be split into multiple instances, and it’s easy to scale the application horizontally. At the same time, each request contains all the information load balancers need to successfully distribute traffic across servers.
- Scalability — Since REST is stateless and cache-friendly, it’s possible to add or replace individual API servers independently. Load balancers can distribute traffic across multiple instances, and caching can be applied at multiple levels — browser, CDN, API gateway — to reduce server load under high traffic.
- Interoperability — REST over HTTP works across languages and platforms, using widely supported formats such as JSON or XML. A Python back end can serve a JavaScript front end; a Java system can consume a Ruby API. The only requirement is knowing the request and response structure.
- Maintainability and fault isolation — As long as the interface contract stays intact, your development team can independently update or replace components exposed through a REST API. This makes testing and debugging more contained, since services are decoupled from each other. Plus, when components are separated, the risk of cascading failures decreases, especially with proper resilience patterns in place.
Beyond these internal benefits, businesses can also increase revenue by offering access to their product, service, or data on a paid basis via a custom REST API.
It’s also worth noting that while REST APIs offer a lot of flexibility due to their statelessness, working with this technology can also increase a product’s payload size. This may not be ideal for products and services that require real-time, low-latency communication.
Need stable and scalable API connections?
Let’s discuss how we can help you unlock new business value with seamless integrations. Our team will build and maintain your APIs to enhance system compatibility, data consistency, and operational efficiency.
When to add a REST API to an existing system
Before deciding on integrating a REST API, your team should assess both the technical readiness of your system and the business case for the investment. After all, not every connectivity problem requires a full REST API layer, and not every system is ready to support one without prior refactoring.
Below, we list several scenarios where REST API integration can bring your business the most value:
✓ Multi-platform product expansion. Say your system currently serves one type of client — a web front end. You need to add a mobile app, a desktop client, or a public-facing portal without duplicating backend logic. In this scenario, a REST API layer is exactly what you need, as it gives all of those clients a shared interface to work with.
The business logic stays in one place; the clients consuming it can be built and iterated on independently.
✓ Third-party service integration. Most payment providers, shipping carriers, identity verification services, and analytics platforms expose REST APIs themselves. Separating REST API and business layers allows you to change the connections of various third-party providers in the business layer without impacting the REST API. This also means that if you change the connections in the business layer, they will automatically be used in the REST API.
✓ Partner and ecosystem access. If other businesses need access to your system’s data or functionality, a REST API is the standard mechanism for exposing that access in a controlled and versioned way. For example, your partners or users will be able to build on top of your platform, automate procurement, or sync your data with their own tools.
✓ E-commerce and logistics orchestration. Inventory, courier network, and warehouse management systems need to coordinate across multiple external services in real time. They benefit the most from a REST API layer that standardizes communication between different services, especially when the number of integrations is expected to grow over time.
✓ Healthcare and IoT data flows. Laboratory equipment, connected devices, monitoring sensors, and other systems that aggregate data from external sources use REST APIs to receive, normalize, and route that data. The stateless request model works well here because each data event is discrete and doesn’t depend on the prior state.
✓ Financial services connectivity. Banking and FinTech systems typically connect to payment rails, compliance services, or financial data providers through REST APIs. The clear request–response contract and support for token-based authentication make REST a practical fit for environments with strict access control requirements.
Now that we’ve covered the key whats and whys, let’s take a look at a practical REST API integration example, starting with system extension planning.
Note: The following sections will be most useful to readers interested in technical details of REST API implementation. For information on security-focused REST API integration best practices and recommendations, please jump to the REST API security measures section.
Read also
How to Create Secure REST APIs in Node.js: A Practical Guide
Ensure your APIs are designed with security in mind from the start. Discover effective methods for building secure REST APIs in Node.js that will help you prevent breaches, improve system reliability, and support long-term growth.

Planning system extension via a REST API
To illustrate the practical side of a REST API implementation, we’ll look at an order management system built on the Model–View–Controller (MVC) pattern.
System overview
The system is structured into three separate, independent layers:
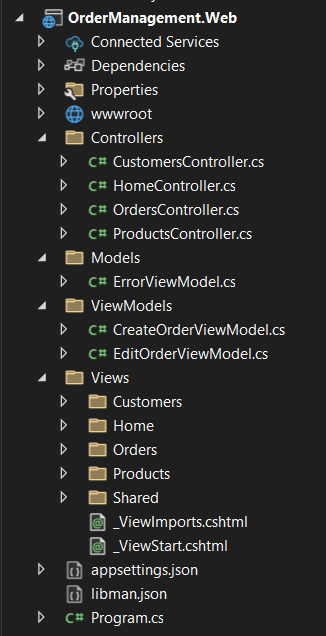
1) OrderManagement.Web handles user requests through a web interface. It contains controllers that process browser requests, views that manage UI interaction, and models that carry data between the browser and the application layer.

The controllers in this layer handle standard CRUD operations for orders. For example, the Index action retrieves all orders and passes them to a view. In turn, the Create action validates incoming form data, calls the service layer to persist the new order, and redirects on success or returns the form with an error message if something goes wrong:
// GET: Orders
public async Task<IActionResult> Index()
{
    var orders = await _orderService.GetAllOrdersAsync();
    return View(orders);
}

// POST: Orders/Create
[HttpPost]
[ValidateAntiForgeryToken]
public async Task<IActionResult> Create(CreateOrderViewModel viewModel)
{
    if (ModelState.IsValid)
    {
        try
        {
            await _orderService.CreateOrderAsync(viewModel.Order);
            return RedirectToAction(nameof(Index));
        }
        catch (Exception ex)
        {
            ModelState.AddModelError("", "Unable to create order. Please try again.");
        }
    }

    viewModel.Customers = await _customerService.GetCustomerDropdownItemsAsync();
    viewModel.Products = await _productService.GetProductDropdownItemsAsync();
    return View(viewModel);
}The views render order data in a structured table, with status badges, customer details, and action buttons:
<table class="table table-hover" id="ordersTable">
  <thead>
    <tr>
      <th>Order Number</th>
      <th>Customer</th>
      <th>Items</th>
      <th>Order Date</th>
      <th>Status</th>
      <th>Total</th>
      <th>Actions</th>
    </tr>
  </thead>
  <tbody>
    @foreach (var order in Model.OrderByDescending(o => o.OrderDate))
    {
      <tr data-status="@order.Status">
        <td>
          <a asp-action="Details" asp-route-id="@order.Id" class="text-decoration-none fw-bold">
            @order.OrderNumber
          </a>
        </td>
        <td>
          <div class="d-flex align-items-center">
            <div class="customer-avatar bg-primary text-white rounded-circle d-flex align-items-center justify-content-center me-2" style="width: 32px; height: 32px;">
              @(order.Customer?.FirstName.FirstOrDefault().ToString().ToUpper())
            </div>
            <div>
              <a asp-controller="Customers" asp-action="Details" asp-route-id="@order.CustomerId" class="text-decoration-none d-block">
                @($"{order.Customer?.FirstName} {order.Customer?.LastName}")
              </a>
              <small class="text-muted">
                @order.Customer?.Email
              </small>
            </div>
          </div>
        </td>
        <td>
          <span class="badge bg-secondary">
            @order.OrderItems.Count items
          </span>
        </td>
        <td>
          <div>@order.OrderDate.ToString("MMM d, yyyy")</div>
          <small class="text-muted">
            @order.OrderDate.ToString("HH:mm")
          </small>
        </td>
        <td>
          <span class="badge bg-@(order.Status switch {
                                OrderStatus.Pending => "warning",
                                OrderStatus.Processing => "info",
                                OrderStatus.Shipped => "primary",
                                OrderStatus.Delivered => "success",
                                OrderStatus.Cancelled => "danger",
                                _ => "secondary"
                            })">@order.Status</span>
        </td>
        <td>
          <div class="fw-bold">@order.TotalAmount.ToString("C")</div>
          <small class="text-muted">
            @order.OrderItems.Count item(s)
          </small>
        </td>
        <td>
          <div class="btn-group">
            <a asp-action="Details" asp-route-id="@order.Id" class="btn btn-sm btn-info" title="Details">
              <i class="bi bi-eye"></i> Details
            </a>
            <a asp-action="Edit" asp-route-id="@order.Id" class="btn btn-sm btn-primary" title="Edit">
              <i class="bi bi-pencil"></i> Edit
            </a>
            @if (order.Status != OrderStatus.Delivered && order.Status != OrderStatus.Cancelled)
            {
              <button type="button" class="btn btn-sm btn-danger" data-bs-toggle="modal" data-bs-target="#cancelModal" data-order-id="@order.Id" data-order-number="@order.OrderNumber">
                <i class="bi bi-x-circle"></i> Cancel
              </button>
            }
          </div>
        </td>
      </tr>
    }
  </tbody>
</table>The POST request gets sent to the controller via a Create form:
<form asp-action="Create" method="post" id="orderForm">CreateOrderViewModel bundles everything the Create form needs into a single object:
public class CreateOrderViewModel
{
    public OrderModel Order { get; set; } = new OrderModel();
    public IEnumerable<DropdownItem> Customers { get; set; } = [];
    public IEnumerable<DropdownItem> Products { get; set; } = [];
}2) OrderManagement.Core holds the business logic.
This layer defines domain models and the interfaces for working with them. It also manages the transformation between database representations and the data the application layer works with. This is the layer where order validation, pricing calculation, and order number generation happen:
public async Task<IEnumerable<OrderModel>> GetAllOrdersAsync()
{
    return _mapper.Map<IEnumerable<OrderModel>>(await _orderRepository.GetAllAsync());
}

public async Task<OrderModel> CreateOrderAsync(OrderModel order)
{
    var customer = await _customerRepository.GetByIdAsync(order.CustomerId)
        ?? throw new InvalidOperationException("Customer not found");

    foreach (var item in order.OrderItems)
    {
        var product = await _productRepository.GetByIdAsync(item.ProductId)
            ?? throw new InvalidOperationException($"Product with ID {item.ProductId} not found");
        item.UnitPrice = product.Price;
    }

    order.OrderNumber = $"ORD-{DateTime.Now:yyyy-MM}-{order.Id:D3}";
    order.OrderDate = DateTime.Now;
    order.TotalAmount = order.OrderItems.Sum(item => item.UnitPrice * item.Quantity);

    return _mapper.Map<OrderModel>(await _orderRepository.CreateAsync(_mapper.Map<Order>(order)));
}3) OrderManagement.Data manages database access through repositories.
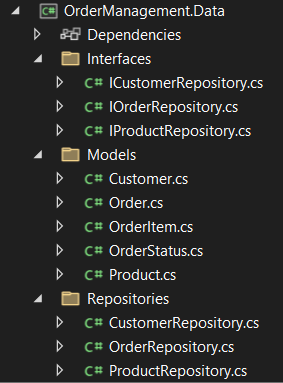
This layer handles reading and writing order, customer, and product data, and it keeps that data cleanly separated from the business logic in the Core layer:
public async Task<IEnumerable<Order>> GetAllAsync()
{
    return [.. InMemoryDatabase.Orders];
}

public async Task<Order> CreateAsync(Order order)

{
    order.Id = InMemoryDatabase.Orders.Count > 0 ?
        InMemoryDatabase.Orders.Max(o => o.Id) + 1 : 1;
    order.Customer = InMemoryDatabase.Customers.FirstOrDefault(c => c.Id == order.CustomerId);

    foreach (var item in order.OrderItems)
    {
        item.Product = InMemoryDatabase.Products.FirstOrDefault(p => p.Id == item.ProductId);
    }

    InMemoryDatabase.Orders.Add(order);
    return order;
}This is what a database data storage model can look like:
public class Order
{
     public int Id { get; set; }
     public string OrderNumber { get; set; } = string.Empty;
     public DateTime OrderDate { get; set; }
     public OrderStatus Status { get; set; }
     public decimal TotalAmount { get; set; }
     public int CustomerId { get; set; }
     public Customer Customer { get; set; } = new Customer();
     public List<OrderItem> OrderItems { get; set; } = [];
}Let’s take a look at how the components of our system interact when a user makes a request:
Table 2: Component communication within the system
| Communication path | Format | What happens |
|---|---|---|
| User→View | request | User triggers an action in the browser (button click, form submit). The view captures the event, constructs an HTTP request, and sends it to the controller. |
| View→Controller | request | The HTTP request reaches the matching controller action. The controller validates the request structure and proceeds if valid. |
| Controller→Service | request | The controller calls the appropriate service method, passing the request data. It also handles any exceptions the service raises and returns the relevant error to the view. |
| Service→Repository | request | The service applies business logic, prepares data for persistence, and calls the relevant repository method. |
| Repository→Database | request | The repository translates the request into a database operation and executes it. |
| Database→Repository | response | The database returns the result. The repository receives it in the database’s native format. |
| Repository→Service | response | The repository maps the raw database result into domain models, merging related data if needed, and returns it to the service. |
| Service→Controller | response | The service applies any post-retrieval business logic, transforms the data into a format the controller can work with, and returns it. |
| Controller→View | response | The controller selects the appropriate view, passes the processed data to it, and hands off rendering. |
| View→User | response | The view renders HTML using model data and returns the updated UI to the browser. |
In this system, business logic is already decoupled from the presentation layer, which is a good starting point for planning a REST API integration. However, there are some limitations due to the nature of the system’s architecture.
Limitations of the MVC-only architecture
Before adding a REST API layer, it’s worth assessing what the current architecture can and can’t do well. The results of this assessment will determine what the API needs to handle and set realistic expectations about the effort involved.
We’ll be looking at four levels of limitations:
Table 3: MVC architecture limitations
| Level | Specific limitations |
|---|---|
| Technical | ⚠️Tight coupling between the View layer and the service logic makes it difficult to serve clients other than a browser. ⚠️Constrained scalability due to the monolithic structure creates problems under high traffic because the whole application has to be deployed and scaled as a single unit. ⚠️The absence of independent, stateless endpoints makes it harder to handle concurrent requests efficiently. |
| Business | ⚠️The system can’t effectively support a mobile application, as there’s no interface designed for machine-to-machine communication. ⚠️Integration with third-party services requires custom point-to-point work rather than a standardized interface. ⚠️Adding new features is slower because changes in one layer can affect others. |
| Operational | ⚠️Increased resource use on the server side, mostly due to the fact that the full application stack is always running. ⚠️Scaling the system horizontally and adding more servers is difficult when the application isn’t designed to be stateless. ⚠️Deployments require taking the system down entirely rather than rolling out changes incrementally. ⚠️Monitoring is limited to what the web application itself exposes. |
| Development | ⚠️Parallel development across multiple developers is harder because layers are not fully independent. ⚠️Testing is complex and time-consuming, since unit testing requires more of the system than would be necessary with cleaner separation. ⚠️Code reuse across different parts of the system is limited. |
With these limitations in mind, we can objectively assess the system and determine the overall feasibility of REST API integration.
Read also
How to Test REST API Services on the .NET Platform
Optimize your software quality by applying structured REST API testing methodologies. Discover how you can detect vulnerabilities early, ensure reliable integrations, and maintain high performance across your applications.

Feasibility assessment for API integration
The impact on the existing MVC application during development is minimal, since the API can be deployed in parallel, allowing existing web functionality to continue working without changes. To minimize potential performance-related risks, it’s also important to properly configure caching, optimization, and monitoring.
The architecture supports this integration well: business logic is already isolated in the Core layer, and data access is separated into repositories.
On the cost side, this involves:
- Developer time for API design, implementation, testing, and documentation
- Infrastructure costs for hosting the API separately
- Supporting tooling such as authentication services, monitoring, and security certificates
The expected return includes lower integration costs, improved scalability, faster feature delivery, and the option to monetize API access, which should justify the necessary investment.
The implementation effort can be planned across four phases:
- Requirements elicitation and API design
- Core infrastructure implementation (authentication, security, base endpoints)
- Integration with existing system layers and testing
- Deployment with monitoring setup
The time a development team needs for such a project depends on the complexity of the existing system and the number of endpoints required.
Aside from timeline planning, a REST API integration project has specific staffing and infrastructure requirements that should be accounted for beforehand.
On the team side, the core need is a qualified backend developer working full-time on API design, implementation, security, and performance. For the final integration phase, additional developers are typically needed to work in parallel. You’ll also need a DevOps engineer to cover CI/CD pipeline updates, monitoring configuration, and infrastructure setup.
Infrastructure requirements include separate development and testing environments, additional production servers for API hosting, monitoring systems, documentation hosting, and authentication services. You’ll also need tools for:
- API design and documentation — Swagger/OpenAPI
- API testing — Postman, JMeter
- Monitoring — Application Insights, ELK Stack
- Security scanning
- Load testing
Adding the API also introduces some risks you’ll need to plan around.
Concurrent operations between the API and the existing web system can create data consistency issues. Say that a warehouse worker updates an order status via the web system at the exact same time an API client tries to submit payment confirmation. In misconfigured systems, this may lead to the system marking order status as either paid or processed instead of reflecting both states.
To address data consistency issues, your team needs to establish proper transaction management and validation. One way to do this is by wrapping related operations in database transactions with appropriate isolation levels. Ideally, instead of being applied partially, concurrent entries should either be fully completed or rolled back.
Working with a publicly exposed interface, your team will also have to deal with new attack vectors, such as credential stuffing, DDoS, and injection attacks. There’s also a risk of downtime during rollout, which can be mitigated with a specific deployment strategy such as blue–green deployment.
Read also
Integrating FinTech APIs: Key Considerations for Security, Compliance, and Performance
Discover practical methods to protect transactions, ensure regulatory compliance, and build scalable systems that support your business growth.

A practical example of REST API implementation
Now, let’s move to actual practice.
In the following REST API integration examples, we’ll be working with the OrderManagement system described earlier. Our scope only includes CRUD operations for the Orders entity, which should be enough to demonstrate the full implementation pattern, from project setup through versioning and security.
First, we need to define the list of operations (endpoints) that the API will perform.
For our Order Management system, the API endpoints can be structured around business entities:
- Orders
- Products
- Customers
Each resource can support standard CRUD operations (CREATE, READ, UPDATE, DELETE).
The base URL structure will follow this pattern:
https://api.<randomsystemname>.com/v1
For the Order entity, we will create a full cycle of operations.
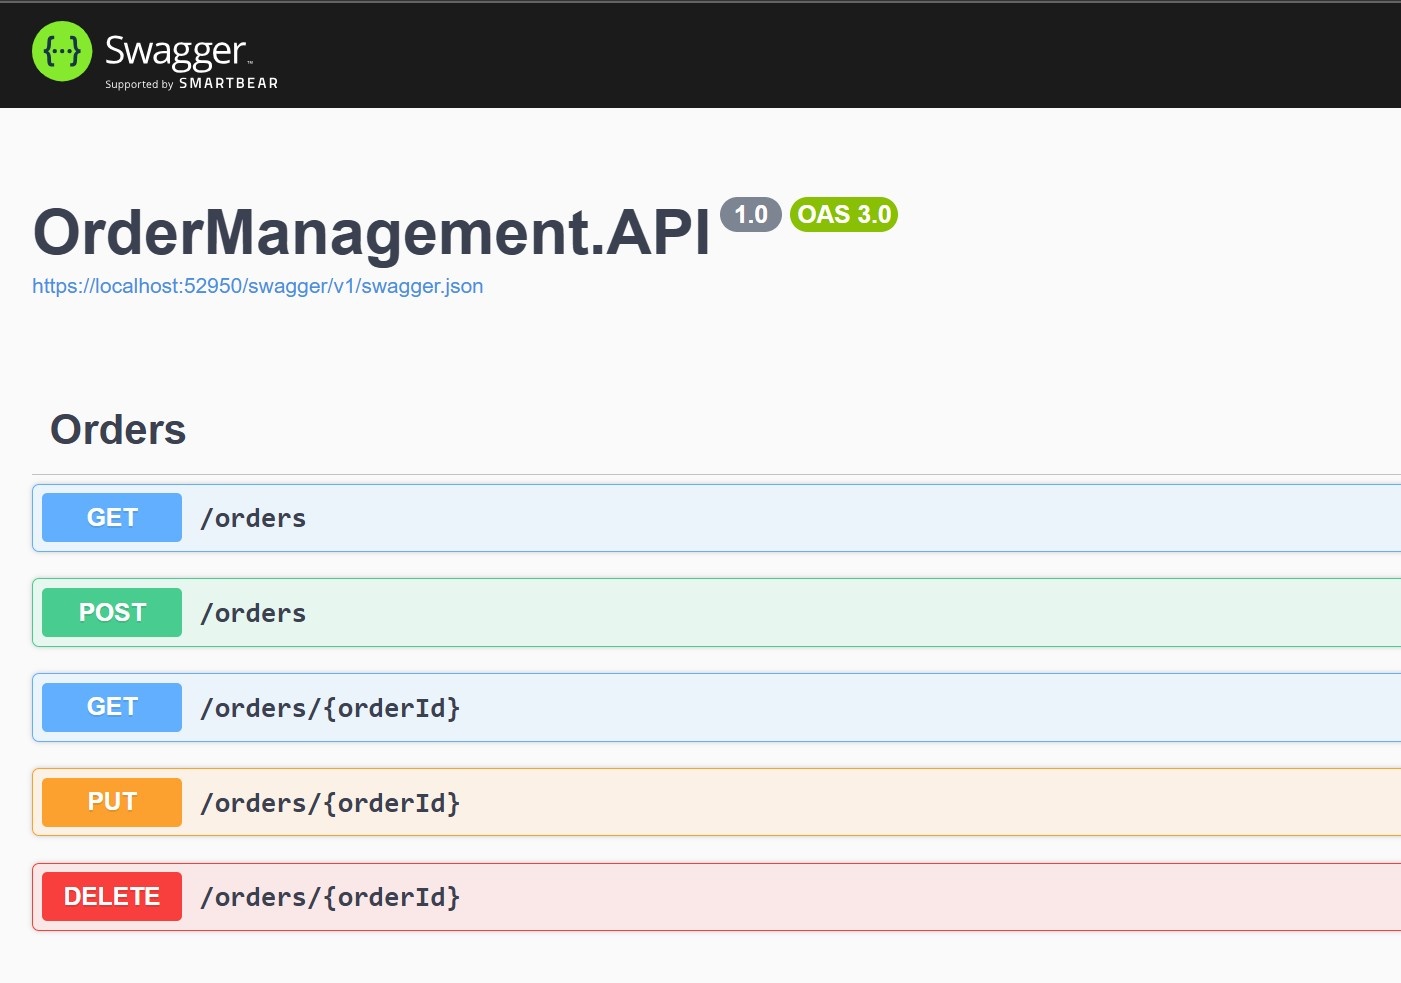
The main endpoint /orders will be responsible for creating and retrieving orders. To work with individual orders, we will use /orders/{orderId}.
Order status will be updated via the same endpoint using a PUT request, and order cancellation will use a DELETE request.
The Product entity will be managed under the /products endpoint. This will cover operations such as creating, updating, and managing inventory.
Product types will be handled via /products/categories for convenient catalog organization. Product search will be performed through the main endpoint by adding query parameters.
Customer management will be handled through the /customers endpoint. This will allow for creating, updating, and retrieving customers from the system. We will also provide access to a customer’s order history via /customers/{customerId}/orders.
Customer authentication will be handled through /auth.
Additionally, we will add the /analytics endpoint, which will return aggregated data about orders, customer behavior, and product popularity.
Now, let’s look at the environment and tooling required for this implementation:
- Visual Studio or Visual Studio Code as the IDE
- Git for version control
- Postman for API testing
- ASP.NET Core Web API as the framework
- AutoMapper for object mapping between domain models and API response models
- Swagger/OpenAPI for documentation and in-development testing
1. Creating the API project
We begin with adding a new project called OrderManagement.API to the existing solution. This project sits alongside the existing Web, Core, and Data layers, connecting to the business logic in Core without duplicating it.
In the new project, we add a Controllers/OrdersController with CRUD endpoint implementations, a Models folder for request and response DTOs, and a Program.cs file that initializes the API and registers Swagger.
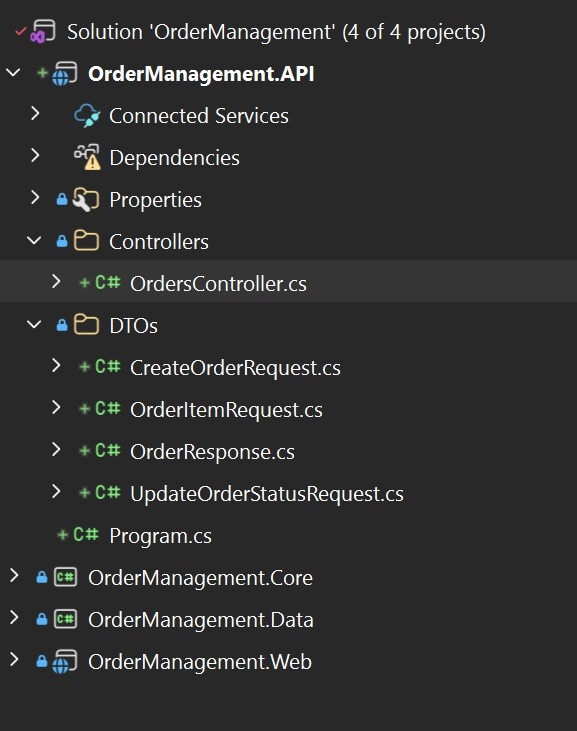
The controller injects IOrderService from OrderManagement.Core. The API layer maps incoming requests to the domain model, calls the existing service, and maps the result back to an API response:
namespace OrderManagement.API.Controllers
{
    [ApiController]
    [Route("orders")]
    public class OrdersController : ControllerBase
    {
        private readonly IOrderService _orderService;

        public OrdersController(IOrderService orderService)
        {
            _orderService = orderService;
        }

        [HttpGet]
        public async Task<ActionResult<IEnumerable<OrderResponse>>> GetAll()
        {
            var orders = await _orderService.GetAllOrdersAsync();
            return Ok(orders.Select(MapToResponse));
        }

        [HttpGet("{orderId:int}")]
        public async Task<ActionResult<OrderResponse>> GetById(int orderId)
        {
            var order = await _orderService.GetOrderByIdAsync(orderId);
            if (order is null)
                return NotFound();

            return Ok(MapToResponse(order));
        }

        [HttpPost]
        public async Task<ActionResult<OrderResponse>> Create([FromBody] CreateOrderRequest request)
        {
            var model = new OrderModel
            {
                CustomerId = request.CustomerId,
                OrderItems = request.OrderItems.Select(i => new OrderItemModel
                {
                    ProductId = i.ProductId,
                    Quantity = i.Quantity
                }).ToList()
            };

            var created = await _orderService.CreateOrderAsync(model);
            return CreatedAtAction(nameof(GetById), new { orderId = created.Id }, MapToResponse(created));
        }

        [HttpPut("{orderId:int}")]
        public async Task<IActionResult> UpdateStatus(int orderId, [FromBody] UpdateOrderStatusRequest request)
        {
            var order = await _orderService.GetOrderByIdAsync(orderId);
            if (order is null)
                return NotFound();

            order.Status = request.Status;
            await _orderService.UpdateOrderAsync(order);
            return NoContent();
        }

        [HttpDelete("{orderId:int}")]
        public async Task<IActionResult> Cancel(int orderId)
        {
            var order = await _orderService.GetOrderByIdAsync(orderId);
            if (order is null)
                return NotFound();

            await _orderService.DeleteOrderAsync(orderId);
            return NoContent();
        }

        private static OrderResponse MapToResponse(OrderModel order) => new()
        {
            Id = order.Id,
            OrderNumber = order.OrderNumber,
            CustomerId = order.CustomerId,
            CustomerName = order.CustomerName,
            OrderDate = order.OrderDate,
            Status = order.Status,
            TotalAmount = order.TotalAmount,
            OrderItems = order.OrderItems.Select(i => new OrderItemResponse
            {
                Id = i.Id,
                ProductId = i.ProductId,
                ProductName = i.ProductName,
                Quantity = i.Quantity,
                UnitPrice = i.UnitPrice,
                Total = i.Total
            }).ToList()
        };
    }
}The request DTO keeps the incoming data shape separate from the domain model — a good practice that lets the API contract evolve independently of the internal model:
namespace OrderManagement.API.DTOs
{
    public class CreateOrderRequest
    {
        public int CustomerId { get; set; }
        public List<OrderItemRequest> OrderItems { get; set; } = new();
    }
}Program.cs registers services, configures AutoMapper, and enables Swagger. Note that repositories are registered as singletons here because this example uses in-memory storage. In a production system with a real database, they would typically be scoped:
using OrderManagement.Core.Interfaces;
using OrderManagement.Core.Mapping;
using OrderManagement.Core.Services;
using OrderManagement.Data.Interfaces;
using OrderManagement.Data.Repositories;

var builder = WebApplication.CreateBuilder(args);

builder.Services.AddControllers();
builder.Services.AddEndpointsApiExplorer();
builder.Services.AddSwaggerGen();

// AutoMapper
builder.Services.AddAutoMapper(typeof(MappingProfile));

// Repositories (singleton for in-memory storage)
builder.Services.AddSingleton<ICustomerRepository, CustomerRepository>();
builder.Services.AddSingleton<IProductRepository, ProductRepository>();
builder.Services.AddSingleton<IOrderRepository, OrderRepository>();

// Services
builder.Services.AddScoped<ICustomerService, CustomerService>();
builder.Services.AddScoped<IProductService, ProductService>();
builder.Services.AddScoped<IOrderService, OrderService>();

var app = builder.Build();

if (app.Environment.IsDevelopment())
{
    app.UseSwagger();
    app.UseSwaggerUI();
}

app.UseHttpsRedirection();
app.UseAuthorization();
app.MapControllers();

app.Run();If you use Swagger, it will generate a colorful interface that helps you verify the correct operation of all API endpoints. This is what the interface looks like when we start the OrderManagement.API project in Visual Studio IDE.
2. API versioning
As the API evolves, versioning ensures that existing clients continue to work when new capabilities are added.
In our example, we apply a hybrid strategy:
- Major versions are indicated in the URL path –
/v1/orders,/v2/orders - Minor versions are handled via an HTTP header, following a MAJOR.MINOR.PATCH format –
X-API-Version
The implementation uses two NuGet packages: Asp.Versioning.Mvc and Asp.Versioning.Mvc.ApiExplorer. They handle the routing logic and make versioning visible in the Swagger UI.
The supporting infrastructure consists of:
- Versioning/ApiVersionConstants.cs — defines supported versions and the deprecation date for V1
- Versioning/ApiVersionHeaderMiddleware.cs — validates the X-API-Version header, includes it in responses, and injects deprecation headers for V1
- Swagger/ConfigureSwaggerOptions.cs — generates per-version API descriptions including migration notes
- Swagger/ApiVersionHeaderOperationFilter.cs — adds the X-API-Version header parameter to the Swagger UI for each version
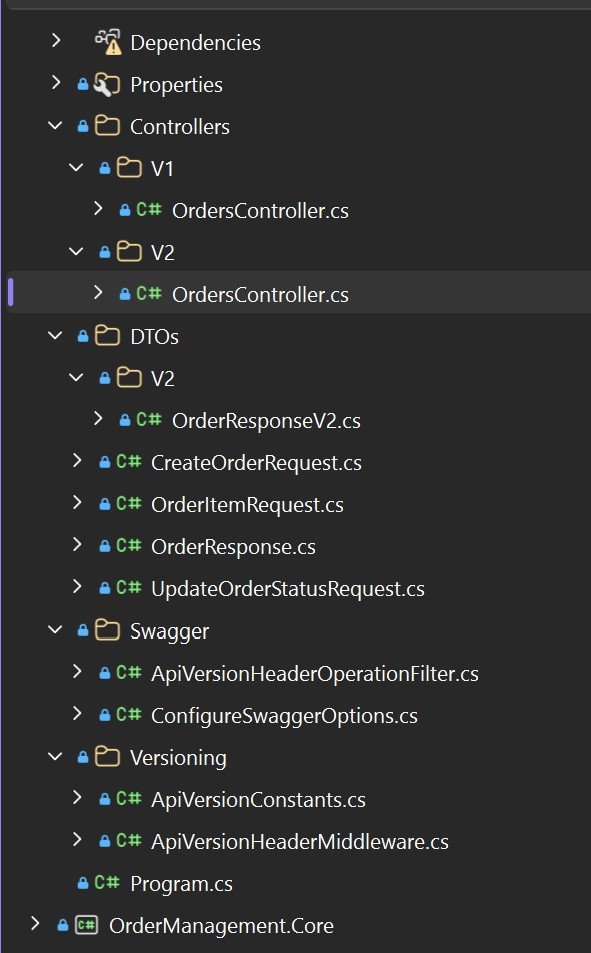
With versioning infrastructure in place, the controller is split into two versions.
V1 (Controllers/V1/OrdersController.cs) is based on the original controller and marked as deprecated.
V2 (Controllers/V2/OrdersController.cs) adds three capabilities that are common requirements as APIs mature:
- An itemCount field in the order response
- Status-based filtering via query parameter (
?status=Pending) - Pagination support (
?page=1&pageSize=20), with total count and page metadata returned in response headers
This is what the project’s architecture looks like now:
Let’s look at the V1 controller structure:
using Asp.Versioning;
using Microsoft.AspNetCore.Mvc;
using OrderManagement.API.DTOs;
using OrderManagement.Core.Interfaces;
using OrderManagement.Core.Models;

namespace OrderManagement.API.Controllers.V1
{
    [ApiController]
    [ApiVersion("1.0")]
    [Route("v{version:apiVersion}/orders")]
    [Tags("Orders (v1 — deprecated)")]
    public class OrdersController : ControllerBase
    {
        private readonly IOrderService _orderService;

        public OrdersController(IOrderService orderService)
        {
            _orderService = orderService;
        }

        /// <summary>Returns all orders.</summary>
        [HttpGet]
        [ProducesResponseType(typeof(IEnumerable<OrderResponse>), StatusCodes.Status200OK)]
        public async Task<ActionResult<IEnumerable<OrderResponse>>> GetAll()
        {
            var orders = await _orderService.GetAllOrdersAsync();
            return Ok(orders.Select(MapToResponse));
        }

        /// <summary>Returns a single order by ID.</summary>
        [HttpGet("{orderId:int}")]
        [ProducesResponseType(typeof(OrderResponse), StatusCodes.Status200OK)]
        [ProducesResponseType(StatusCodes.Status404NotFound)]
        public async Task<ActionResult<OrderResponse>> GetById(int orderId)
        {
            var order = await _orderService.GetOrderByIdAsync(orderId);
            if (order is null)
                return NotFound();

            return Ok(MapToResponse(order));
        }

        /// <summary>Creates a new order.</summary>
        [HttpPost]
        [ProducesResponseType(typeof(OrderResponse), StatusCodes.Status201Created)]
        public async Task<ActionResult<OrderResponse>> Create([FromBody] CreateOrderRequest request)
        {
            var model = new OrderModel
            {
                CustomerId = request.CustomerId,
                OrderItems = request.OrderItems.Select(i => new OrderItemModel
                {
                    ProductId = i.ProductId,
                    Quantity = i.Quantity
                }).ToList()
            };

            var created = await _orderService.CreateOrderAsync(model);
            return CreatedAtAction(nameof(GetById), new { orderId = created.Id }, MapToResponse(created));
        }

        /// <summary>Updates the status of an order.</summary>
        [HttpPut("{orderId:int}")]
        [ProducesResponseType(StatusCodes.Status204NoContent)]
        [ProducesResponseType(StatusCodes.Status404NotFound)]
        public async Task<IActionResult> UpdateStatus(int orderId, [FromBody] UpdateOrderStatusRequest request)
        {
            var order = await _orderService.GetOrderByIdAsync(orderId);
            if (order is null)
                return NotFound();

            order.Status = request.Status;
            await _orderService.UpdateOrderAsync(order);
            return NoContent();
        }

        /// <summary>Cancels (deletes) an order.</summary>
        [HttpDelete("{orderId:int}")]
        [ProducesResponseType(StatusCodes.Status204NoContent)]
        [ProducesResponseType(StatusCodes.Status404NotFound)]
        public async Task<IActionResult> Delete(int orderId)
        {
            var order = await _orderService.GetOrderByIdAsync(orderId);
            if (order is null)
                return NotFound();

            await _orderService.DeleteOrderAsync(orderId);
            return NoContent();
        }

        private static OrderResponse MapToResponse(OrderModel order) => new()
        {
            Id = order.Id,
            OrderNumber = order.OrderNumber,
            CustomerId = order.CustomerId,
            CustomerName = order.CustomerName,
            OrderDate = order.OrderDate,
            Status = order.Status,
            TotalAmount = order.TotalAmount,
            OrderItems = order.OrderItems.Select(i => new OrderItemResponse
            {
                Id = i.Id,
                ProductId = i.ProductId,
                ProductName = i.ProductName,
                Quantity = i.Quantity,
                UnitPrice = i.UnitPrice,
                Total = i.Total
            }).ToList()
        };
    }
}The V2 Controller extends GetAll with status filtering and pagination metadata:
using Asp.Versioning;
using Microsoft.AspNetCore.Mvc;
using OrderManagement.API.DTOs;
using OrderManagement.API.DTOs.V2;
using OrderManagement.Core.Interfaces;
using OrderManagement.Core.Models;

namespace OrderManagement.API.Controllers.V2
{
    [ApiController]
    [ApiVersion("2.0")]
    [Route("v{version:apiVersion}/orders")]
    [Tags("Orders (v2)")]
    public class OrdersController : ControllerBase
    {
        private readonly IOrderService _orderService;

        public OrdersController(IOrderService orderService)
        {
            _orderService = orderService;
        }

        /// <summary>
        /// Returns all orders with optional status filtering and pagination.
        /// Pagination metadata is returned via <c>X-Total-Count</c>, <c>X-Page</c>, and <c>X-Page-Size</c> response headers.
        /// </summary>
        [HttpGet]
        [ProducesResponseType(typeof(IEnumerable<OrderResponseV2>), StatusCodes.Status200OK)]
        public async Task<ActionResult<IEnumerable<OrderResponseV2>>> GetAll(
            [FromQuery] OrderStatus? status,
            [FromQuery] int page = 1,
            [FromQuery] int pageSize = 20)
        {
            var orders = await _orderService.GetAllOrdersAsync();
            var filtered = orders.AsEnumerable();

            if (status.HasValue)
                filtered = filtered.Where(o => o.Status == status.Value);

            var total = filtered.Count();
            var paged = filtered.Skip((page - 1) * pageSize).Take(pageSize);

            Response.Headers["X-Total-Count"] = total.ToString();
            Response.Headers["X-Page"] = page.ToString();
            Response.Headers["X-Page-Size"] = pageSize.ToString();

            return Ok(paged.Select(MapToResponse));
        }

        /// <summary>Returns a single order by ID.</summary>
        [HttpGet("{orderId:int}")]
        [ProducesResponseType(typeof(OrderResponseV2), StatusCodes.Status200OK)]
        [ProducesResponseType(StatusCodes.Status404NotFound)]
        public async Task<ActionResult<OrderResponseV2>> GetById(int orderId)
        {
            var order = await _orderService.GetOrderByIdAsync(orderId);
            if (order is null)
                return NotFound();

            return Ok(MapToResponse(order));
        }

        /// <summary>Creates a new order.</summary>
        [HttpPost]
        [ProducesResponseType(typeof(OrderResponseV2), StatusCodes.Status201Created)]
        public async Task<ActionResult<OrderResponseV2>> Create([FromBody] CreateOrderRequest request)
        {
            var model = new OrderModel
            {
                CustomerId = request.CustomerId,
                OrderItems = request.OrderItems.Select(i => new OrderItemModel
                {
                    ProductId = i.ProductId,
                    Quantity = i.Quantity
                }).ToList()
            };

            var created = await _orderService.CreateOrderAsync(model);
            return CreatedAtAction(nameof(GetById), new { orderId = created.Id }, MapToResponse(created));
        }

        /// <summary>Updates the status of an order.</summary>
        [HttpPut("{orderId:int}")]
        [ProducesResponseType(StatusCodes.Status204NoContent)]
        [ProducesResponseType(StatusCodes.Status404NotFound)]
        public async Task<IActionResult> UpdateStatus(int orderId, [FromBody] UpdateOrderStatusRequest request)
        {
            var order = await _orderService.GetOrderByIdAsync(orderId);
            if (order is null)
                return NotFound();

            order.Status = request.Status;
            await _orderService.UpdateOrderAsync(order);
            return NoContent();
        }

        /// <summary>Cancels (deletes) an order.</summary>
        [HttpDelete("{orderId:int}")]
        [ProducesResponseType(StatusCodes.Status204NoContent)]
        [ProducesResponseType(StatusCodes.Status404NotFound)]
        public async Task<IActionResult> Delete(int orderId)
        {
            var order = await _orderService.GetOrderByIdAsync(orderId);
            if (order is null)
                return NotFound();

            await _orderService.DeleteOrderAsync(orderId);
            return NoContent();
        }

        private static OrderResponseV2 MapToResponse(OrderModel order) => new()
        {
            Id = order.Id,
            OrderNumber = order.OrderNumber,
            CustomerId = order.CustomerId,
            CustomerName = order.CustomerName,
            OrderDate = order.OrderDate,
            Status = order.Status,
            TotalAmount = order.TotalAmount,
            ItemCount = order.OrderItems.Count,
            OrderItems = order.OrderItems.Select(i => new OrderItemResponse
            {
                Id = i.Id,
                ProductId = i.ProductId,
                ProductName = i.ProductName,
                Quantity = i.Quantity,
                UnitPrice = i.UnitPrice,
                Total = i.Total
            }).ToList()
        };
    }
}The code for DTOs/V2/OrderResponseV2 looks like this:
using OrderManagement.Core.Models;

namespace OrderManagement.API.DTOs.V2
{
    /// <summary>
    /// Extended order response introduced in V2.
    /// Adds <see cref="ItemCount"/> to the V1 payload.
    /// </summary>
    public class OrderResponseV2
    {
        public int Id { get; set; }
        public string OrderNumber { get; set; } = string.Empty;
        public int CustomerId { get; set; }
        public string CustomerName { get; set; } = string.Empty;
        public DateTime OrderDate { get; set; }
        public OrderStatus Status { get; set; }
        public decimal TotalAmount { get; set; }

        /// <summary>Total number of line items in this order. New in V2.</summary>
        public int ItemCount { get; set; }

        public List<OrderItemResponse> OrderItems { get; set; } = new();
    }
}Next, let’s look at Swagger/ApiVersionHeaderOperationFilter. This filter runs at documentation generation time rather than request time. It injects the X-API-Version header parameter into every operation in the Swagger UI, pre-populated with the allowed minor versions for that endpoint’s major version.
using Microsoft.OpenApi.Any;
using Microsoft.OpenApi.Models;
using OrderManagement.API.Versioning;
using Swashbuckle.AspNetCore.SwaggerGen;

namespace OrderManagement.API.Swagger
{
    public class ApiVersionHeaderOperationFilter : IOperationFilter
    {
        public void Apply(OpenApiOperation operation, OperationFilterContext context)
        {
            var groupName = context.ApiDescription.GroupName;
            if (string.IsNullOrEmpty(groupName))
                return;

            var isV1 = groupName.StartsWith("v1", StringComparison.OrdinalIgnoreCase);
            var supportedVersions = isV1
                ? ApiVersionConstants.V1SupportedMinorVersions
                : ApiVersionConstants.V2SupportedMinorVersions;
            var defaultVersion = isV1
                ? ApiVersionConstants.V1Default
                : ApiVersionConstants.V2Default;

            operation.Parameters ??= [];
            operation.Parameters.Add(new OpenApiParameter
            {
                Name = ApiVersionConstants.HeaderName,
                In = ParameterLocation.Header,
                Required = false,
                Schema = new OpenApiSchema
                {
                    Type = "string",
                    Enum = supportedVersions.Select(v => (IOpenApiAny)new OpenApiString(v)).ToList(),
                    Default = new OpenApiString(defaultVersion)
                },
                Description = $"Minor version in MAJOR.MINOR.PATCH format. Supported: {string.Join(", ", supportedVersions)}. Defaults to `{defaultVersion}`."
            });
        }
    }
}СonfigureSwaggerOptions generates one Swagger document per major version, with version-specific details added by the BuildDescription method.
using Asp.Versioning.ApiExplorer;
using Microsoft.Extensions.Options;
using Microsoft.OpenApi.Models;
using OrderManagement.API.Versioning;
using Swashbuckle.AspNetCore.SwaggerGen;

namespace OrderManagement.API.Swagger
{
    public class ConfigureSwaggerOptions : IConfigureOptions<SwaggerGenOptions>
    {
        private readonly IApiVersionDescriptionProvider _provider;

        public ConfigureSwaggerOptions(IApiVersionDescriptionProvider provider)
        {
            _provider = provider;
        }

        public void Configure(SwaggerGenOptions options)
        {
            foreach (var description in _provider.ApiVersionDescriptions)
            {
                options.SwaggerDoc(description.GroupName, CreateInfoForApiVersion(description));
            }
        }

        private static OpenApiInfo CreateInfoForApiVersion(ApiVersionDescription description)
        {
            var major = description.ApiVersion.MajorVersion;

            return new OpenApiInfo
            {
                Title = "Order Management API",
                Version = description.ApiVersion.ToString(),
                Description = BuildDescription(major, description.IsDeprecated),
                Contact = new OpenApiContact
                {
                    Name = "API Support",
                    Email = "[email protected]"
                }
            };
        }

        private static string BuildDescription(int? major, bool isDeprecated)
        {
            var deprecationBadge = isDeprecated ? " **⚠️ DEPRECATED**" : string.Empty;

            return major switch
            {
                1 => $"""
                      ### V1 — Basic CRUD{deprecationBadge}

                      This version is **deprecated** and will be sunset on `{ApiVersionConstants.V1SunsetDate}`.
                      Please migrate to V2 as soon as possible.

                      **Minor versions (`{ApiVersionConstants.HeaderName}` header):** {string.Join(", ", ApiVersionConstants.V1SupportedMinorVersions)}
                      - `1.0.0` — initial release
                      - `1.1.0` — bug-fix release (current V1 default)

                      ---
                      #### Migration from V1 to V2
                      | Change | V1 | V2 |
                      |--------|----|----|
                      | Base URL | `/v1/orders` | `/v2/orders` |
                      | `X-API-Version` | `1.x.x` | `2.x.x` |
                      | Response: `itemCount` | ❌ | ✅ |
                      | Filtering by status | ❌ | `?status=Pending` |
                      | Pagination | ❌ | `?page=1&pageSize=20` |
                      | Pagination headers | ❌ | `X-Total-Count`, `X-Page`, `X-Page-Size` |

                      To roll back to V1 during transition: point the base URL back to `/v1/` and set `{ApiVersionConstants.HeaderName}: 1.1.0`.
                      """,

                2 => $"""
                      ### V2 — Enhanced Orders ✅ Current stable version

                      **Minor versions (`{ApiVersionConstants.HeaderName}` header):** {string.Join(", ", ApiVersionConstants.V2SupportedMinorVersions)}
                      - `2.0.0` — initial V2 release with filtering and pagination
                      - `2.1.0` — extended pagination headers (current V2 default)

                      **New in V2 compared to V1:**
                      - `GET /v2/orders` supports `?status=` query filter
                      - `GET /v2/orders` supports `?page=` and `?pageSize=` for pagination
                      - Order response includes `itemCount` field
                      - Pagination metadata returned via `X-Total-Count`, `X-Page`, `X-Page-Size` headers
                      """,

                _ => string.Empty
            };
        }
    }
}
ApiVersionConstants centralizes all version-related values in one place so that changes to versioning policy only require edits to a single file:
namespace OrderManagement.API.Versioning
{
    public static class ApiVersionConstants
    {
        public const string HeaderName = "X-API-Version";

        // V1 minor versions — receives bug fixes only, new features go to V2
        public const string V1Default = "1.1.0";
        public static readonly string[] V1SupportedMinorVersions = ["1.0.0", "1.1.0"];

        // V2 minor versions — current, actively developed version
        public const string V2Default = "2.1.0";
        public static readonly string[] V2SupportedMinorVersions = ["2.0.0", "2.1.0"];

        // RFC 8594 Sunset header value (HTTP-date format)
        public const string V1SunsetDate = "Thu, 01 Jan 2026 00:00:00 GMT";
    }
}The ApiVersionHeaderMiddleware middleware runs on every request and handles three things:
- Extracts the major version from the URL path
- Validates the
X-API-Versionheader against the supported minor versions for that major version - Adds deprecation headers to V1 responses so clients have a machine-readable signal to migrate
namespace OrderManagement.API.Versioning
{
    public class ApiVersionHeaderMiddleware
    {
        private readonly RequestDelegate _next;

        public ApiVersionHeaderMiddleware(RequestDelegate next)
        {
            _next = next;
        }

        public async Task InvokeAsync(HttpContext context)
        {
            var urlMajorVersion = ExtractMajorVersionFromPath(context.Request.Path);

            if (urlMajorVersion.HasValue)
            {
                var supportedMinorVersions = urlMajorVersion == 1
                    ? ApiVersionConstants.V1SupportedMinorVersions
                    : ApiVersionConstants.V2SupportedMinorVersions;

                var defaultMinorVersion = urlMajorVersion == 1
                    ? ApiVersionConstants.V1Default
                    : ApiVersionConstants.V2Default;

                if (context.Request.Headers.TryGetValue(ApiVersionConstants.HeaderName, out var headerValue)
                    && !string.IsNullOrWhiteSpace(headerValue))
                {
                    var versionString = headerValue.ToString();

                    if (!TryParseVersion(versionString, out var headerMajor))
                    {
                        context.Response.StatusCode = StatusCodes.Status400BadRequest;
                        await context.Response.WriteAsJsonAsync(new
                        {
                            error = $"Invalid '{ApiVersionConstants.HeaderName}' format. Expected MAJOR.MINOR.PATCH (e.g., '1.0.0')."
                        });
                        return;
                    }

                    if (headerMajor != urlMajorVersion.Value)
                    {
                        context.Response.StatusCode = StatusCodes.Status400BadRequest;
                        await context.Response.WriteAsJsonAsync(new
                        {
                            error = $"'{ApiVersionConstants.HeaderName}' major version ({headerMajor}) does not match URL major version ({urlMajorVersion.Value})."
                        });
                        return;
                    }

                    if (!supportedMinorVersions.Contains(versionString))
                    {
                        context.Response.StatusCode = StatusCodes.Status400BadRequest;
                        await context.Response.WriteAsJsonAsync(new
                        {
                            error = $"Version '{versionString}' is not supported. Supported: {string.Join(", ", supportedMinorVersions)}."
                        });
                        return;
                    }

                    context.Items[ApiVersionConstants.HeaderName] = versionString;
                }
                else
                {
                    context.Items[ApiVersionConstants.HeaderName] = defaultMinorVersion;
                }

                context.Items["UrlMajorVersion"] = urlMajorVersion.Value;
            }

            context.Response.OnStarting(() =>
            {
                if (context.Items.TryGetValue("UrlMajorVersion", out var majorObj) && majorObj is int major && major == 1)
                {
                    context.Response.Headers.Append("Deprecation", "true");
                    context.Response.Headers.Append("Sunset", ApiVersionConstants.V1SunsetDate);
                    context.Response.Headers.Append("Link", "</v2/orders>; rel=\"successor-version\"");
                }

                if (context.Items.TryGetValue(ApiVersionConstants.HeaderName, out var version) && version is string versionValue)
                {
                    context.Response.Headers[ApiVersionConstants.HeaderName] = versionValue;
                }

                return Task.CompletedTask;
            });

            await _next(context);
        }

        private static int? ExtractMajorVersionFromPath(PathString path)
        {
            var segments = path.Value?.Split('/', StringSplitOptions.RemoveEmptyEntries);
            if (segments is { Length: > 0 }
                && segments[0].StartsWith('v')
                && int.TryParse(segments[0][1..], out var major))
            {
                return major;
            }
            return null;
        }

        private static bool TryParseVersion(string value, out int major)
        {
            major = 0;
            var parts = value.Split('.');
            if (parts.Length != 3) return false;
            if (!int.TryParse(parts[0], out major)) return false;
            if (!int.TryParse(parts[1], out _)) return false;
            if (!int.TryParse(parts[2], out _)) return false;
            return true;
        }
    }
}Here’s the updated Program.cs code, with the same structure as before but several changes reflecting API versioning:
using Asp.Versioning;
using Microsoft.Extensions.Options;
using OrderManagement.API.Swagger;
using OrderManagement.API.Versioning;
using OrderManagement.Core.Interfaces;
using OrderManagement.Core.Mapping;
using OrderManagement.Core.Services;
using OrderManagement.Data.Interfaces;
using OrderManagement.Data.Repositories;
using Swashbuckle.AspNetCore.SwaggerGen;

var builder = WebApplication.CreateBuilder(args);

builder.Services.AddControllers();
builder.Services.AddEndpointsApiExplorer();

// API Versioning — major versions via URL (/v1/, /v2/), minor versions via X-API-Version header
builder.Services.AddApiVersioning(options =>
{
    options.DefaultApiVersion = new ApiVersion(2, 0);
    options.AssumeDefaultVersionWhenUnspecified = true;
    options.ReportApiVersions = true;
    options.ApiVersionReader = new UrlSegmentApiVersionReader();
}).AddApiExplorer(options =>
{
    options.GroupNameFormat = "'v'VVV";
    options.SubstituteApiVersionInUrl = true;
});

// Swagger — one document per major version
builder.Services.AddTransient<IConfigureOptions<SwaggerGenOptions>, ConfigureSwaggerOptions>();
builder.Services.AddSwaggerGen(options =>
{
    options.OperationFilter<ApiVersionHeaderOperationFilter>();
});

// AutoMapper
builder.Services.AddAutoMapper(typeof(MappingProfile));

// Repositories (singleton for in-memory storage)
builder.Services.AddSingleton<ICustomerRepository, CustomerRepository>();
builder.Services.AddSingleton<IProductRepository, ProductRepository>();
builder.Services.AddSingleton<IOrderRepository, OrderRepository>();

// Services
builder.Services.AddScoped<ICustomerService, CustomerService>();
builder.Services.AddScoped<IProductService, ProductService>();
builder.Services.AddScoped<IOrderService, OrderService>();

var app = builder.Build();

if (app.Environment.IsDevelopment())
{
    app.UseSwagger();
    app.UseSwaggerUI(options =>
    {
        foreach (var description in app.DescribeApiVersions())
        {
            options.SwaggerEndpoint(
                $"/swagger/{description.GroupName}/swagger.json",
                $"Order Management API {description.GroupName.ToUpperInvariant()}");
        }
    });
}

app.UseHttpsRedirection();
app.UseMiddleware<ApiVersionHeaderMiddleware>();
app.UseAuthorization();
app.MapControllers();

app.Run();3. Authentication and authorization
Our API uses JSON Web Tokens (JWT) for authentication.
A JWT is a self-contained, cryptographically signed token that carries all the information the server needs to verify a request without requiring server-side session storage. The carried data commonly includes the issuer, audience, expiration time, and any claims about the user.
When working with JWT-based authentication, the RS256 algorithm is recommended for most production scenarios.
Short token lifetimes combined with a rotation mechanism reduce the exposure window if a token is compromised.
This is how we configure JWT authentication in the API:
// Configure API
var jwtSettings = new JwtSettings
{
    Key = "your_very_long_secret_key_at_least_32_chars",
    Issuer = "your_issuer",
    Audience = "your_audience",
    ExpirationInMinutes = 60
};

builder.Services.AddAuthentication(JwtBearerDefaults.AuthenticationScheme)
    .AddJwtBearer(options =>
    {
        options.TokenValidationParameters = new TokenValidationParameters
        {
            ValidateIssuer = true,
            ValidateAudience = true,
            ValidateLifetime = true,
            ValidateIssuerSigningKey = true,
            ValidIssuer = jwtSettings.Issuer,
            ValidAudience = jwtSettings.Audience,
            IssuerSigningKey = new SymmetricSecurityKey(
                Encoding.UTF8.GetBytes(jwtSettings.Key))
        };
});A dedicated AuthController handles login and token issuance. In production, the credential check here would call an identity service or user store rather than comparing hardcoded values:
// Authenticate user in a special Auth controller and provide JWT
[ApiController]
[Route("[controller]")]
public class AuthController : ControllerBase
{
    private readonly JwtSettings _jwtSettings;
    public AuthController(JwtSettings jwtSettings)
    {
        _jwtSettings = jwtSettings;
    }

    [HttpPost("login")]
    public IActionResult Login([FromBody] LoginModel model)
    {
        // Credentials check
        if (model.Username != "test" || model.Password != "test123")
            return Unauthorized();

        var token = GenerateJwtToken(model.Username);
        return Ok(new { token });
    }

    private string GenerateJwtToken(string username)
    {
        var securityKey = new SymmetricSecurityKey(
            Encoding.UTF8.GetBytes(_jwtSettings.Key));

        var credentials = new SigningCredentials(
            securityKey, SecurityAlgorithms.HmacSha256);

        var claims = new[]
        {
            new Claim(ClaimTypes.Name, username),
            new Claim(ClaimTypes.Role, "User"),
            new Claim(JwtRegisteredClaimNames.Jti, Guid.NewGuid().ToString())
        };

        var token = new JwtSecurityToken(
            issuer: _jwtSettings.Issuer,
            audience: _jwtSettings.Audience,
            claims: claims,
            expires: DateTime.Now.AddMinutes(_jwtSettings.ExpirationInMinutes),
            signingCredentials: credentials
        );

        return new JwtSecurityTokenHandler().WriteToken(token);
    }
}Protecting a controller with JWT requires a single [Authorize] attribute that instructs ASP.NET Core to validate the token before allowing access to any endpoint in that controller:
[Authorize]
[ApiController]
[Route("[controller]")]
public class OrdersController ...Those are the key stages of adding a rest API to an existing system. Now, let’s look at ways to enhance REST API security.
REST API security measures
When building or integrating a REST API, there are several levels of security to account for:
✓ Transport security. All endpoints should be served over HTTPS using TLS 1.3. It’s best to automate certificate rotation so that your encryption certificates don’t expire unexpectedly, causing a service outage. A common choice for this task is Let’s Encrypt.
✓ Rate limiting. Make sure to apply API request limiting by IP address, API key, and individual user. Use sliding window algorithms, since they handle bursty traffic better than fixed-window algorithms. To help clients adapt their request patterns, make sure to show limits in response headers.
✓ Input validation. Your team needs to pay special attention to injection attack vectors, such as SQL injection and command injection. Every endpoint should validate all incoming parameters before passing them further into the system. Validation errors must return clear, consistent error messages.
✓ Key management. API keys and secrets should be rotated regularly. Configure your system to track key use in audit logs and flag anomalous patterns, such as unusual volumes, unexpected geographic origins, or repeated authentication failures.
✓ Monitoring and alerting. Run regular security audits and set real-time alerts for security-relevant events like failed authentication attempts, unusual traffic patterns, and potential data exfiltration. You can use tools like Application Insights or the ELK Stack for this.
✓ Error handling. Error responses should follow a consistent format that provides the client with enough information to handle the error. At the same time, it’s important to prevent exposure of internal implementation details that attackers could exploit to compromise the system.
Here are the key risk levels and validation requirements for each HTTP method:
Table 4: Key risk levels and validation requirements for HTTP methods
| HTTP method | Reversibility | Risk level | Authentication | Validation requirements |
|---|---|---|---|---|
| GET | Yes | Low | JWT token | ✓ Parameter type and range checks ✓ Rate limiting by IP and user ✓ No sensitive data in query strings |
| POST | Partially | Medium | JWT token + role claim | ✓ Full request body schema validation ✓ Injection checks on all string inputs ✓ Idempotency key recommended for financial operations |
| PUT/PATCH | Partially | Medium | JWT token + role claim + resource ownership check | ✓ Schema validation ✓ Confirm resource exists before update ✓ Audit log of the before/after state for regulated data |
| DELETE | No or only via backup/recovery | High | JWT token + elevated role + explicit confirmation field in request body | ✓ Confirm resource exists and is in a deletable state ✓ Check for dependent records ✓ Write audit log entry before executing ✓ Consider soft-delete for production systems |
Integrate REST APIs securely and efficiently with Apriorit
Building a REST API layer on top of an existing system is a complex process that involves API design, authentication architecture, versioning strategy, and production monitoring. With over 24 years of experience in software engineering, Apriorit has exactly the expertise you’ll need for such a task.
Depending on where your project is, we can assist with:
- API integration — planning the integration architecture, designing endpoint structures, and implementing REST API layers for existing systems while preserving current functionality
- Backend development — server-side implementation, service layer design, database access patterns, and performance optimization
- Custom software development — end-to-end delivery for teams that need to move faster than their current in-house capacity allows
Whether you’re evaluating if REST API integration makes sense for your system, planning an implementation, or looking to reinforce an existing API with better security or scalability, our team will help you get the results you want.
Looking to modernize legacy systems with APIs?
Partner with Apriorit to design and implement high-performance integrations that support your growing ecosystem. Let us ensure your APIs are resilient, compliant, and protected from evolving threats.
FAQ
What is REST API integration?
<p>It’s the process of connecting a system to other applications or services via a REST API, an architectural style that uses standard HTTP methods to exchange data.</p>
<p>You can add a REST API layer to your existing system so it can be consumed by external clients, or you can connect your system to third-party services that expose their own REST APIs. In both cases, the goal is to enable communication between systems without requiring either side to know the other’s internal implementation.</p>
What business value can I get from adding a REST API to an existing system?
<p>If you build a REST API for your own product, you will make it accessible to clients and external platforms.</p>
<p>If you add a third-party REST API to an existing system, you can expand the system’s capabilities and quickly add new functionality without investing in rebuilding your product’s core logic.</p>
<p>REST API integration can also help improve system scalability, since stateless API endpoints can be scaled horizontally, and it simplifies maintenance by decoupling the interface from the implementation.</p>
When should I use API integration to add third-party functionality rather than building the same functionality in-house?
<p>There are three key factors to account for when making this choice:</p>
<ul>
<li>Build cost vs integration cost</li>
<li>Time to market</li>
<li>Long-term maintenance</li>
</ul>
<p>If a well-supported API already offers the capability you need, integrating it is typically faster and cheaper than building equivalent functionality internally. It also offloads ongoing maintenance to the provider. </p>
<p>Building in-house makes more sense when the functionality is core to your product’s differentiation. Custom-built functionality is also the right choice when existing APIs don’t meet your performance or compliance requirements, or when you need full control over the data and implementation.</p>
How do you implement a REST API safely and securely?
<p>To enhance the security of your REST API, all endpoints should be served over HTTPS, and authentication should use a well-established mechanism such as JWT or OAuth 2.0. </p>
<p>Every incoming request must be validated before it reaches business logic. Rate limiting and throttling should be implemented to protect APIs from abuse and denial-of-service attacks.</p>
<p>We also set real-time alerts on suspicious patterns and incorporate additional controls to limit access to sensitive and critical data and ensure reliable compliance logging. This is especially important for systems operating in highly regulated industries.</p>