 Skip to main content

Locks don’t stop thieves from stealing cars, but they do make it much harder. Code obfuscation works the same way: obfuscated code still can be reverse engineered, but doing so requires lots of time and knowledge.
However, correct and effective obfuscation is a challenge by itself. A developer needs to choose an obfuscation method and apply lots of effort to make the labyrinthine code flawless. In this article, we discuss the Low Level Virtual Machine (LLVM) and provide a detailed tutorial on how to develop LLVM pass for code obfuscation.
This article will be useful for developers who are looking for a powerful tool to protect their code.
Contents:
Benefits of using LLVM for bytecode obfuscation
To protect their code, developers usually choose between source code, binary code, and bytecode obfuscation. Source code obfuscation leads to challenges in handling and debugging obfuscated code. Binary obfuscation is complicated by itself, not to mention that the process must be repeated for each system architecture.
The best solution is bytecode obfuscation, as you avoid handling both source code and machine code. The most common bytecode that can be used with different sets of languages and on different platforms is LLVM bytecode.
LLVM is a compiler infrastructure designed to reduce the time required for and costs of compiling code. It’s equipped with a set of reusable libraries and well-defined interfaces that allow developers to implement an application’s front end in any language they choose and have LLVM generate low-level code from it. In this way, LLVM substitutes lots of language-specific compilers and eliminates the need to learn specific languages.
There are two major benefits of using LLVM for code obfuscation:
- It’s universal because LLVM bitcode (the bytecode of LLVM) is the back end of an application, and the obfuscating doesn’t depend on the language of the source code, which is the front end of an application. As such, the obfuscator created with LLVM can modify code written in many different languages, from C to Ada. Also, it’s possible to compile Objective-C and Swift to bitcode.
- The first and best-known LLVM front end, Clang, is commonly used. Today it’s the default compiler for Android and macOS.
Let’s investigate how LLVM works before trying to obfuscate code with it.
Need to protect your application’s code from hackers?
Reach out to our cybersecurity experts and get bullet-proof protection for your software!
LLVM components
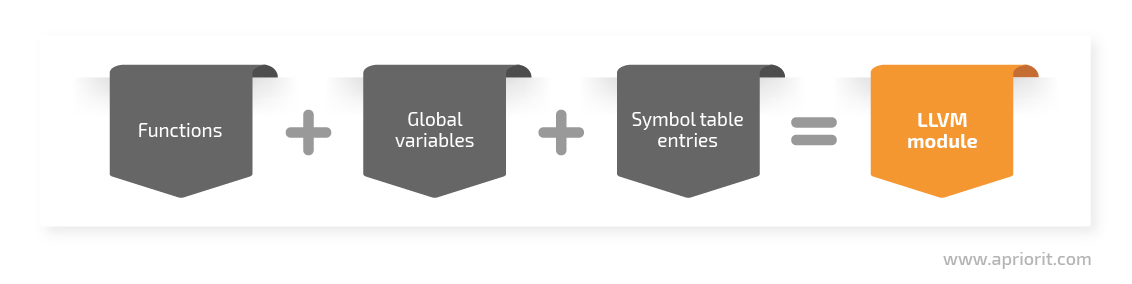
The LLVM compiler system works at a low level and doesn’t operate with abstractions such as classes. LLVM programs are composed of modules — translated units of input programs. Each module consists of functions, global variables, and symbol table entries. Modules may be combined with the LLVM linker, which merges function and global variables, resolves forward declarations, and forms symbol table entries.
There are two kinds of variables in LLVM: local and global. They are distinguished by the prefixes % and @ respectively. If a variable’s name isn’t set, a name will be assigned by the parent counter, beginning from 0 and incrementing by 1 with each new unnamed variable. A parent is an object where a variable is declared: it’s either a function or module depending on whether the variable is local or global.
You may also find variables with the ! prefix. It shows that the variable contains metadata used by the optimizer and code generator. Metadata has either a string or node type. If metadata has a name, it’s possible to look it up in the internal module table that’s built during bitcode module generation. Metadata may be attached to functions, instructions, and variables. It also may be used as a function argument.
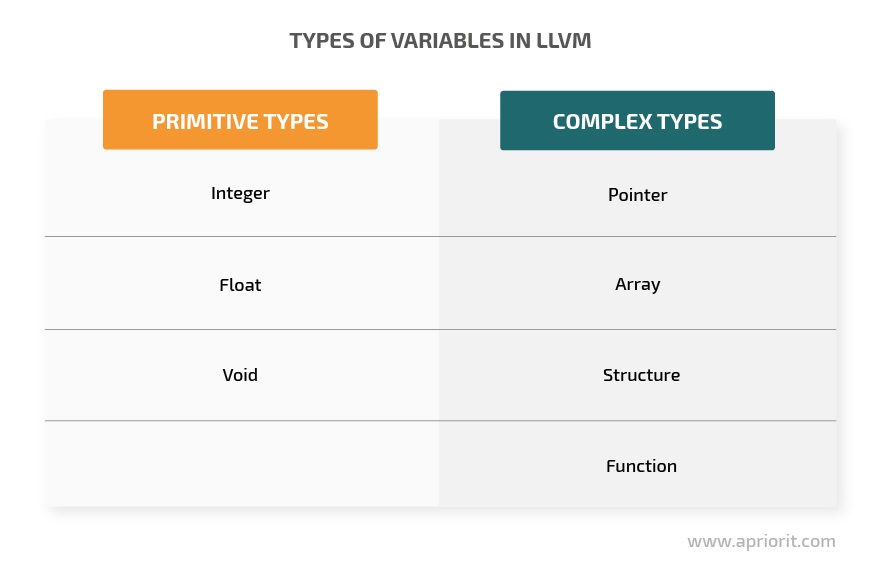
Variables may have these primitive types:
- Integer, marked by
iX, whereXis a bit capacity beginning from 1 - Float, marked by the keywords
float,double, etc. - Void with the corresponding keyword
There are also complex variable types:
- Pointers – Type*, i8*, i8** , <{i32, i32, i32, i32}>*, etc.
- Arrays – [N x T], where N is the size of the array and T is the type of elements
- Structures – {…}, where types of structure fields are enumerated with commas
- Functions – returnedType (parameterType, declare i32 printf(i8*, …), define i64 @fib(i32) {…})
Complex variable types are recursive and may consist of other complex types. Strings are represented as arrays of integers.
Functions in LLVM consist of basic blocks, which are sets of instructions. The results of these instructions are stored in local variables. Basic blocks are usually labeled by an automatically generated comment, except for the initial basic block, which is initiated by a function. The initial basic block is labeled by LLVM when a module is translated to bitcode. Labels are used for transmitting the control flow between basic blocks.
Functions and variables may be declared external when they’re defined in another module. In this case, their values may be known only when all modules are linked. External labels make loops possible. LLVM follows the static single assignment form, so variable values can’t be reassigned. To avoid reassigning variables, you can use the phi instruction. It assigns a value to a variable based on the preceding basic block.
Instructions in LLVM resemble instructions from high-level languages. You can use them to:
- perform basic mathematical, logical, and binary operations
- allocate and free memory for variables
- store and load variables from memory
- compare variables
- call other functions.
The following instructions are rare in high-level languages but are frequently used in LLVM:
getelementptr– Accesses the address of an aggregate variablebitcast– Converts a variable to another type without changing its bitsinttoptr– Converts an integer to a pointerbr– Transmits the control flow to another basic block under the proper conditions
With this knowledge in mind, let’s find out how to obfuscate code using LLVM.
Read also
Anti Debugging Protection Techniques with Examples
Protect your software from illegal reversing. Leverage our expertise in reverse engineering and get a set of techniques that will keep your code safe from hackers.

Creating your first obfuscating pass
LLVM provides a robust API with rich documentation that helps us access and modify bitcode. With this API, you can build an obfuscating pass. A pass in LLVM is a structuring technique used by the compiler to transform and optimize source code. While transforming code, a pass can also obfuscate it.
To create your first LLVM pass, download the LLVM source code. LLVM has comprehensive documentation and tutorials that are very helpful if you’re using this compiler for the first time.
For this tutorial, let’s take a C program that will perform mathematical operations. Let’s assume we want to print the name of a function when it’s called so we can easily distinguish it.
Our first step is to clone the llvm git repository. To create a pass, store the repository in the llvm/lib/Transforms folder. Let’s call the pass InsertPrintFunction. Then let’s create a folder with the name InsertPrintFunction and update CMakeLists.txt, adding the add_subdirectory(InsertPrintFunction) command. This will provide all the LLVM dependencies needed for the pass. The InsertPrintFunction folder now contains two files: CMakeLists.txt and InsertPrintFunction.cpp.
CMakeLists.txt includes the following code:
if(WIN32 OR CYGWIN)
  set(LLVM_LINK_COMPONENTS Core Support)
endif()

add_llvm_loadable_module( LLVMInsertPrintFunction
  InsertPrintFunction.cpp

  DEPENDS
  intrinsics_gen
  PLUGIN_TOOL
  opt
)After creating the folder and files, you can start building an LLVM project that includes your pass.
You may also want to build the pass outside LLVM, only referencing it. To do that, you have to manually add the LLVM libraries to include in CMakeLists.txt in order to set definitions in LLVM_DEFINITIONS. Of course, dependencies of the pass must be built beforehand and their paths must be passed to CMake. The CMakeLists.txt file for the independent LLVM pass will look like this:
project(LLVMInsertPrintFunction)
add_definitions(${LLVM_DEFINITIONS})
include(HandleLLVMOptions)
include(AddLLVM)

if(WIN32 OR CYGWIN)
  set(LLVM_LINK_COMPONENTS Core Support)
endif()

add_llvm_library( ${PROJECT_NAME}
  InsertPrintFunction.cpp

  DEPENDS
  intrinsics_gen
  PLUGIN_TOOL
  opt
  )
target_include_directories(${PROJECT_NAME} PUBLIC ${LLVM_INCLUDE_DIRS})There are different ways to handle the received module. For example, if you need to access global variables, it makes sense to work with the whole module. Otherwise, you may only need to run over each function to analyze and change the code.
The initial code for the pass will look like this:
//===- InsertPrintFunction.cpp - Example code from "Writing an LLVM Pass" ---------------===//
//
//                     The LLVM Compiler Infrastructure
//
// This file is distributed under the University of Illinois Open Source
// License. See LICENSE.TXT for details.
//
//===----------------------------------------------------------------------===//

#include "llvm/IR/BasicBlock.h"
#include "llvm/IR/Constants.h"
#include "llvm/IR/DerivedTypes.h"
#include "llvm/IR/Function.h"
#include "llvm/IR/GlobalVariable.h"
#include "llvm/IR/IRBuilder.h"
#include "llvm/IR/InstIterator.h"
#include "llvm/IR/Instructions.h"
#include "llvm/IR/TypeBuilder.h"
#include "llvm/IR/Use.h"
#include "llvm/IR/Value.h"
#include "llvm/IR/ValueHandle.h"
#include "llvm/Support/CommandLine.h"
#include "llvm/Support/raw_ostream.h"
#include "llvm/Transforms/Utils/BasicBlockUtils.h"

#include <vector>

using namespace llvm;

namespace {
class InsertPrintFunction : public FunctionPass {
public:
  static char ID; // Pass identification, replacement for typeid
  InsertPrintFunction() : FunctionPass(ID) {}

  bool runOnFunction(Function &F) override {
    if (F.empty()) {
      return false;
    }
    return false;
  }
};
}

char InsertPrintFunction::ID = 0;
static RegisterPass<insertprintfunction> X("InsertPrintFunction", "Insert Print Function Pass");This code will create a library that you can load using the opt tool and use to work with the bitcode module, even though you’re not currently using it to modify the module.
The code above has three lines you should pay attention to:
- The InsertPrintFunction class declaration, which derives from the FunctionPass class.
- Override function runOnFunction, which interacts with the functions in the module and returns true if it changes the module.
- The
RegisterPassparameter at the end of the file. The PassManager uses this parameter to notify theopttool that a pass was taken.
runOnFunction is your entry point to the module. At the beginning of its execution, check whether the function you’re going to modify has a body. The validation looks like this:
   if (F.empty()) {
     return false;
}Then you need to receive the printf function. To do that, get the pointer to the parent module from the received function. All functions received in the pass share the same parent module.
Next, obtain a pointer to the printf function declaration, which returns a 32-bit number, receives a pointer to the char* string, and may have variadic arguments.
Related project
Device Firmware Reversing to Obtain the Screen Mirroring Protocol
Discover how reverse engineering our client’s original firmware allowed us to reconstruct the secure connection process without original documentation and enable cross-platform compatibility for video mirroring.
The LLVM documentation states that if a module finds the printf function but it has an unexpected signature, it will return it as an object of the Constant class instead of as a Function. Here’s an example of such a response:
Module *parentModule = F.getParent();
Constant *availablePrint = parentModule->getOrInsertFunction("printf",
FunctionType::get(IntegerType::getInt32Ty(parentModule->getContext()),
PointerType::get(Type::getInt8Ty(parentModule->getContext()), 0),
/* Var Args */ true));As LLVM has a huge number of classes with complicated inheritance, it’s crucial to be sure whether an object has the correct type. LLVM provides its own means for run-time type identification. The key operators are:
- isa<X> – returns
bool, which indicates whether the object’s type belongs to X - cast<X> – returns a pointer to an object of X class if its type is indeed X or crashes the program otherwise
- dyn_cast<X> – returns a pointer to an object if it has the dyn_cast<X> type (like cast<X> does) or else returns
null
If you want to obtain an object of some class and use its properties and methods, use the dyn_cast operator wrapped in an if instruction:
if (auto printFunction = dyn_cast<Function>(availablePrint)) {Keep in mind that developing complex passes requires more if instructions to check object types, which leads to functions with a high level of nesting.
Once you receive the basic entry block, split it. Then insert a new block that will contain instructions. Here’s how you can do that:
BasicBlock *entryBasicBlock = &F.getEntryBlock();
BasicBlock *splitBasicBlock = entryBasicBlock->splitBasicBlock(entryBasicBlock->getFirstNonPHIOrDbgOrLifetime());
BasicBlock *generatedBasicBlock = BasicBlock::Create(F.getContext(), "PrintFunctionName", &F, splitBasicBlock);Basic blocks must know what other basic blocks are called after their last instruction is completed. To ensure they know this, create the br instruction for the basic entry block to make it lead to a new basic block. You can create a new basic block by dividing the old one in half and turning one part of it into a new block. Then replace the terminator instruction with this br instruction. These actions will add the printf function to the generated basic block and execute it:
BranchInst *newBr = BranchInst::Create(generatedBasicBlock);
ReplaceInstWithInst(entryBasicBlock->getTerminator(), newBr);When creating instructions, you must notify how they are declared: either by the pointer to the instructions or by the basic block. To reduce repetition, use the IRBuilder class to create instructions and insert them into a specific location without explicitly passing properties:
IRBuilderu0026lt;u003e instructionBuilder(generatedBasicBlock);Now you can add instructions that will print the function. First, you need to get the name of the function you’re working with and save it as a string. To do that, create an object of the ConstandDataArray class with the name of the function as its value:
auto functionName = F.getName().str();
auto printedName = ConstantDataArray::getString(parentModule->getContext(), functionName + "\n");Then indicate in the code that you’ve stored such a string in memory by allocating memory with the alloca instruction. The type of a given string indicates that you’re allocating memory for a variable of type string. Here’s the instruction:
auto allocInstruction = instructionBuilder.CreateAlloca(printedName->getType());Next, assign allocated memory to your value (the name of the function). Store the string in the allocated memory by creating the store instruction:
instructionBuilder.CreateStore(printedName, allocInstruction);The last step before inserting the printf function is casting a type-safe pointer, getelementptr inbounds. Getelementptr is an instruction for receiving an address of an aggregate subelement. Inbounds are safety measures for receiving the proper subelement.
If you look at the printf function in the .ll file, you’ll see that it receives the pointer to getelementptr inbounds. You need to receive the pointer to the first element of the string. To receive it, execute such instruction and pass two zeros to it:
Value *zero = ConstantInt::get(Type::getInt32Ty(parentModule->getContext()), 0);
auto ptr = instructionBuilder.CreateInBoundsGEP(allocInstruction, {zero, zero});Now you can call the printf function and pass arguments to it. You have only one argument here: the instruction you’ve just created. Name it to indicate that it has been generated by your pass:
std::vector<Value *> args {
ptr
};
instructionBuilder.CreateCall(printFunction, args, "printfCall");After that, create the br instructions to pass further function execution as usual. With these final lines of code, you’ve completed the pass and returned true to show that the pass has modified the code:
BranchInst::Create(splitBasicBlock, generatedBasicBlock);
return true;Here’s how your pass will look:
//===- InsertPrintFunction.cpp - Example code from "Writing an LLVM Pass" ---------------===//
//
// The LLVM Compiler Infrastructure
//
// This file is distributed under the University of Illinois Open Source
// License. See LICENSE.TXT for details.
//
//===----------------------------------------------------------------------===//
#include "llvm/IR/BasicBlock.h"
#include "llvm/IR/Constants.h"
#include "llvm/IR/DerivedTypes.h"
#include "llvm/IR/Function.h"
#include "llvm/IR/GlobalVariable.h"
#include "llvm/IR/IRBuilder.h"
#include "llvm/IR/InstIterator.h"
#include "llvm/IR/Instructions.h"
#include "llvm/IR/TypeBuilder.h"
#include "llvm/IR/Use.h"
#include "llvm/IR/Value.h"
#include "llvm/IR/ValueHandle.h"
#include "llvm/Support/CommandLine.h"
#include "llvm/Support/raw_ostream.h"
#include "llvm/Transforms/Utils/BasicBlockUtils.h"
#include <vector>
using namespace llvm;
namespace {
class InsertPrintFunction : public FunctionPass {
public:
static char ID; // Pass identification, replacement for typeid
InsertPrintFunction() : FunctionPass(ID) {}
bool runOnFunction(Function &F) override {
   if (F.empty()) {
     return false;
}
Module *parentModule = F.getParent();
Constant *availablePrint = parentModule->getOrInsertFunction("printf",
          FunctionType::get(IntegerType::getInt32Ty(parentModule->getContext()),
            PointerType::get(Type::getInt8Ty(parentModule->getContext()), 0),
          /* Var Args */ true));
if (auto printFunction = dyn_cast<Function>(availablePrint)) {
 BasicBlock *entryBasicBlock = &F.getEntryBlock();
   BasicBlock *splitBasicBlock = entryBasicBlock->splitBasicBlock(entryBasicBlock->getFirstNonPHIOrDbgOrLifetime());
BasicBlock *generatedBasicBlock = BasicBlock::Create(F.getContext(), "PrintFunctionName", &F, splitBasicBlock);
BranchInst *newBr = BranchInst::Create(generatedBasicBlock);
      ReplaceInstWithInst(entryBasicBlock->getTerminator(), newBr);
IRBuilder<> instructionBuilder(generatedBasicBlock);
auto functionName = F.getName().str();
    auto printedName = ConstantDataArray::getString(parentModule->getContext(), functionName + "\n");
auto allocInstruction = instructionBuilder.CreateAlloca(printedName->getType());
instructionBuilder.CreateStore(printedName, allocInstruction);
Value *zero = ConstantInt::get(Type::getInt32Ty(parentModule->getContext()), 0);
    auto ptr = instructionBuilder.CreateInBoundsGEP(allocInstruction, {zero, zero});
std::vector<Value *> args {
      ptr
      };
      instructionBuilder.CreateCall(printFunction, args, "printfCall");
BranchInst::Create(splitBasicBlock, generatedBasicBlock);
    return true;
}
return false;
}
};
}
char InsertPrintFunction::ID = 0;
static RegisterPass<InsertPrintFunction> X("InsertPrintFunction", "Insert Print Function Pass");Let’s use this pass to obfuscate this code:
#include <stdio.h>

// shows nth element of Fibonnaci sequence
unsigned long fib(unsigned nth) {
    long x = 0;
    long y = 1;
    long z = 0;
    for (int i = 0; i < nth; i++) {
        z = x + y;
        x = y;
        y = z;
    }
    return x;
}

// returns factorial of nth element
unsigned long factorial(unsigned long nth) {
    if (!nth) {
        return 1;
    }
    return nth * factorial(nth - 1);
}

int main() {
    printf("%lu\n",factorial(3));
    fib(6);
    return 0;
}To obfuscate our code, let’s first create bitcode to work with:
clang -emit-llvm -o main.bc -c main.cYou may look at the readable bitcode content by calling llvm-dis:
llvm-dis main.bc -o main.llIf you have the opt tool and the pass, you can run the following command to execute the pass:
opt -load LLVMInsertPrintFunction.dylib -InsertPrintFunction main.bc -o main.o.bcThe generated file is processed by the pass. You may call llvm-dis again to look at the inserted functions. The other way to look at the execution of the changed program is to execute two commands. First, generate an object file from the bitcode:
llc -filetype=obj main.o.bThis will create a main.o.o file, which you can pass to GNU Compiler Collection to create an executable with this command:
gcc main.o.o -o changedExecutablevHere’s a comparison of the outputs of the unmodified and modified binaries:
| Unmodified | Modified |
 | 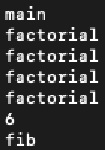 |
As factorial is a recursive function, we see multiple prints of its call. With that, the original unmodified binary is obfuscated.
Read also
Catching Sandbox-Evading Malware: Techniques, Principles & Solutions
Build a sandbox that will prevent even the most evasive malware from execution. Explore the best practices of malware detection from Apriorit’s cybersecurity experts.

Conclusion
As you can see from the tutorial above, creating a pass to obfuscate even a simple piece of code is quite a challenging task. Developing more complex passes integrated into build systems is even more complicated. However, the benefits of using such passes are huge: they allow you to modify your bitcode in lots of ways, making it secure from hacker attacks and reversing. LLVM has almost limitless capabilities for protecting your code.
In this article, you’ve learned how to work with LLVM and how to create a simple obfuscating pass. If you want to protect more complex software, challenge our experienced reverse engineering team with this task!
Resources
- Getting Started with the LLVM System – tutorial for downloading and building LLVM
- LLVM documentation for classes used in LLVM passes
- Example of creating an LLVM pass
- LLVM Language Reference Manual
Need a team of ethical reverse engineers?
Let’s chat about how we can get to the core of your software and make it more secure, resilient, and reliable for your users!
Have a question?
Ask our expert!
Program Manager


