 Skip to main content
Have you ever felt a desire to take some mechanism apart to find out how it works? That desire is the leading force in reverse engineering. This skill is useful for analyzing product security, finding out the purpose of a suspicious .exe file without running it, recovering lost documentation, developing a new solution based on legacy software, etc.
In this article, we discuss the knowledge base needed to perform reverse engineering, basic principles of reverse engineering a piece of Windows software, disassemblers, and tools. We also provide a step-by-step example of reverse engineering an application.
Contents
- What is software reverse engeneering?
- What do we need for reverse engineering?
- Theoretical Knowledge. Software Reverse Engineering Process
- Useful Tools for Reverse Engineering Windows Software
- Disassemblers
- Windows Sysinternals
- Network Monitoring Tools
- Debuggers
- Real-life software reverse engineering example
- How to reverse engineer a driver
- Conclusion
What is software reverse engineering?
Reverse engineering is the process of uncovering principles behind a piece of hardware or software, such as its architecture and internal structure. The question that drives reverse engineering is How does it work?
Obviously, if you have documentation, the whole process becomes much simpler. But it often happens that there’s no documentation and you need to find another way to learn how a piece of software works.
When might you need to reverse engineer a piece of software and how might doing so help you?
There are many uses of reverse engineering in the field of computer science, including:
- Researching network communication protocols
- Finding algorithms used in malware such as computer viruses, trojans, ransomware, etc.
- Researching the file format used to store any kind of information, for example emails databases and disk images
- Checking the ability of your own software to resist reverse engineering
- Improving software compatibility with platforms and third-party software
- Using undocumented platform features
The legality of reverse engineering depends on its purpose and how the software will be used. All the purposes mentioned above are completely legitimate, assuming you’ve obtained a copy of the software legally. But if you intend to, for example, reverse engineer a certain feature of a closed application and then implement it in another application, you’ll probably get into trouble.
Regarding legal documentation, reverse engineering is often prohibited by end-user license agreements (EULAs). But the US Digital Millennium Copyright Act specifies that reversing a piece of software is legal if it’’ done to improve compatibility with other products.
Legal requirements vary from country to country, so take your time to research them before you start.
Now let’s see how to reverse engineer software.
Want to enhance your software’s capabilities?
Quickly launch high-quality research, detect and fix critical bugs, and improve your systems’ efficiency and security. Leverage the knowledge of our reverse engineering specialists for your project.
What do we need for reverse engineering?
To start reverse engineering software, you need:
- knowledge in the field where you want to apply reverse engineering
- tools that will allow you to apply your knowledge while trying to disassemble software.
Let’s consider a generic example that isn’t connected to software. Let’s say you have a watch and you want to find out if it’s mechanical, quartz, or automatic.
Having knowledge of the field means you should know that there are three types of watches. Additionally, you should know that if there’s a battery, it’s located inside the watch, and you can see it if you open it up. You should also have basic knowledge of a watch’s internal structure, what the battery looks like, and what tools you need to open a watch case. Having the tools to apply your knowledge means that you need to have a screwdriver or other dedicated tool that will give you the chance to open the watch.
Just like reverse engineering a watch requires a specific skill set and tools, reverse engineering software requires its own field-specific knowledge and tools.
Theoretical Knowledge. Software Reverse Engineering Process
For different software reverse engineering tasks, you need different types of knowledge. Of course, there’s common knowledge that will help you in most reverse engineering tasks: knowledge of common application structures, programming languages, compilers, and so on. However, without special theoretical knowledge, you can’t solve specific reverse engineering tasks.
| If you… | You need knowledge of… |
| reverse engineer any network applications | principles of inter-process communications, the structure of networks, connections, network packets, etc. |
| reverse cryptographic algorithms | cryptography and the most popular algorithms used in the field |
| research file structures | basic file concepts and how different systems or components work with files |
Special techniques can save a lot of time while reversing special types of software. In the case of file interactions, making a test that writes unique type values to a file while logging the offsets and data size to the actual storage file may help you find common patterns in offsets. This will give you a hint about the internal structures of these files.
When starting the process of reverse engineering, software developers generally use a disassembler in order to find algorithms and program logic in place. There are many different executable file formats, compilers (which give different outputs), and operating systems. This diversity of technologies precludes the use of one single technology for reversing all types of software.
To understand the decompiled code, you need some knowledge of the assembler language, function calling conventions, stack structure, stack frames concept, etc.
Knowing the assembler output for different code samples may help you in uncovering the original functionality. Let’s consider some reverse engineering examples for the Windows x86 platform.
Let’s say we have the following code:
int count = 0;
for (int i = 0; i < 10; ++i)
{
count++;
}
std::cout << count;
If we compile this code to an executable file, we’ll see this in the disassembler:
004113DE loc_4113DE:
004113DE     mov     eax, [ebp-14h]
004113E1     add     eax, 1
004113E4     mov     [ebp-14h], eax
004113E7 loc_4113E7:
004113E7     cmp     [ebp-14h], 0Ah
004113EB     jge     short loc_4113F8
004113ED     mov     eax, [ebp-8]
004113F0     add     eax, 1
004113F3     mov     [ebp-8], eax
004113F6     jmp     short loc_4113DE
004113F8 loc_4113F8:
004113F8     mov     ecx, ds:?cout@std
004113FE     push    eax
00411400     call    ds:basic_ostream@operator<<(int)
00411404     xor     eax, eax
00411406     retn
As we can see, the regular cycle turned into assembly code with comparisons and jumps. Notice that the assembly code doesn’t use the regular assembly loop with the counter in the ecx register. In addition, local variables here are referred to as [ebp-14h] and [ebp-8] accordingly.
Let’s see what will happen if we compile this code using the release build:
00401000 main     proc near
00401000     mov     ecx, ds:?cout@std
00401006     push    0Ah
00401008     call    ds:basic_ostream@operator<<(int)
0040100E     xor     eax, eax
00401010     retn
00401010 main     endp
This piece of code doesn’t look anything like the previous. This is because of how the code was optimized. Technically, the loop was removed, since it’s not doing anything valuable other than incrementing the count variable to 10. So the optimizer decided just to keep the final value of the count variable and place the value directly as an argument for the count output operator.
The compilers that we use nowadays are very good at optimizing code. That’s why when reverse engineering, it’s better to understand the idea behind the code (the principles of the code) rather than to try getting the original code itself. If you understand the idea behind the code, you can just write your own prototype that fits the original task.
In most cases, any reverse engineer is required to understand how the compiler generates the code to be able to reconstruct the code from whatever architecture. This is because disassemblers typically only show the assembly instructions, which can be difficult to understand and analyze directly. However, today, advancements in tools like IDA, Ghidra, and Radare allow for decompilation into a pseudo-C representation. Pseudo-C code resembles C code, but it might not be compilable due to architecture-specific details or optimizations made by the compiler. However, it offers a much clearer understanding of the program’s logic compared to raw assembly instructions. This simplifies the decompilation process by providing a higher-level view of the original source code.
Consider the following code snippet written for the Windows platform:
#include <windows.h>
#include <stdio.h>

struct MyDate
{
    WORD wYear;
    WORD wMonth;
    WORD wDay;
};

__declspec(noinline) void CheckTheDate(MyDate & date)
{
    if (date.wYear >= 2024 && date.wMonth == 1 && date.wDay == 1)
        printf("It's a new year, let's celebrate");
}

int main()
{
    SYSTEMTIME sysTime = {0};
    GetSystemTime(&sysTime);

    MyDate date = {sysTime.wYear, sysTime.wMonth, sysTime.wDay};
    CheckTheDate(date);
    return 0;
}
Compiling this code in release mode and loading the executable into a decompiler like IDA results in pseudo-C code that partially resembles the original source. It will represent it like this:
int __fastcall main(int argc, const char **argv, const char **envp)
{
  __int16 v4[4]; // [rsp+20h] [rbp-28h] BYREF
  struct _SYSTEMTIME SystemTime; // [rsp+28h] [rbp-20h] BYREF

  SystemTime = 0i64;
  GetSystemTime(&SystemTime);
  v4[0] = SystemTime.wYear;
  v4[1] = SystemTime.wMonth;
  v4[2] = SystemTime.wDay;
  sub_140001070(v4);
  return 0;
}
The decompiler can recognize the _SYSTEMTIME structure defined in the Windows header file. However, for programmer-defined structures like MyDate, it might misinterpret the data as an array. In this case, IDA sees v4 in the main function as an integer array (__int16 v4) instead of the intended MyDate structure.
In order to fix this, IDA allows you to create user-defined structures. Add the definition:
struct MyDate
{
    WORD year;
    WORD month;
    WORD day;
};
After that, change the type of v4 from array of int to MyDate. The pseudo-code of main() will start looking like this:
int __fastcall main(int argc, const char **argv, const char **envp)
{
  MyDate v4; // [rsp+20h] [rbp-28h] BYREF
  struct _SYSTEMTIME SystemTime; // [rsp+28h] [rbp-20h] BYREF

  SystemTime = 0i64;
  GetSystemTime(&SystemTime);
  v4.year = SystemTime.wYear;
  v4.month = SystemTime.wMonth;
  v4.day = SystemTime.wDay;
  sub_140001070(&v4);
  return 0;
}
v4 is not an array anymore, so we can continue into sub_140001070.
_int64 __fastcall sub_140001070(_WORD *a1)
{
  __int64 result; // rax
  result = 2024i64;
  if ( *a1 >= 0x7E8u && a1[1] == 1 && a1[2] == 1 )
    return sub_140001010("It's a new year, let's celebrate");
  return result;
}
This demonstrates how decompiler output relies on the underlying assembly instructions. The decompiler analyzes instructions like cmp word ptr [rcx+2], 1. It also has no information about the type of date, so it decides that there’s some work being done with the WORD array.
But after you change the definition of the function from __int64 __fastcall sub_140001070(_WORD *a1) to __int64 __fastcall sub_140001070(MyDate *date), the code will start looking like this:
__int64 __fastcall sub_140001070(MyDate *date)
{
  __int64 result; // rax

  result = 2024i64;
  if ( date->year >= 0x7E8u && date->month == 1 && date->day == 1 )
    return sub_140001010("It's a new year, let's celebrate");
  return result;
}
By providing additional information like structure definitions, the reverse engineer guides the decompiler towards a more accurate representation of the initial source code.
So, modern reverse engineering is happening less in the form of work over the assembler code and more in the form of reconstruction of pseudo-C into a real source code. Yet, to perform the reverse engineering accurately, you still need to understand how exactly the decompiler decides to generate pseudo-C from the specific assembler instructions and what it could have been in the initial source code.
It will be very useful to know what assembly code you’ll get if you compile different operators, structures, and other language constructions. Understanding resultant assembly code is a good way to start the C++ reverse engineering process, but we won’t get into the technical details of it here.
Read also
9 Best Reverse Engineering Tools for 2023 [Updated]
Choose reversing tools that suit your project based on our overviews and practical experiences of using them in real-life projects.
![9 Best Reverse Engineering Tools for 2023 [Updated]](data:image/svg+xml,%3Csvg%20xmlns='http://www.w3.org/2000/svg'%20viewBox='0%200%200%200'%3E%3C/svg%3E)
Useful tools for reverse engineering Windows software
We’ve already described several reverse engineering tools, including ProcessMonitor and ProcessExplorer, in our application architecture research. These tools are absolutely indispensable for reverse engineering.
In this section, we’ll review the most popular disassemblers and a few more tools that we use for our reverse engineering projects.
You can get more details and usage examples in our article on best software reverse engineering tools.
Disassemblers
A disassembler is a program that translates an executable file to assembly language. The most popular one is IDA Pro
IDA Pro
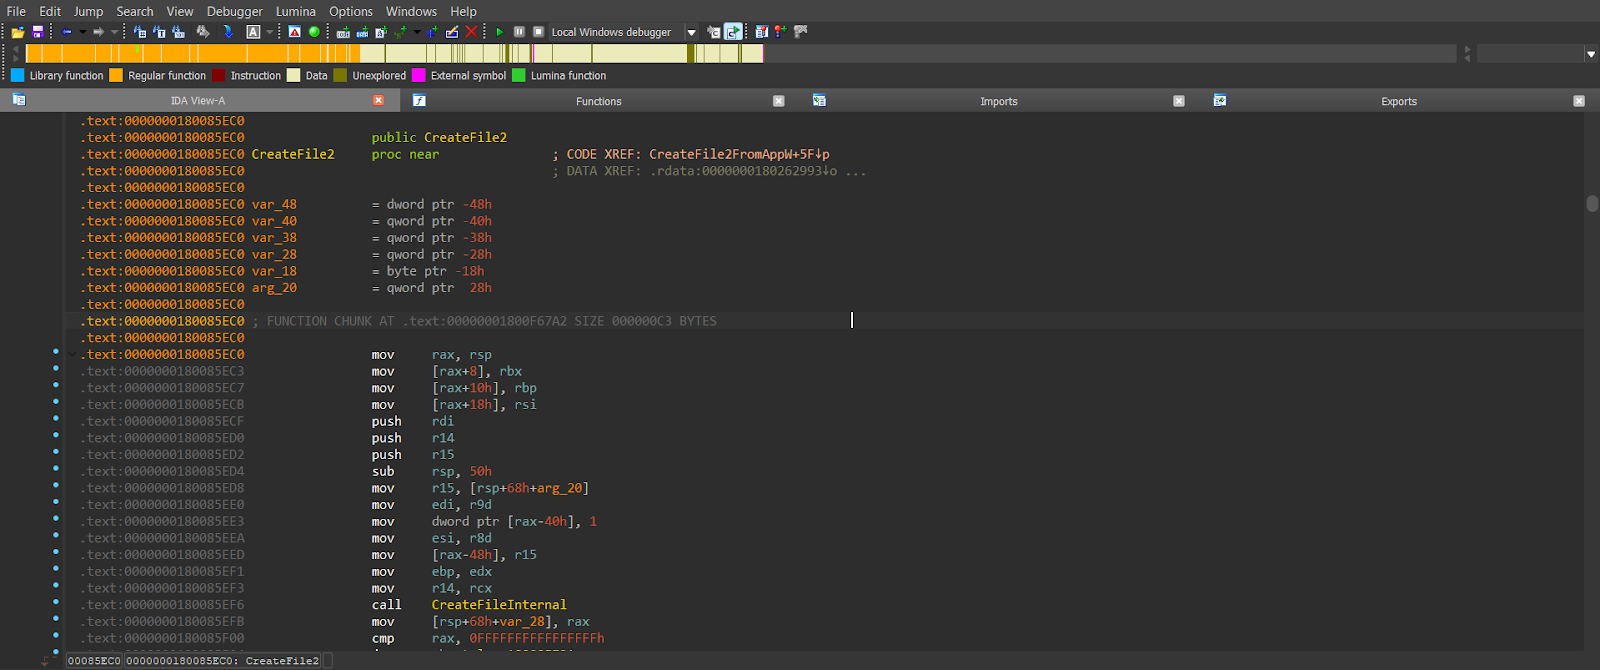
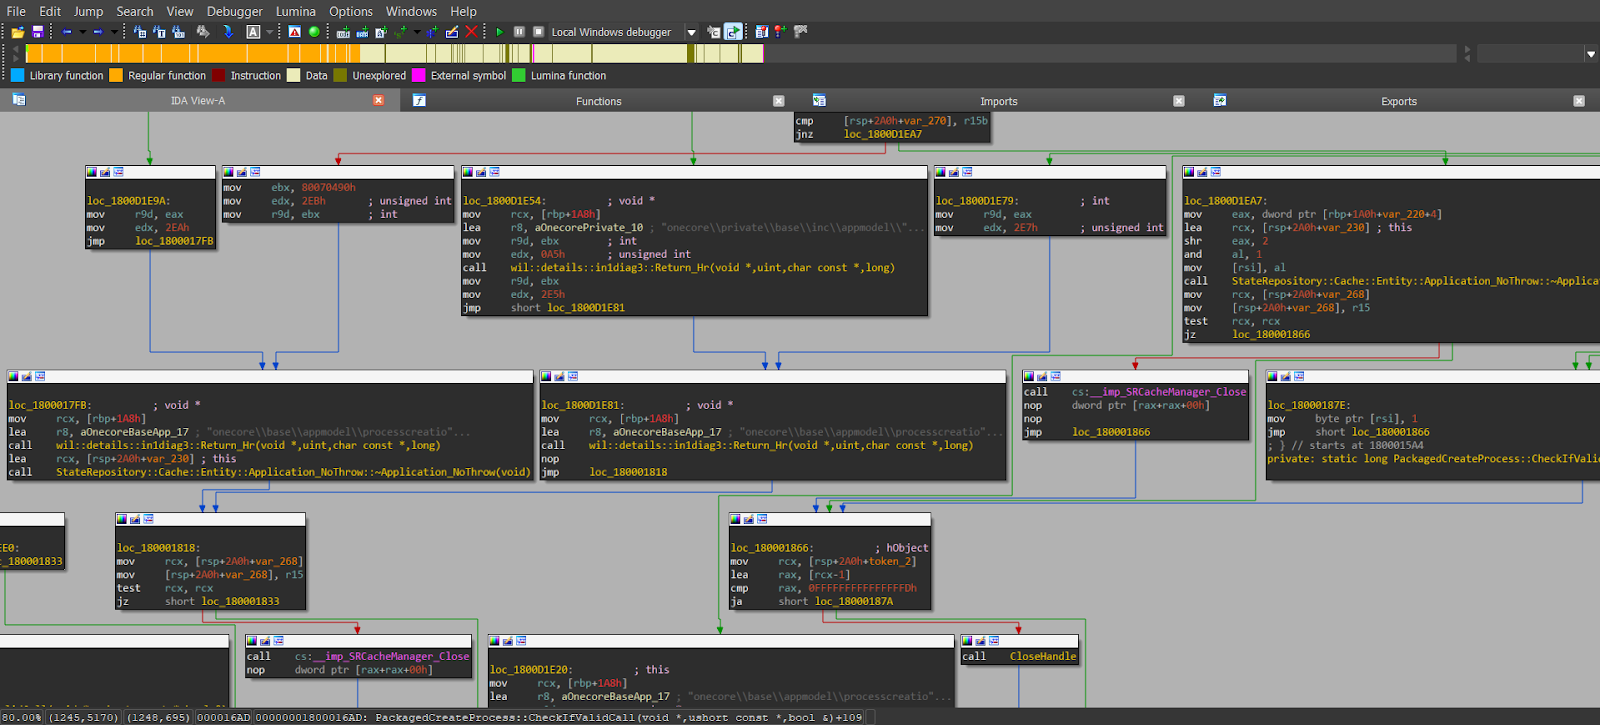
IDA Pro is a convenient and powerful tool for disassembly. It has a huge number of instruments that allow you to quickly disassemble a piece of software. It’s also interactive so that you can not only view the code but also edit it. For example, you can rename the function and variables, introduce the structures, and apply the structures to both code and data. The tool can show the function call tree, parse import and export of the executable, and show information about the executables. It can even show the code in C. Also, it supports multiple CPU architectures, so it’s possible to use IDA Pro to reverse engineer code for ARM, AVR, M68k, and many other architectures.
Ghidra
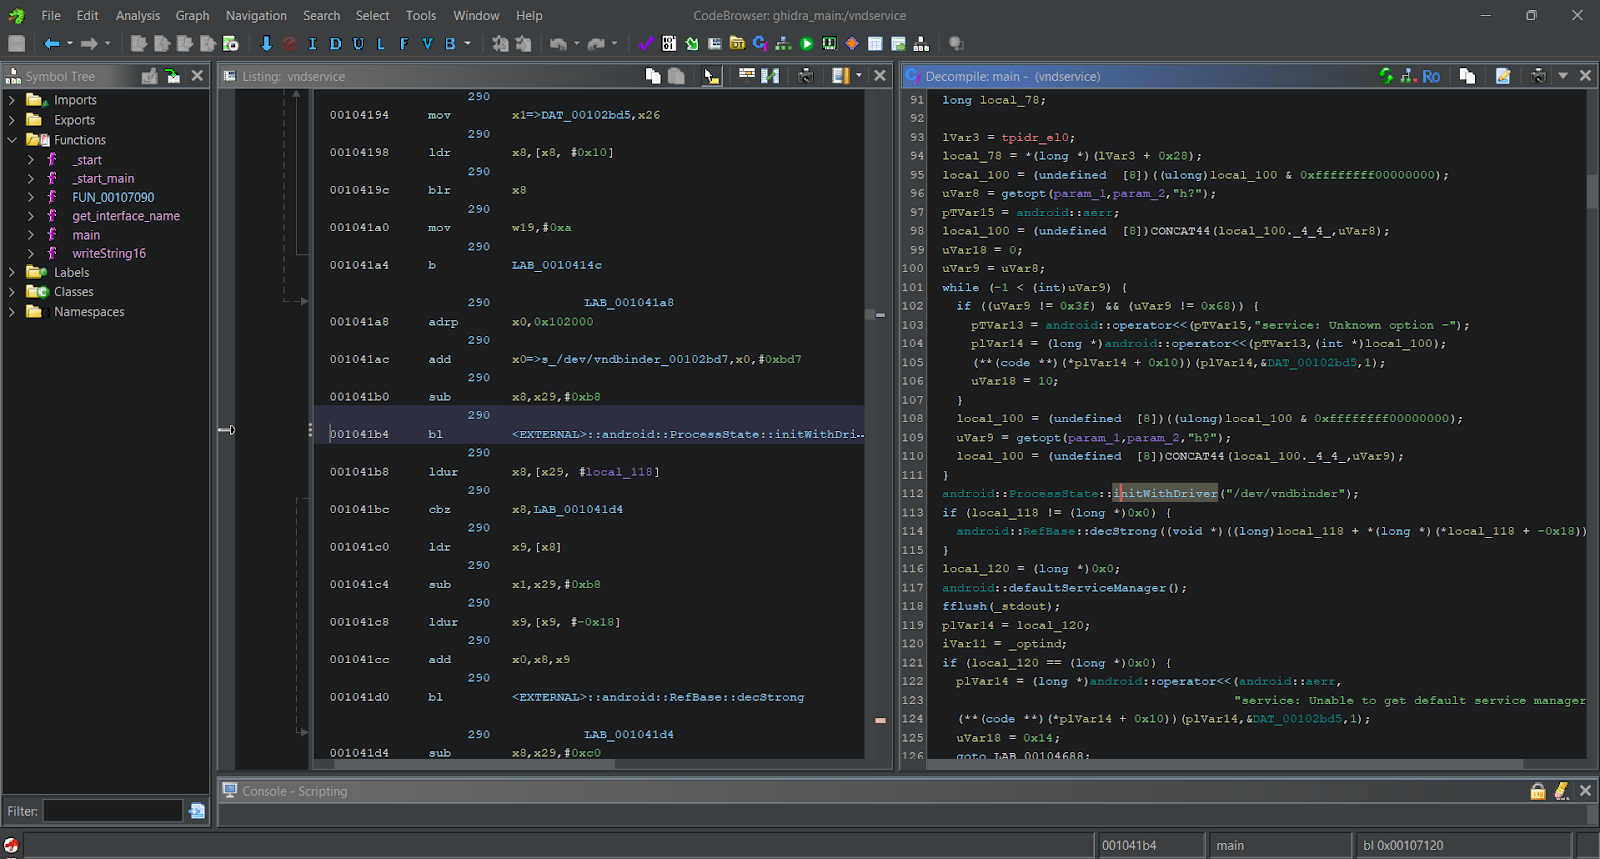
Ghidra is an open-source disassembler and decompiler developed by the National Security Agency (NSA). Ghidra stands out for its decompiler’s availability across all supported CPU architectures, which makes it better than IDA Pro in this regard. Additionally, as it’s written in Java, it prompts cross-platform compatibility. However, Ghidra can be resource-intensive in terms of memory usage.
Radare/Rizin
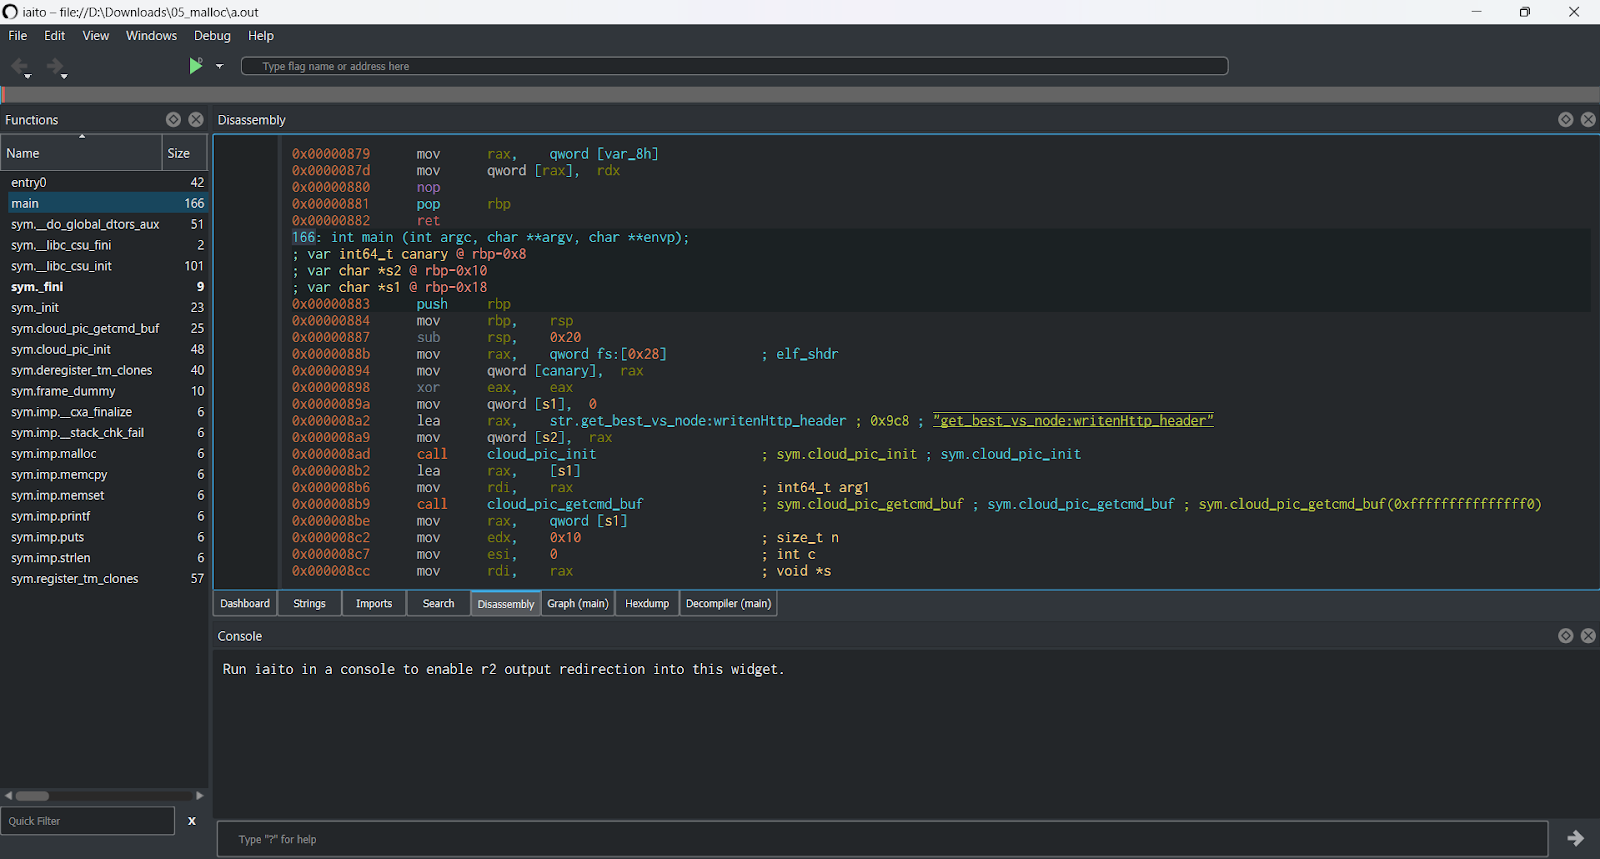
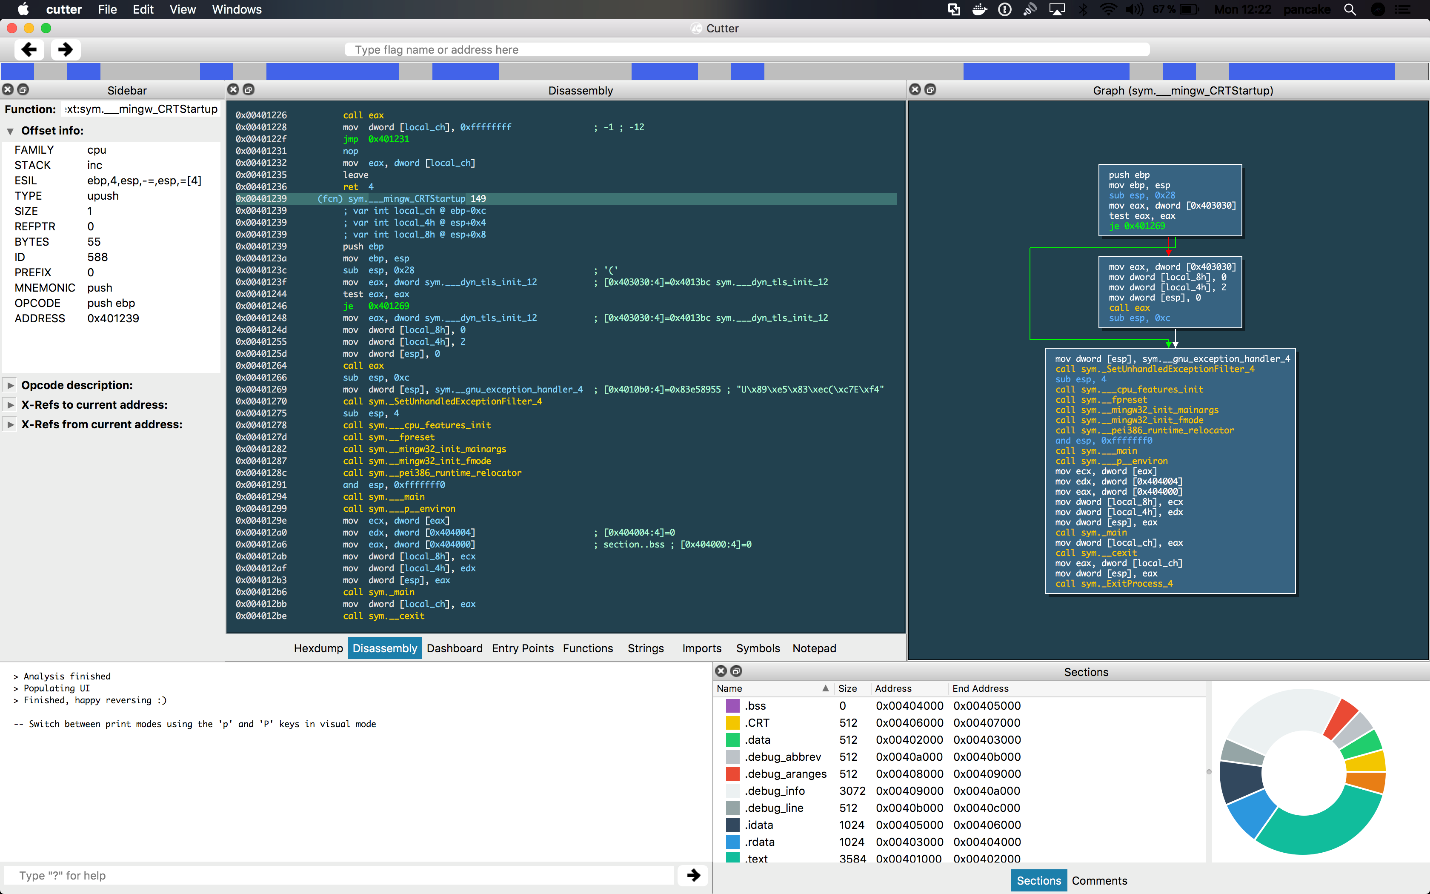
The Radare disassembler has all the IDA features without being as robust and stable, but it’s free and open source. Radare itself is a console tool, but it has an Iaito frontend, which makes it a true alternative to IDA and Ghidra. Alternatively, you can use Rizin, which is a fork of Radare. It has its own GUI called Cutter. It combines the free and open-source nature of Radare with a user-friendly GUI and an improved decompiler, making it a potentially attractive alternative to commercial options like IDA or even Ghidra.
Dynamic instrumentation tools
Dynamic instrumentation is the approach to reverse engineering that controls the code in runtime through a set of hooks. This approach allows you to inject your custom code into a running process and then dynamically set hooks at some points of the code. This way, you can monitor and control code execution.
Frida is a dynamic instrumentation toolkit mainly for iOS and Android, though it also supports Windows and Linux. It lets you inject snippets of JavaScript or your own library into native apps so that you control the code execution via the JavaScript callbacks.
DynamoRIO is a Windows-specific library and toolset focused on various tasks such as code coverage analysis, memory value tracing, memory debugging, fuzzing, and performance analysis.
Windows Sysinternals
Windows Sysinternals utilities are generally used for management, diagnostics, troubleshooting, and monitoring of the Microsoft Windows environment. But they’re also suitable for reverse engineering Windows software.
TCPView is a network sniffer that shows all information about TCP/UDP packets from all processes. This tool is useful for reversing network protocols.
PortMon is a physical system port monitor. It monitors serial and parallel ports and all traffic that goes through them.
WinObj shows all global objects in the system in a hierarchical structure. This tool can be useful when reversing an application that works with synchronization primitives such as mutexes and semaphores and also when reverse engineering kernel mode drivers.
Network monitoring tools
Wireshark
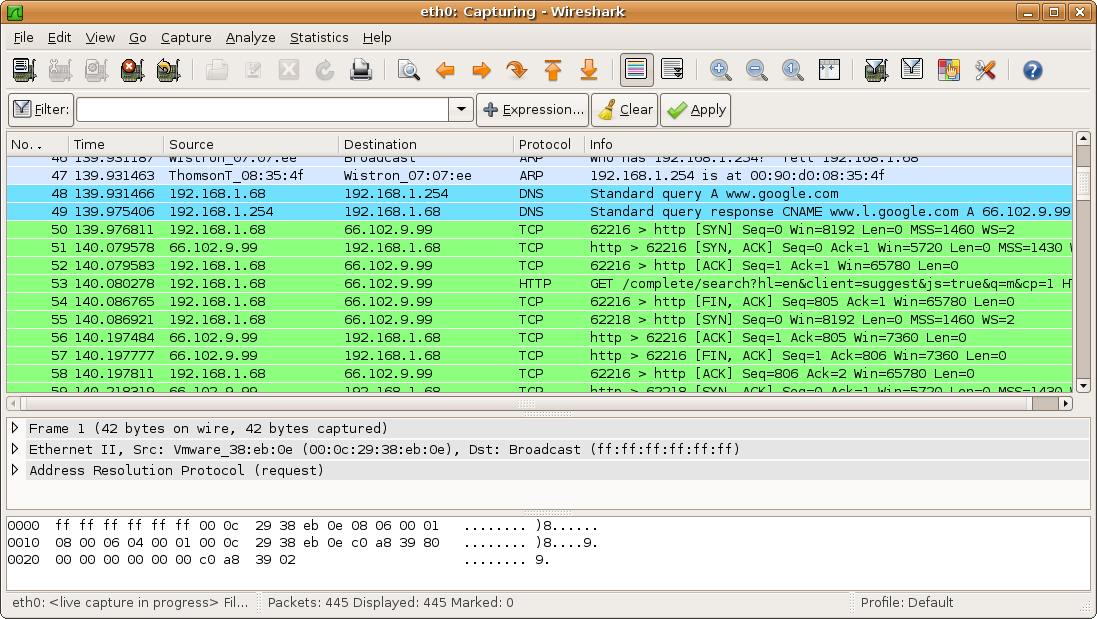
Wireshark is one of the most powerful network sniffers. It not only allows you to capture network traffic but also contains parsers for various network protocols, starting from really low-level like Ethernet, TCP, and IP to application-specific protocols like WebSockets and XMPP.
Fiddler
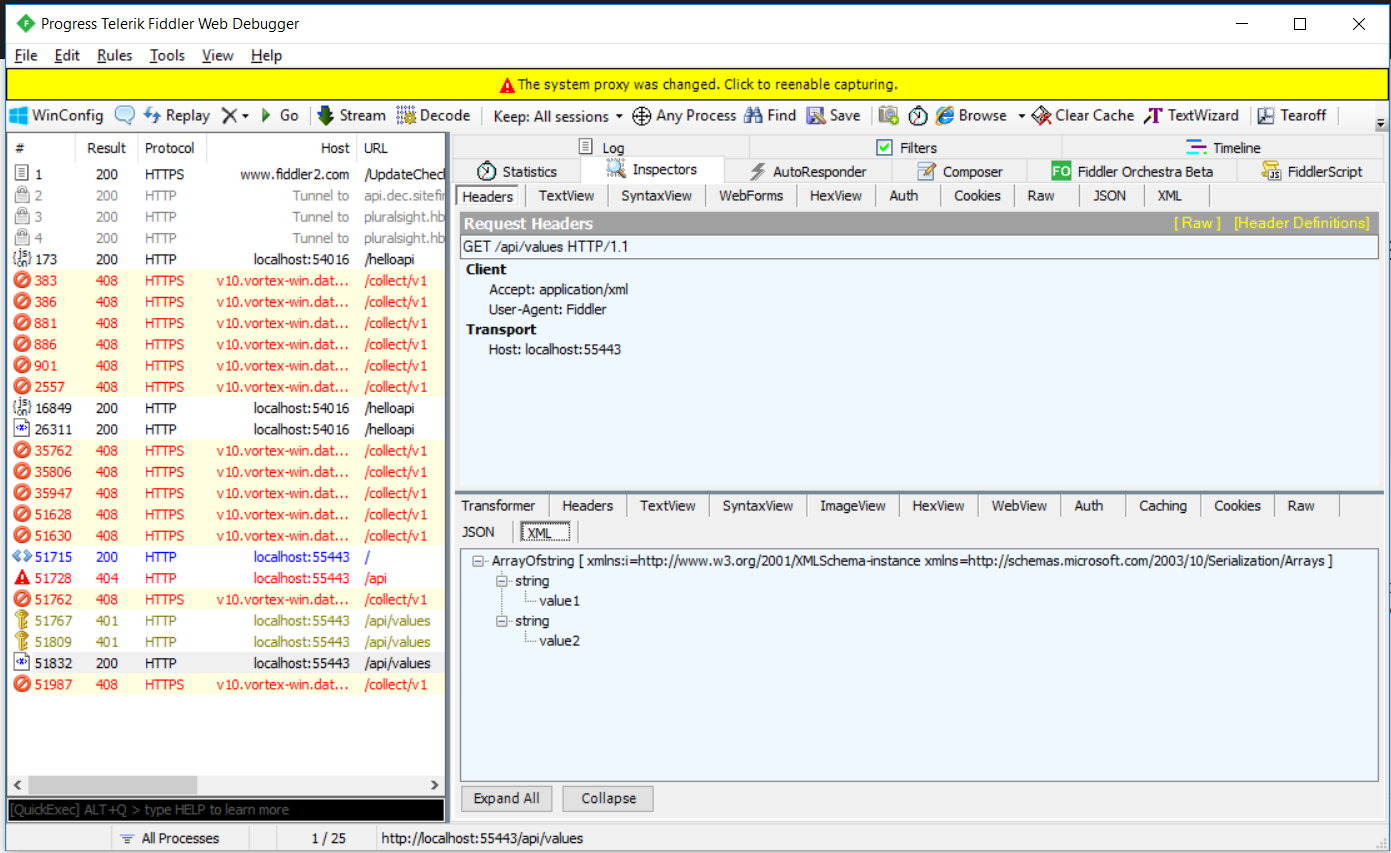
Fiddler is a web proxy that records traffic from browsers and allows you to analyze HTTP/HTTPS requests. Unlike Wireshark, it shows HTTP sessions instead of separate network packets. Fiddler also allows you to analyze compressed data sent over HTTP and analyze JSON and XML data when monitoring SOAP, REST, and AJAX requests.
API Monitor
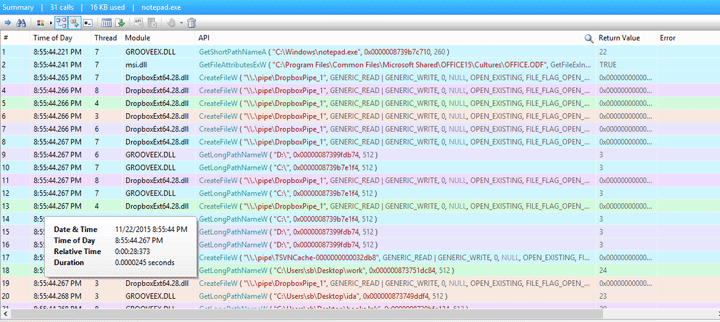
API Monitor is a useful tool for discovering which APIs are called by an application and what behavior the application expects from those APIs. This tool has a powerful database and lets you see calls to a huge number of API functions of not only kernel32 and ntdll but also COM, managed environment, and others. Also, API Monitor provides convenient filtering mechanisms.
Related project
Developing Software for a Drone Battery Charging and Data Management Unit
To help our client quickly deliver an MVP of the drone battery recharging kit, we reversed its batteries to develop embedded software and emulated the device to test our code. Read the full text to discover exciting details of this success story.
Debuggers
A debugger is invaluable for any developer to see what a program is doing right now. You get the same benefit from debugging when reversing applications as you get from debugging live applications.
The most popular debuggers are OllyDbg, WinDbg, and Windbg Preview.
OllyDbg
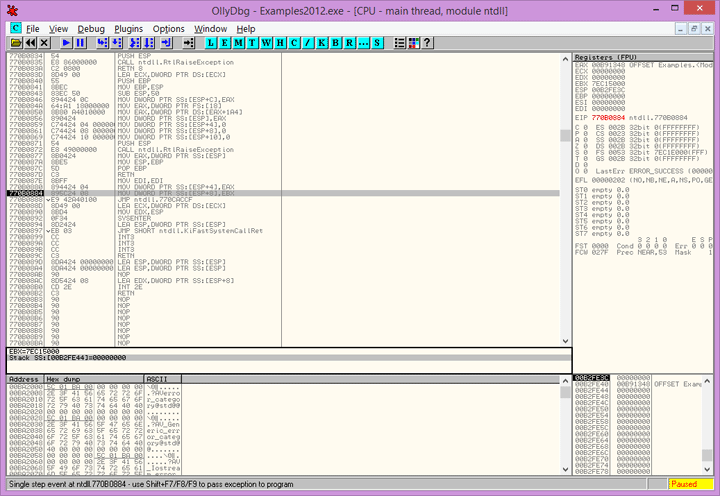
Screenshot 9. OllyDBG
OllyDbg (and its successor x64dbg) is probably the best debugger when it comes to software reverse engineering. It was specifically developed for the needs of reversing, and has all the tools needed for that purpose:
- a built-in disassembler with the ability to analyze and identify key data structures
- an import and export analysis feature
- a built-in assembling and patching engine
The ability to parse API functions and their parameters makes it easy to reverse interactions with a system. The stack view provides a lot of information about the call stack. One more important advantage is that you may use OllyDbg with debug-protected applications, when usual reverse engineering debuggers just can’t do anything.
WinDbg
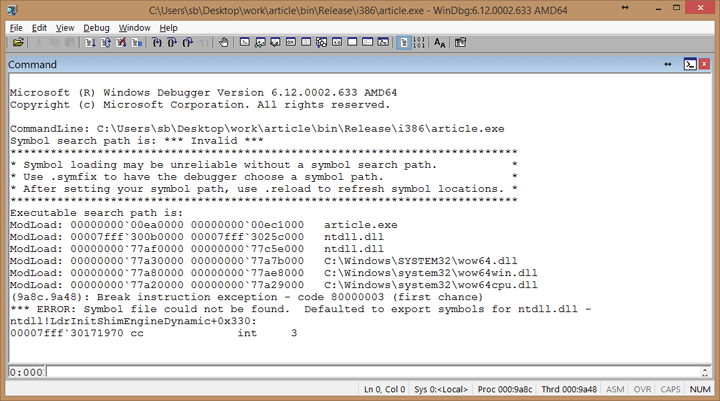
Screenshot 10. Windbg
Despite its simple interface, WinDbg has powerful tools for debugging. It has a built-in disassembler, various commands that allow you to know almost everything about the process/system you’re debugging, and the ability to do kernel-mode debugging, which is probably the most valuable feature. It’s a big advantage for reversing drivers, kernel-mode drivers in particular.
Windbg Preview
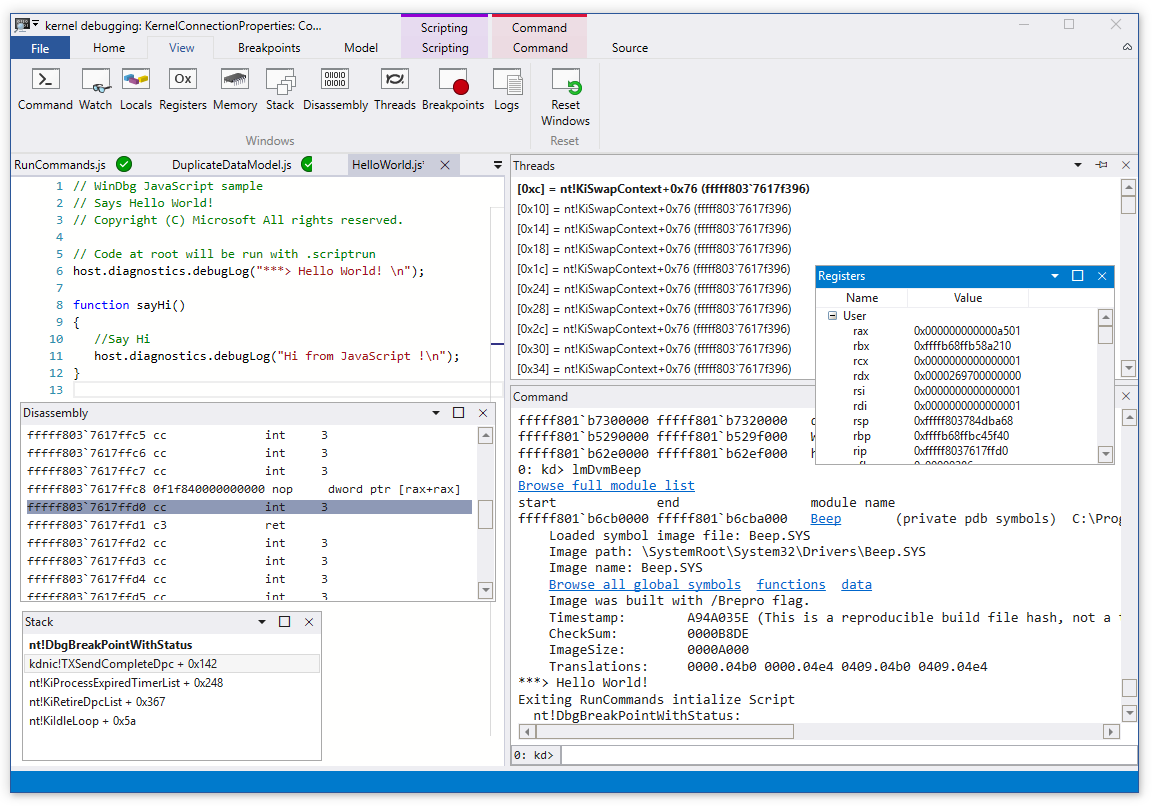
Windbg Preview is a new version of Windbg developed by Microsoft. It’s distributed via the Windows Store only. It has all the features of the classic Windbg coupled with a new UI and several new features. One of these new features is Time Travel Debugging, which allows you to record some period of program execution and then replay it as many times as you need. This way, you can execute the interesting parts of the code by stepping, without being afraid to run some code accidentally and lose the context or all the data.
Real-life software reverse engineering example
Now we’ll see an example of how to do reverse engineering for a piece of software. Let’s imagine you have a suspicious executable file. You need to find out what this program does and if it’s safe for users.
Considering the scenario, it’s a good idea not to run this executable on your work computer but to use a virtual machine instead. Let’s start the application in our virtual machine.
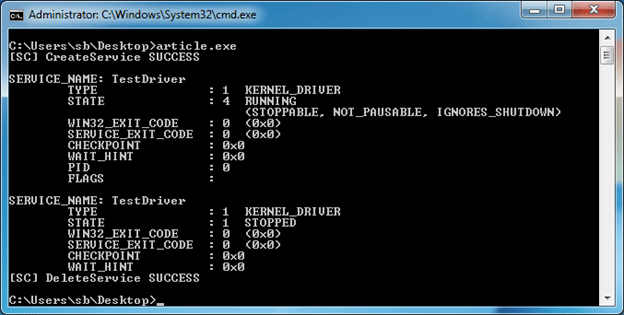
Screenshot 12. Process creates a service
As we can see, this file creates a Windows service named TestDriver. It has the type kernel, so we know it’s a driver. But where does it take the driver file from in order to run? We can use ProcessMonitor from Sysinternals Suite to find out. When we open ProcessMonitor, we can set up filters to show us only the file activity from the process we’re interested in. Its activity log looks like this:
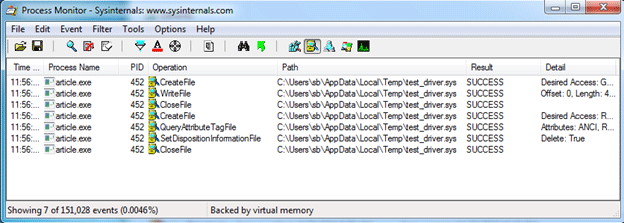
Screenshot 13. FileMon information
The driver file is created by the process that we’re reversing, and this process puts this file in the user’s temp directory. There’s no need to look for the file in the temp folder since we see that the process deletes it right after use. So what does the process do with this file? If it unpacks the file, we may try to find it in the process’s resource section, since this is a common place to store such data. Let’s look there. We’ll use another tool – Resource Hacker – to examine the resources. Let’s run it:
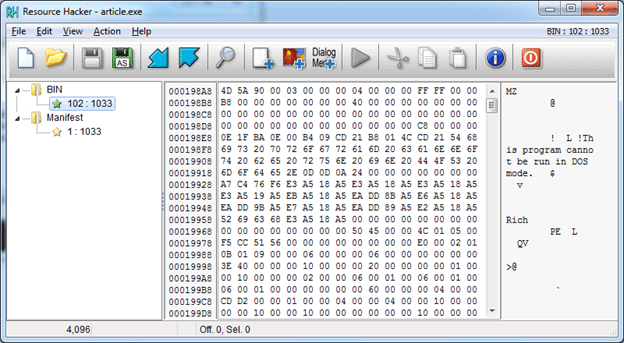
Screenshot 14. Examine resources with Resource Hacker
Bingo! As we can see from the found resource content, this is probably the Windows executable file, since it starts with an MZ signature and has the string “This program cannot be run in DOS mode.” Let’s check if it’s our driver file. For that purpose, we extract the resource using Resource Hacker and open it in the disassembler.
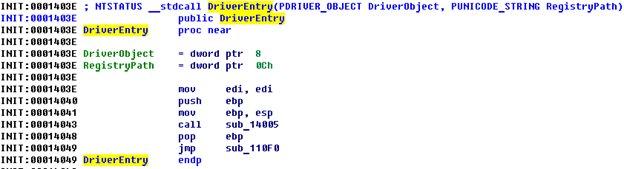
Screenshot 15. Disassembler screen
As we know, DriverEntry is the entry point for kernel-mode drivers in Windows systems. We can continue our research, as it looks like we’ve found the right driver.
Related project
Improving a SaaS Cybersecurity Platform with Competitive Features and Quality Maintenance
Discover how proven reverse engineering practices helped Apriorit adjusted the client’s software to new platforms and enhanced it with new features.

How to reverse engineer a driver
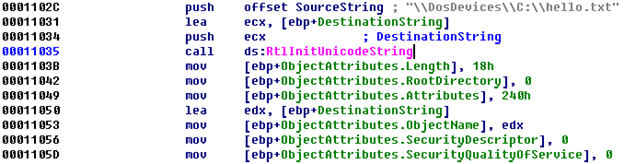
To begin reverse engineering the driver, we examine functions that are called from DriverEntry one by one. If we go to sub_14005, we find nothing interesting, so we continue with sub_110F0 and find this code:
Code piece 1
Code piece 2

Code piece 3

Code piece 4
Some lines are omitted here for the sake of simplicity.
In the first listing, a unicode string is created, and this string points to the path C:hello.txt. After that, the structure OBJECT_ATTRIBUTES is filled with regular values; we know that this structure is often needed when calling functions like ZwCreateFile.
In the second listing, we see that ZwCreateFile is indeed called, which makes us pretty sure that the driver creates the file – and we know where this file is located after it’s created.
From the third and fourth listings, we can see that the driver takes the unicode string and writes it to the buffer (this happens in the sub_11150 function), and the buffer will be written to the file using the ZwWriteFile function. At the end, the driver closes the file using the ZwClose API.
Let’s summarize. We found out that the original program extracts the driver file from its resources, puts it in the temp folder of the current user, creates the Windows service for this driver, and runs it. After that, the program stops and deletes the service and the original driver file from the temp directory. From this behavior and from analyzing the disassembly, it appears that the driver doesn’t do anything except create a file on the C drive named hello.txt and write the string “Hello from driver”.
Now we need to check if we’re correct. Let’s run the program and check the C drive:
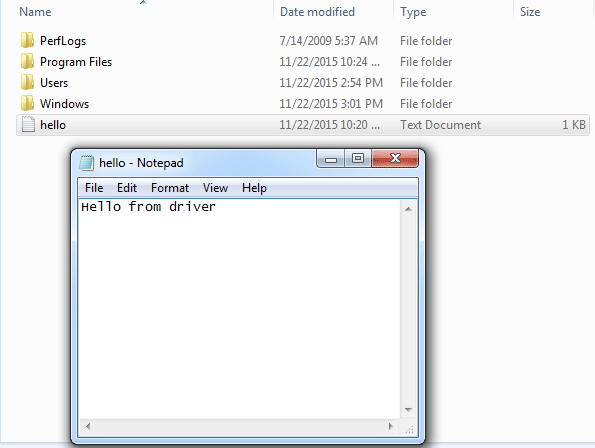
Screenshot 16. Application screen
Wonderful! We’ve reverse-engineered this simple computer program, and now we know that it’s safe to use.
We could have achieved this result in many different ways – using debugging or API Mon, writing tests, etc. You can find your own ways to reverse engineer software that work for you.
Conclusion
Windows software reverse engineering requires a solid educational background and reverse programming experience. In order to perform reverse engineering, you need to combine skills in disassembling, network monitoring, debugging, API integration, several program languages, compilers, etc. You also have to be very careful when reversing software in order not to break copyright laws or harm your system.
At Apriorit, we have an experienced team of reverse engineers. If you want to apply reverse engineering skills to your project, feel free to contact us!
Need to improve your project’s protection?
Solve tasks of any complexity: analyze product security, investigate suspicious files, recover lost documentation, and more. Entrust your project to Apriorit’s reverse engineering and cybersecurity experts.


